The Outdoor Adventure Giving you tips, tricks & recommendations to help make adventuring in the Outdoors fun, safe & exciting for you and your kids.

“I know the theory”… I chuckle when I hear that. Not because it isn’t true, but like anything, there are so many factors that you don’t see on paper. As much as understanding the concept, one has to consider the physical effort/coordination/will to survive that plays a part in successfully transferring theory into reality.
 |
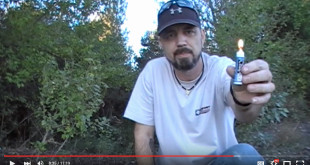
| One of several iterations of my fire-bow set |
For example, The first day I tried to start a fire with a firebow and drill all I got was a sore arm from the numerous tries, and a couple bruised and bleeding knuckles from the firebow punishing me for trying to record a DIY video without ever having actually done it before myself. Yes, I successfully got the coal burning, but it was a long, hard slog, and it took me a few days to get the materials, rhythm and everything else to work. So lets talk about what I’ve learned so far and what the “theory” is for starting a fire with what is considered one of these easiest methods of friction fire starting.
What you need:
- Drill or spindle – A cylindrical piece of wood about 8-10 inches with a point at one end and flat/slightly tapered edge at the other.
- Fire board / hearth board – a piece of dry, wood (same material as the spindle) around a foot long (30 cm) with at least 3 flat sides.
Both of the above should be made from dry softwood (evergreens).
- Firebow – just like any bow a piece of wood that is slightly flexible and has a string tight enough to keep a good hold of the drill
- Bearing block – A small object, preferable hardwood, stone, bone or shell that has a small hole for the point of the spindle,
- catcher – bark, dry leaf, thin piece of wood or other surface to place under the board to catch any wood dust and powder.
- Tinder Bundle – dry, finely shaved / shredded bark, dry wood, moss, cotton, etc. Used to ignite the coal created by the bow and drill.
Steps:
- On the fireboard, cut a circular hole deep and wide enough to keep the drill in the same spot while drilling.
- Place the drill in the bow so that the string wraps around the drill once.
- Place the catcher underneath the fireboard, directly beneath the hole.
- Place the flat end of the drill in the hole in the fireboard, and apply pressure to the bearing block
- start a slow, consistent sawing motion with medium pressure on the bearing block. Continue until you see smoke.
- Cut a V notch that intersects almost to the center of the hole in the fireboard.
- Start to saw again applying enough pressure and speed to produce a pile of wood dust that is dark brown to black in color.
- When you start to see smoke, continue sawing and apply a bit more speed and pressure.
- When you have maintained a strong billow of smoke for 10 seconds or more, stop and tap the dust off the fireboard and onto the catcher.
- If you can see a red coal in the pile, slowly and carefully transfer your coal to your tinder pile (take your time, fan it gentle with your hand so ensure good airflow before transferring it).
- Close the tinder bundle around the coal
- Blow gently and steadily into the bundle. (Make sure you hold the bundle out to one side so as not to allow sweat to drop on it).
- Continue blowing until fire is produced… or you pass out from exhaustion. (ok, so don’t do that last part)

- Try putting a green leaf between the bearing block and the drill to reduce friction on the top end of the drill. This will focus the heat where it should be: on the fireboard.
- If your drill dust is too light in color, you need to apply more pressure and/or drill more quickly. You want a rich, dark brown-black pile of dust that will take a coal.
- use your lower leg to apply pressure on the arm that holds the bearing block. This takes the pressure off your arm and wastes less upper body strength.