Home / blog (page 7)

blog

Altai Oasis – Sorata, Bolivia

As you descend the river rock path to the open meadow a hand painted sign greets, “I sowed my dreams here, please tread lightly.” Johnny, a Bolivian who fell in love with the country after spending some time in Europe has certainly sown something wonderful.

For about 28 years he has called the small town of Sorata home. Since that day 28 years ago, he has turned this riverside forest into his own paradise. This true oasis is filled with blossoming fruit trees, beautiful flowers and wild anis.

The accommodation caters to everyone from campers who want to bring their own tent and use the outdoor kitchen to multi-bed sleeping rooms with shared bathrooms to clean and tidy cabañas (cabins) with living rooms and private kitchens. They even have matrimonial suites with private bathrooms and towels folded to look like flowers. The only downside in my experience was that some of the beds sagged.

Oh, and all these bathrooms boast tankless hot water heaters (which equate to long hot showers… and I mean hot).

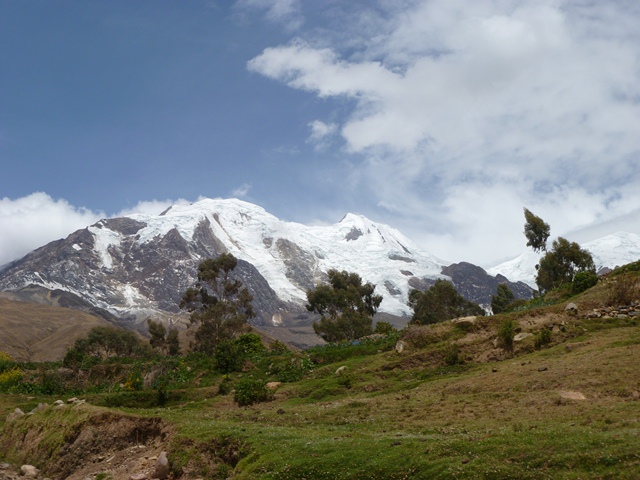
Johnny has moved his restaurant out of the town center and into his balcony. A great decision. The new balcony location shares the warm feel of locally cut and personally worked eucalyptus wood. In addition to this and complementing the friendly and tastefully decorated dining area is the view across the valley of the local peak of Illampu (6400M+). The food is excellent. From goulash to crepes you wont be disappointed. The soups and salads made from his own garden vegetables are a real treat. Oh… Make sure you try the steak with the garlic sauce. It is massive and excellently grilled.

If you are brave, you can even try their ambient temperature swimming pool or pick up some snacks from the Kiosk.

Our kids loved the geese, ducks and turkeys that wander in the lower meadow and spent a good deal of time climbing and playing in the tree fort. They would have spent all of their time out there if it hadn’t been for the rain (we visited in the wet season).

The town of Sorata itself offers various forms of tourism from mountaineering, multi day hikes (up to the glacier fed lake), mountain biking or a fun tour of “gruta San Pedro” (a cave with a navigable lagoon and the friendly chirp of bats). They even list sport fishing as an option, (although, we didn’t have any success with that).

All in all, the stay was quite enjoyable. We hope to visit them again in the dry season and take advantage of all that Sorata has to offer.

If you missed the previous post on Sorata and what to see a bit more of the scenery, take a look at the brief comments and videos:
Fishing in Sorata
San Pedro Caves

San Pedro Caves and a bit of 4x4ing

A few weeks back my parents came to visit us, so we decided to take a trip down to the small town of Sorata. My parents were kind enough to watch the kids while my wife and I went for a trip down to the San Pedro Cave.

The cave is quite large and humid, but the feature piece is the underwater lake. There was at one point blind fish in the water but they have disappeared. Nevertheless, you can take a peddle boat the length of the cave and enjoy the rock formations and sound of bats overhead. 
Half the fun is getting there and back on the muddy roads that hug the side of the mountain. Rarely ever more than 1 1/2 lanes wide with blind corners, they keep you on your toes. We went at a particularly rainy time of year and frequently encountered washouts and mud slides. We had a blast.
Take a look at the video below as we try to capture a little bit of what we saw.

An unsuccessful fishing trip in Sorata, Bolivia

Travelling down a major road strewn with boulders, mudslides and small lagoons should have perhaps served as a warning to us of the success of the trip. but, for some reason, it didn’t deter us.

I wanted to get in a few sights and hopefully a bit of sport fishing when my parents came down to visit. We got all the gear together and made a few homemade flies for the trip as well. Then it was off for the 3 our drive to Sorata, Bolivia in the raining season.

Regardless of the fact that the river looked like brown soup from the runoff, the hike down to the water and through the brush generated excellent memories and beautifully views to remember.

Take a look at the video below of the adventure and stay tuned for part 2 of our trip.

Update your favorites: We have a domain

After much humming and hawing we’ve got ourself a new domain.
Update your links to Http://www.theoutdooradventure.net.

Survival tips from my kids – Tip 1: Bush Tea

Hike review: Stevens Lakes, BC

The Stevens Lakes Chain
An hour or two out of Clearwater, BC on logging roads that often have deadfalls blocking their way is a slightly obscure trailhead Marked “Stevens Lakes 7 Km”. It is considered back country and you need a good back country map book (Something that documents the forest service roads of BC).  What you find is a beautiful series of lakes where the parks department has dropped in 2 canoes and a camp area that has present numerous other (leaky) inflatable boats, some pots and two grills and if your lucky maybe a broken fishing rod, and whats more, a view of Battle Mountain. Did I mention the fishing?
 Following the  Raft/Ritchie FSR off Road 9 East of Clearwater, before you enter the park, you snake up a maze of logging roads, some of which appear more like trails because of the encroaching brush and one or two that are flagged, as part of the FSR has eroded (Be careful and map your road). Make sure you bring a vehicle that you don’t mind getting scratched, and be sure to bring a saw to cut up any deadfalls in the way.

Eventually, if you take the right road you will arrive at an old clearcut section with space to park your car. Following down the road, keep an eye out on the right side for the sign and follow it off the logging road and into the woods.
Make sure you leave the logging road at this point. We had some late arrivals who missed the sign and followed the logging road down into the valley. They ended up blazing a trail and adding a few hours to their trip.
One of the large open meadows on the way in.
At times the trail is well marked, at others it is just open meadows with the occasional cairn. After the first 45 minutes or so of ascent it levels out. For the last 30 minutes to an hour you descend on a well marked trail (watch out for the deadfalls across the trail) until you get to a very wet meadow. (Worth taking off the shoes and socks until you get across). At the camp you will find several flat camp areas, a picnic table and a fire pit. If the canoes are still there, use the red one.
Only one other group arrived that summer long weekend (August). That is my gauge of a good location. The only complaint was that the dog they brought with them was barking constantly. We didn’t see any wildlife other than the fish and the mosquitos.
We set up camp and headed out to fish. The best area is about 100 meters off shore where there is a deep hole. Definitely bring a collapsable rod. Wedding bands were excellent as well as flatfish.  On a double wedding band I lost something around 18 inches or so. We had 3 people in the canoe and several times had 2 trout on at once. We feasted well that night.
For a hike, we decided to make a trip to battle mountain. We used the canoe and a couple inflatable boats to cross the lake and head east to a stream. From there we followed the stream up sticking close on the left side up past a small waterfall to a lake. We stopped for lunch and then climbed a steep slope on the far side of the lake to another ridge. Because of a late start we couldn’t make it to the old inactive Volcano, but it is a defintely doable day trip if you started early (15 KM return).
We got back to camp in the late afternoon to greet some late arrivals and do some more fishing. We would have kept more than we did, but nobody liked the thought of having to pack out the food we didn’t eat.
Battle Mountain
After a nice hike back to our vehicles we took a detour into Wells Gray Provincial Park to see Helmcken falls.
 
Early morning on the lake.


Just make sure you know where you are going, it is easy to get lost amongst the old logging roads. In addition you need to be able to orientate yourself. There are no trails aside from the begging and descent to the campsite. Bring a map and know how to use it and either a GPS or compass.
  
Resources:
Map of the area:
http://www.wellsgray.info/home/maps/tfb/map-tfb.html
Wells Gray Provincial Park Back Country page:
Parks Map:
Lat and Long of the Camp site for Google Earth:
51°56’31.70″N, 119°47’12.21″W

Video: Summit attempt of Illimani, Bolivia 6400 Meters

take a look:.

Illimani part 2, or the importance of exercise

What got me in the end was not altitude sickness, although that was the cause for the ringing in my ears from about 5000 meters up, but not enough exercise. We found out later that it was already a hard time of year to try the summit, which just compounded the fact that this was a real hike.
I’ve gotten away with working a desk job and coming out of winter with a layer of insulation without being affected by my obviously poor physical condition (“but round IS a shape, Paul”). Getting away with a 3 day hiking trip using a base camp without much physical preparation has been painful but never a road block.
When you start at a bit over 3200 M and are supposed to end up at 6400M in roughly 48 hours there isn’t much chance to “take it easy”. Plus it’s embarrassing when the porters, wearing leather sandals, beat you. My New Zealand friend described it as “a whole different level of hard [tough].”
Endurance has never been a strong point. I ran cross country in high school (always came in last) and focused on sprints, hurdles and triple jump. I haven’t touched cross country in the last 10 years and it shows. I did do walking though.
 In Ecuador I walked at least 3 days a week as much as 5 Km at times, but after being robbed, that ended. There’s nothing like a screwdriver in your side to demotivate you from going out in public without an armoured vehicle.
In Bolivia (We’ve been here for 5 months now) we have had plenty of time to adjust to the altitude and I’ve walked a bit, but nowhere near enough. When you are on ice and every step needs to be stamped to make sure you don’t slide into some crevasse (sp. Grieta) plus the fact that oxygen is hard to come by, there is not much room for out-of-shape-ness. Trips around the block or through the center (3800M) are useful, but don’t replace exercise.
In the end I was stopping every 5 meters or so and the words of another friend echoed in my ears, “What goes up, must come down”. I had made it up 3+ hours on the ice and with another 3 or 4 to go I doubt I would have made it down safely.
Surprisingly the altitude didn’t stop me. I had figured if anything going slightly insane and delirious (happened to another friend the first time he tried to summit Illimani) would be my problem, but that’s not to say it didn’t affect me. As I mentioned earlier, my ears were ringing from about 5000M up and as you will hear in a video I will upload soon, your body expends a whole lot of energy just breathing.
So I figure I’ll make use of an elliptical trainer to start, running every second day and doing weight training on the off days. This summer I’d like to summit Huayna Potosi (6000M and much easier) and do some hikes back in Canada. Then when the time is right I’ll have a go at Illimani again.
FYI. I would not recommend Adolfo Andino as a tour guide. He did not tell us the truth and was obviously more interested in our money than safety. One of his guides (who showed up on the 3rd day) was nice, but that was about it. Equipment was below par as well. As you can see: I’m not the only one with this opinion.

Lessons from Illimani – Part 1

All in all, it was a good experience. I didn’t make the summit (stopped at about 6000 m, 400 meters altitude and 4 hours hiking/climbing from the summit), but I made it back to my wife and kids (although the pain in my legs almost made me cry when my son hugged me) and I learned a lot.
In November I was introduced to a whole different level to hiking. A friend who was passing through Bolivia suggested we try to summit Illimani (6400+ M). I had never done anything with crampons and ice axes before, other than a bit of climbing on a climbing wall. In fact, being in Bolivia I hadn’t actually brought any gear except for an icebreaker merino wool base layer. That exercise showed me very clearly the importance of quality gear, travelling with people you can trust and the importance of being in good shape.

I should have paid a bit more attention to the gear when we were given it, rather than get lost in the prospect of doing something I never had done before. We borrowed our climbing and sleeping gear from the guide, including backpacks. The packs were made by high sierra (a Chilean company whose gear looks expensive, but who hasn’t quite gotten the comfort level right). Even with reasonably light packs, after three days my shoulders, back and waist were killing me. There wasn’t enough padding on the waist belt and the shoulders, even though they hardly carried any weight. It would have been nicer to take my regular Swiss army daypack that I got for carrying my laptop around with me.
Next came the down sleeping bag, It was North Face (or so it said). It would have been great, except for 1 thing: it was old and overused. Don’t get me wrong, I’m not a snob that won’t use old gear. There’s just one thing, it needs to do what it’s supposed to do. The “sleeping” (Spanish name for sleeping bag… no joke) was missing more than half its down. That just doesn’t cut it at 5400 meters (high camp).
The Doite tent was actually pretty good, although a bit large and bulky.
 
As for clothes, I wore my tatoo ripstop nylon pants until the actual ice work and almost exclusively wore an Icebreaker 150 base layer wool shirt with a t-shirt overtop (review coming later… of the icebreaker gear). My friend wore katmando’s version of the same and was absolutely fine (although being used to a New Zealand climate he needed a second layer).
The only other thing that I didn’t know about was the crampons. On a steep descent one of them fell apart twice. Not exactly a risk you want to take on a mountain that has claimed the lives of at least 6.

I take at least partial responsibility for not checking or knowing the gear, so I chalk it down to an opportunity to learn from mistakes and be prepared next time.

The scenery was amazing, and this being my first time ice climbing, I’m sure I will never forget it.

How to backpack on a budget

I remember the first time I went into an outdoor store… not Army & Navy, but a real outdoor store. Well I remember the price and thinking that my dad would NEVER buy me anything like that. All that money for a stove and gear. Why? And then I remembered that my dad took us camping in old tents with with two small aluminum poles (from an age gone by) and a pack of matches.

When the Europeans came through and made a mess of things… they brought their “know how” and tinned food and heavy loads, but were faced to make two choices: Die, or listen to the locals. The locals and their know how influenced how the trappers and traders made their way across the continent (or didn’t) and even the things they sold had to drastically change when the native Americans stopped buying cheap rubbish and only traded for quality, usable kit.

Now a dad and wanting to take my kids with me on trips, beit by car, boat or foot I’ve realized that I have to invest in local know how, skills and what I do learn from the “Europeans” needs to be quality, usable and light. Oh and cheap. I don’t live in Seattle and I have 5 mouths to feed.

The light aspect was learned on my first hiking trip with my daughter and wife. My daughter was a year old and we weren’t going to let that stop us. We ended up buying a Kelty Back Country Child Carrier (A deluxe version of the newer Kelty TC 3.0, which included the zip off day back and sun/rain hood) for my wife to carry. It was second hand and a great steal. It is a great pack that we still use, but there isn’t nearly as much space on the back country as their appears to be on the TC 3.0 for stuff, so that left me to carry most of our supplies in and all the dirty diapers out (leave only footprints). That was when I realized, light and compact wasn’t an option it was a necessity.

I didn’t have much of a backpack (one of the good old aluminum framed wonders from the 70s); space and money was a premium.That led me to look for cheap and light ways to pull off this 3 day expedition. That’s what led me to look into inexpensive alternatives to the $130+ backpacking stoves that shocked me years earlier (and their much more efficient modern counterparts). Using sites like Mark Jurey’s “Penny Ultralight Alcohol Stove” I put together something that was lighter and cheaper than what the outdoor store could offer me.

“Be careful, that looks dangerous” was the feedback from the doubters, and to be honest, one should be… careful, that is. With a bit of practice we never had a problem on the hikes we’ve used it on. In fact, that next day we turned around while our dinner was quietly simmering away to see 10 feet of flames coming from one of the $130+ backpacking stoves. I don’t think there is even enough fuel in the penny stove to get 10 feet of flames!

Since then I’ve puttered around with the DIY philosophy and until I get some kind of sponsorship, or a lot more money, I will continue the hunt for creative solutions for that balance of quality, lightweight and low-cost kit.

Video of how to make a variation on the Penny stove to come.

Finding my footing


When I was younger, my Dad would take us camping and fishing fairly regularly. We would travel all around southern British Columbia, Canada and the car trips were kept interesting by his seemingly unending knowledge of local flora and fauna, survival skills and stories about his own childhood in England.

As a kid growing up in the post war UK, he made the most of what he had, taking multi-day biking trips just to get to some obscure fishing hole somewhere. He kept some of his books from his own childhood and shared them with us. From books on stickleback to the tales of Mr Crabtree (The creation of Bernard Venables). More than that, he shared his passion for nature and bushcraft.

Coming to Canada in the late 60s, early 70s, he spent a lot of time in and around the BC parks, mostly fishing, but camping and exploring the mountains, valleys and lakes and absorbing the local know-how: lighting a fire with your “last match”, where to get dry kindling and wood, Looking for good shelter, what to do in the presence of local wildlife, which plants, roots and berries are edible or can be used for survival, what gear and equipment worked best, where to cast that dry fly and how to pull in that wiley brook trout. And while we groaned after hearing “What will you do when you are stuck on that deserted Island with only one match?” for the 8th time that summer, it stuck.

It more than stuck, the passion was passed on. Now, as my own kids start to grow up (4, 2 and 2 months) I know what I want to do. I want to find out what and how my father learned the things he passed on to us. I want them to have an appreciation for nature and the Bushcraft skills of those in times past. I want to give them the skills to buy what they need, make what they can and use what they know. But of course, I’ll have to learn all that first.

So that is why I decided to start this blog. I want to share what I’m learning, to have some kind of reference for myself and motivation to iron out details, get feedback from others and share a passion for getting outside.

The movies and television of today paint the concept of a post apocalyptic need for survival skills. I don’t buy that, neither will I market it. It is just that too much time is spent rotting brains, when we can encourage problem solving (not just why the printer won’t work), ingenuity and creativity outdoors and hands on. In the end, even if they get just an appreciation of the outdoors that they can look back on, that would be enough.