Home / gear (page 9)

gear

Smartwool PHD Hyfi Merino Midlayer – Discount

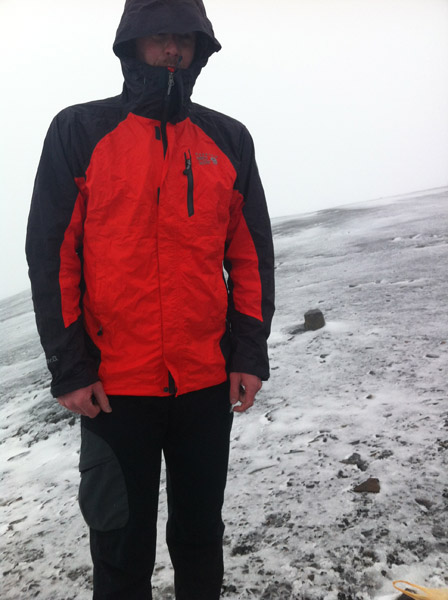
If you’re looking for a high-quality Merino wool Midlayer that looks good and keeps you warm, I recommend taking a look at the Full or half zip PHD Hyfi by Smartwool.

Let’s look at the facts first:

  • ZQ itch-free merino wool is temperature regulating, moisture wicking and odor resistant
  • PHD HyFi merino wool-nylon double jersey knit
  • Flatlock seams reduce chafing and provide a low-profile fit
  • Offset shoulder seems for comfort
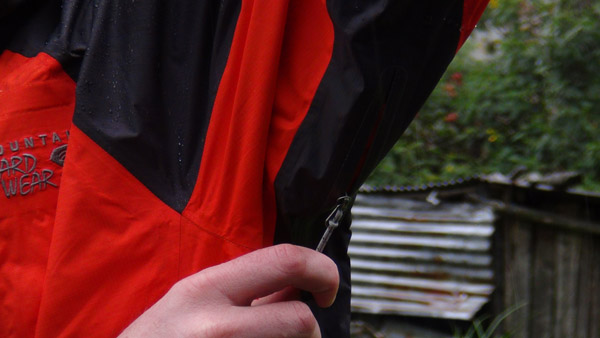
  • Camlock zip front with interior flap and zipper garage
  • Zip chest pocket with media cord port
  • Zip hand pockets
  • Articulated elbows for mobility
  • Extended cuffs with thumbholes and elastic binding
  • Base layer weight: Midweight
  • Sleeves: Long sleeves
  • Closure: Zipper
  • Length: 27″ (based on size large)
  • Weight: 1 lb. 6 oz.
  • Fabric: 64% merino wool, 36% nylon
  • MRSP: $200 (but much less at the Sierra Trading Post)

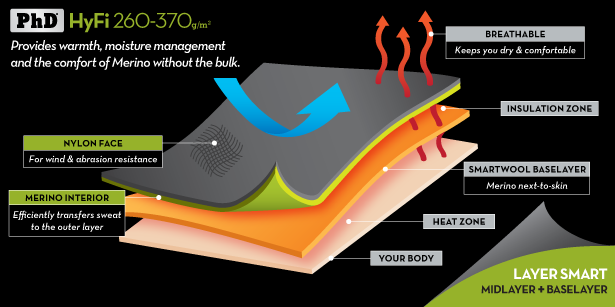
The PHD Hyfi is not a 100% Merino garment. It has a merino wool liner and a Polyester outer. There theory (see diagram below) is that the nylon outer will protect the merino and block wind while the Merino interior will keep you warm and odor and moisture free. It also gives the Hyfi a really nice cut and fit. 100% Merino doesn’t look as tidy and professional as this jacket, although something 100% merino will do a better job with breathability and odor.

phd_hyfi_s13


This jacket has just the right number of pockets. It has 3 external zip pockets and 2 internal ones. To help with breathability, all pockets are made of mesh. The downside of this is that the internal pockets sag a bit and one has to be careful with keys and sharp objects to ensure you don’t snag and damage them. A nice feature is that they include an internatl ear phone access to the external chest pocket for your mp3 player.

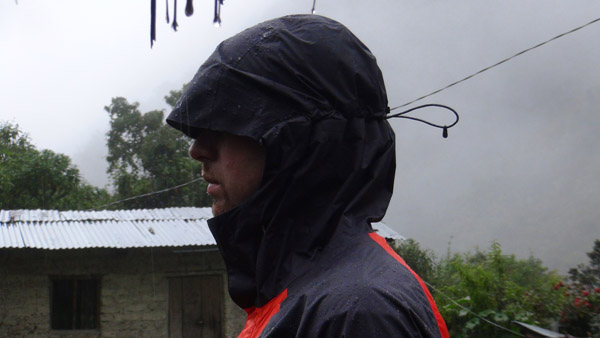
The collar and cut of the jacket are perfect. The collar is just high enough to keep your neck warm and the length is the perfect length to allow you to raise your arms and not get your belly-button blasted by a cool breeze. It’s an athletic cut too so there’s no bulk, but at hte same time, no restriction in movement.

Smartwool added thumb holes to the sleeves to keep your wrists warm while wearing gloves. A great choice. They almost disappear when not in use too so that’s another plus!

SMHYFI1

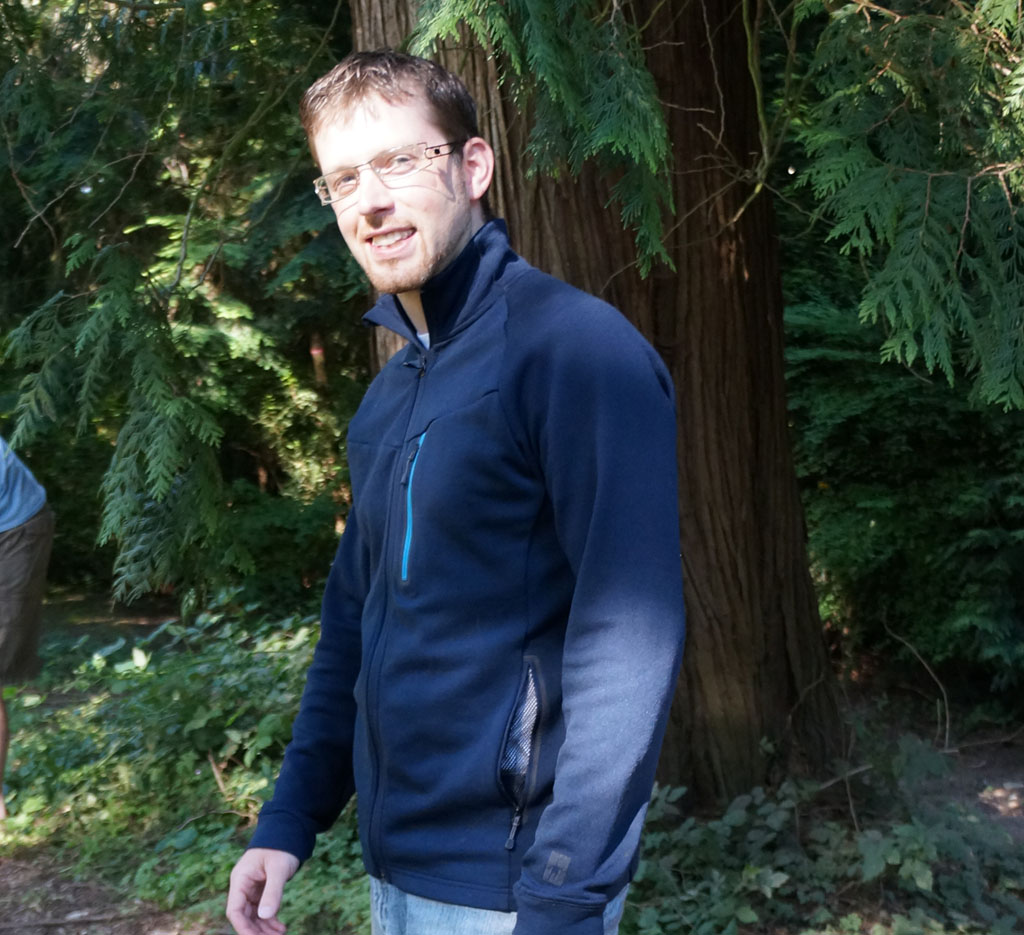
All in all, this is a solid jacket. The price is high, but the styling makes it perfect for formal and informal wear off the trail when you’re not battling the elements in the outdoors.

The Sierra Trading Post gave me this jacket, asking for an honest review. In return they’ve offered the following 25% off discount on all Smartwool gear at the Sierra Trading Post. Just use this link: http://stp.me/SmartwoolReview

Windmill Trekker Stormproof Lighter

I’m all for bushcraft and survival skills. When I start a fire I try to use a fire steel or matches. That said, I know that in an emergency when I most need to light a fire, that will be the most challenging time. It’s hard to beat a good lighter, and the Windmill Trekker is certainly that and more.

Cold fingers and shivering can make a simple task like lighting a match incredibly difficult. The reality is that that’s when lighting a fire needs to be the easiest task you do. Add wind and wet and you’re in for a cold night.

The Trekker by Windmill is a high capacity Butane lighter with a lot of features:

  • Piezo-Electric Ignition
  • High capacity reservoir (1000 ignitions per fill)
  • Windproof flame to 70-80 MPH
  • Water Resistant (5 O-rings)
  • Adjustable flow flame
  • Refillable
  • Rubberized case
  • Dual locking case (external bale and trigger button)
  • Lanyard
  • Weight: 2.5 oz
  • Size: 3.7″ x 1.5″
  • Available in Blaze Orange, Clear, Matte Black, Smoke Black, and Smoke Green
  • MRSP: $55
  • $49.99 at www.buylighters.com

WT1

The first thing you’ll notice when you pick one of these up is that it is not your cheap gas station lighter. It’s a heavy duty piece of survival gear. I see this as a great resource for hunters, fishermen, backpackers and anyone that needs a reliable, practically bombproof method of starting a fire.

The windproof flame is incredibly impressive. Even in high winds the lighter springs to life in a split second and stays on. I can’t help thinking that it’s more of a torch than a lighter. My wife gives me that look as I too often snap it open and “test” it inside.

Finding the fuel flow adjust on the bottom was another treat for me. It quickly went from efficiency mode to look at how quickly I can burn this stump mode… where it has stayed.

The lighter 5 rubber O-rings to keep water out and all the insides moisture free. It’s a nice feature for me, considering that one of my lighters failed for half a day on a recent backpacking trip after I spilled a few drips from my water bottle on it.

WT2

The dual locking makes my wife and I feel more comfortable having it in the house. One has to flip the bale and then press the button underneath it to get access to the lighter. It’s a minor detail, but it will definitely keep moisture and little hands out.

The lanyard is another useful feature. It’s designed for one’s wrist, and I can’t help but think tha a neck sized lanyard would serve a bit better for this sort of device.

I really like the Orange Blaze colour. The olive colour may look cooler, but I like to have my gear easy to find and hard to lose.

Nothing has failed on me yet, but I’d like to see a bit of a sturdier hinge, as that’s probably going to take the most abuse.

Let’s get the biggest elephant out of the room, price. It’s $50 (only $45 with the coupon code BCSURVIVAL). That may seem a lot for a lighter, but it isn’t your typical throw away lighter. It’s a high capacity work horse that you can rely on in the back country and emergency situations where an easy to start flame makes the difference.

So, What do you take with you to light fires on your adventures? Have you ever had your ignition source fail on you for any reason? Please leave a comment down below.


I was given the aforementioned lighter to review by http://www.buylighters.com to get word out about their site, which offers a range of high quality lighters. They are offering a 10% discount on any purchase using the code: BCSURVIVAL. Check them out and check out the Windmill Trekker.

Guideline Eclipse Rx Polarized Sunglasses

My wish list for sunglasses is short. I want high quality glasses that look good, can replace my corrective lenses for outdoor activities and that won’t break on me.

I had purchased some really nice frames and paid for some prescription lenses to be put in, but they honestly didn’t have a good fit for my outdoors adventures and often were left stuffed in my glove box. When I was contacted by Guideline Eyewear to see if I was interested in testing out some sunglasses I was interested, although skeptical, from my bad experience in the past.

They claimed to be super-durable, good looking, high-quality polarized lenses designed for outdoor adventurers… oh and you could get them prescription too! I decided to give them a whirl and see how they held up.

I’m at the stage where I wear corrective lenses 85% of the time so while I can handle driving in a pinch without a prescription I definitely prefer the benefit of a prescription. It means I don’t need to carry two pairs of glasses on the trail, one for sun and one for seeing.

SONY DSC

I opted for the Rx (prescription) version of their Eclipse glasses. They came in a variety of styles, color frames, lenses, lens tints and lens materials. I chose the shiny black frames with a Deep Water grey tint on the lenses.

When they arrived I was impressed with the look and fit. They blocked out all the light around the sides of the frames. Inside they boasted a comfortable rubber padding with vent holes to help with fogging.

I quickly put the polarization to the test with a couple of fishing trips. I got out on a float tube and was able to see through the ripples and reflections and even spot fish that would have otherwise been difficult. (For the fishing audience they also carry another line of frames: Fisherman Eyewear).

Even driving the car I find the reduction of sunlight reflection to be a huge help. I can see vehicles and movement much better now that I’m not distracted by light reflecting off the road, paint, and windows.

As for durability, I’ve taken them backpacking, left them in my pack, stuffed them in glove boxes and even given a few big bear hugs with them hanging in front of my chest.

SONY DSC

The only negative I’ve found is that they put some pressure behind my ears where the arms sit. The plus side of this tightness is that there’s absolutely no movement or slipping when I’m playing sports. They are designed as active wear, so I don’t see this as that much of a negative, but I do want to give a heads-up for those who find that sort of thing a problem.

All Guideline eyewear comes with a limited lifetime warranty. Here’s the text from Guideline’s site as to what that means:

All Guideline Polarized Eyegear products are warranted against defects in workmanship and materials for the lifetime of the product. This warranty does not cover damage from normal wear or abuse, such as scratched lenses. Guideline will either repair or replace, at our option, any pair of Guideline Polarized Eyegear product which is found to be defective. In the event the same model is not available for replacement, Guideline agrees to offer the customer the choice of the three most similar models (of equal or greater value) for the purpose of satisfying this warranty.

The Guideline polarized sunglasses cost $69 and their prescription polarized versions come in at $169. They’re well worth those prices.

All in all, I’m really happy with my sunglasses and will update this article if there are any changes. I definitely would recommend checking them out if you’re in the market for a new pair of sunglasses, prescription or otherwise.


Olicamp XTS and Vector stove

After looking for 6 months for an efficient canister stove for the John Muir Trail I was recommended the Olicamp XTS pot and Vector stove. After a quick chat with Chris from The Gear House I placed an order and waited patiently. Right up front I’ll say I was not disappointed.

The Olicamp XTS

The Olicamp XTS is a 1 liter (quart) anodized aluminum pot with built in heat exchanger fins on the bottom. It weighs in at 6.7 ounces with a lid and insulated handles. It can be purchased with or without the Vector stove.

My favourite part is that the  heat exchanger fins are protected by an aluminum ring. I have other heat exchanger pots and the one without the protective ring inevitably gets bent when I put it down (take note camping pot manufacturers).

The fins supposedly reduce boil time by 40%. Without an identical pot without fins I can’t confirm that, but I can confirm that it does boil a liter of water in under 5 minutes. That’s twice as efficient as my best alcohol stoves.

Most anyone with a heat exchanger pot will tell you that they are much more efficient. When you put the pot on the stove you almost immediately see a ring of bubbles where the heat exchanger fins connect to the pot. A lot of heat that would normally be lost to the sides is picked up by the fins and channeled into the pot.

One side benefit is that a canister will fit perfectly inside the pot.

The Vector Stove

The Vector stove is a 3 ounce stove with folding legs and an adjustable flow rate. It’s basic but has some big benefits.

What I like most about the stove is the fine flow rate adjustment, I can simmer or boil without a problem. If you like to cook and not just boil water, this stove is for you. I have a Jetboil Helios system and while you can cook with it it’s a big hassle getting the temperature just right.

Olicampvector
Vector stove with the Primus ETA

The Vector is designed to work with the Olicamp XTS. This is both a blessing and a curse. I bought a 2.1 liter Primus ETA pot for family camping and the legs are too narrow to rest on the heat fin protector. It works when you put the legs between the fins, but the stove legs turn bright red when you turn the stove on full.

There is no piezo ignition. This will make the piezo haters happy and the piezo lovers sad. Either way, there are no expectations so just bring a lighter and go.

A bit of a downer is that the vector will only fit inside the XTS with the mini canisters and not with the 8 ounce ones.

The setup is great for a solo hiker on a thruhike or anyone who wants an easy, no-fuss setup.

Olicamp XTS

Price: $26-30
Weight: 6.7 ounces
Dimensions: 4.5″ x 5.3″
Capacity: 1L

Vector Stove
Price: $26-30
Weight: 3 ounces
Dimensions: 2.75″ x 3.8″
Manual Ignition
Output: 10 800 BTU

The XTS and Vector can be purchased as a combo for $48.

The Burden of Digital Memories

I have a crisis. My electronic gadgets are taking up more and more weight on my outdoor adventures. It came to a head when I noticed that my camera, video camera, GPS and solar charger was weighing in at almost 10 lbs. Most of this is related to two main things: My desire for better quality memories of the trips and the need to document my adventures and gear for the blog.

I’m going to ask right away. What do you use and what weight sacrifices do you make for more memorable trips?

Condoririfinal

My Original Setup

I used to take just a single Panasonic 14 mp point and shoot with 720p video. It had its advantages. It is light, has an 8x optical zoom and the photos are impressive. The above family photo was taken with said camera. The downsides are that all the video settings (light, exposure, and most importantly focal point) are all locked in to the video when you start recording. Oh, and the sound was tinny. It has made for a lot of wasted footage for when I move closer or farther away from the camera in action shots. Also, it only had a display on the back, meaning you weren’t sure how much of you it was recording when you were on the other side. The huge benefit of this camera was that even with 4 batteries it weighed in at 7 ounces or so.

gpsetup

GoPro Mistakes – I’m no Hero 2 – FullHD

I replaced my Panasonic with a GoPro Hero2 at the recommendation of a friend. The GoPro, frankly, was a bad purchase. Why? The audio stinks. There’s a reason all GoPro videos are dubbed with music.

I had to buy a lot of accessories to make it work. I had to drop a lot of cash on other items such as a tripod mount, a wi-fi remote, a skeleton case for using an external mic and of course a dive housing. Yup, the GoPro comes with a waterproof case, but all underwater shots are blurry without the dive housing.

Oh, and out of the box most stuff didn’t work. I couldn’t even upgrade the firmware with the supplied software. I had to manually flash the firmware (against GoPro recommendations). After several firmware hiccups that left it glitchy it now works, and I will use it for three reasons: I spent a lot of money on it, I can get some interesting perspective shots with it, and it’s USB chargeable. That said, I am looking forward to using it in the water. At 9.3 ounces with the spare battery, etc., it doesn’t make too much of an impression on the pack weight.

Sony Action Camera – FullHD

Through my Social Media Influence (or Klout) I ended up with a Sony Action Cam. I liked that it worked right away and had most of the functionality that I had to buy separately for my Hero 2. I did have to buy an underwater lens, but it was much more reasonable than the Hero2 and the video quality is everything you’d expect from Sony. This is by far my favourite POV camera and frankly I may leave the Hero2 behind for the JMT. Oh, and the shape is a lot nicer than the Hero2. It weighs a tiny bit more (9.6 ounce), but again will provide some great POV and time delay shots.

Sony Handycam – FullHD

On a Boxing Day sale, I picked up a Sony handycam (580) to solve my original problems with my Panasonic Lumix. This was probably my best purchase yet. It solves pretty much all my problems with lighting, sound, auto-focus adjust, and a rotatable screen. It even has an external light for night shots that I’ve used instead of my helmet cam. It’s USB-charging and comes with 32 gigs of on board memory. I did buy an external condenser mic that should give much better sound for my reviews, DIYs and survival and outdoors trips. It’s great for everything except water. Plus, it weighs in at only 13 oz.

Sony a100 DSLR with lens

We were gifted an older DSLR by some very generous family members. The pictures are definitely superior in quality and there is a lot more control over things like exposure and f-stop. I added a Sigma 70-300 macro zoom lens, which although is entry level, was superior to Sony’s equivalent lens… as well as being more economical. I really like this setup, especially with the keyhole mount I bought for it. The only downside is that the camera weighs 33 oz. and the lens another 21 oz.

product-image-4

a bit of Solar Joos

For the John Muir Trail and Bowron Lakes Canoe circuit, I picked up a Solar Joos Orange solar charger. It charges any USB device, which makes it perfect for my hero2, actioncam and even my handycam. The only thing I haven’t been able to find is a charger for my Sony DSLR batteries. That means I needed to pick up a handful batteries for it for our adventures. The Solar Joos is water proof and has an internal battery, so I can charge the Joos Orange and then charge the cameras at camp at the end of the day. This sets me back 24 oz.

Worthwhile sacrifices?

So, am I crazy for taking all this stuff with me? Once I add cables, spare batteries and my other electronics it really does add a lot of weight to my pack (around 9.3 lbs.). If I didn’t have all that stuff, my pack would only weigh 14 lbs total and it would make for easy cruising.

What sacrifices do you think are worthwhile for good memories and quality photos?

I’m a Thermarest Dreamer/Ambassador!

The Therm A Rest Dreamer program is a new ambassador program to promote and share adventures involving the new Therm A Rest sleep systems. I also get to give feedback on the systems and let you know what my thoughts are.

I’m happy I get the chance to team up with a well established name in the outdoors gear field and at the same time, test some great gear in my summer adventures. Oh, and I’ll be happy to get a great nights sleep like so many friends of mine who have sworn by their Therm A Rest.

As with all my reviews, they will be honest and thorough. I treat you guys with the same advice I’d give my family.

Take a look below at the Therm A Rest sleep system video and then check out what they have to offer on their site here. Which system would best fit your 2013 Outdoor Adventures?

Oh, and take advantage of this great deal here. If you buy an Antares sleeping bag at REI on May 4th, you get a NeoAir free!

Platypus Origin 32 Daypack (with video)

Over the past year my Platypus Origin 32 has served as an ultralight weekend pack, diaper bag, laptop bag, Mountain biking hydration system and oh, even a day pack. Let’s just get right to the point, It’s hard to beat the versatility of this day pack and I’d recommend it or its successor to anyone looking for a daypack.

Here are the major features:

  • Weight: 2 lbs 2 oz
  • Capacity: 32 liters
  • Material: Waterproof Ripstop nylon
  • Waterproof zippers
  • Separate Hydration Compartment
  • Waterproof waist belt pockets
  • 3 liter “Big Zip” Platypus hydration bladder included
  • Double main pocket zip
  • Exterior stow pocket
  • 4x compression buckles (for smaller loads)
  • Ice pick / trekking pole loop
  • Waist belt
  • MRSP (of the Sprinter) $149.95

Let’s keep this short and talk about what I like and what I think could be improved:

Likes:

  • Capacity – Perfect for day trips with family or lightweight multi-day trips
  • Waterproof – whether in a tropical rain, or just keeping moisture from a sweaty back out of your pack, it does a great job
  • Weight – The weight is awesome for a mainstream brand. It’s just the right padding on the back and shoulder straps
  • Double zip – Having a double zip allows you to full stuff out from either side without opening the whole pack
  • Waist pockets – It’s awesome to have waist pockets and more main stream brands should start including them
  • Hydration compartment – with hangers for the Big Zip and a way to keep the water separate from the main compartment, Platypus nailed this.

Dislikes:

  • Waist pockets – This pack needed more packing on the hip side of the pocket. Hard items dig into your hips
  • Breathability – The pack is frameless and it could be better with more airflow on the back.
  • The Shape – I’d prefer a longer more traditional shape instead of the half oval style
  • 1 ice axe loop – I’d like another loop for my trekking poles

UPGRADE

Platypus Sprinter

When I was researching for this review I talked to platypus and they told me that the new pack (the Sprinter) replaces the origin 32 and is geared more towards backpackers. They also have other versions for cyclists etc. The Sprinter as you can see has better waist pockets, a more pleasing shape and what looks like better breathability.

Giotto RT8150 Tripod Review

I have a lot of tripods… scratch that. I have a lot of broken tripods. Some of them are light (12-14 ounces) and broken (the plastic heads invariable break at the mounting plate) and one of them is a massive aluminum tripod that weighs several pounds (despite my having hacked away at weight by substituting pins, etc.)  The Achilles heel is always that plastic head. It breaks when I’m miles away from anywhere and need it. My only option is copious amounts of duck tape or leukotape until I get home and invest in another one. In a final desperate attempt I decided to find the lightest metal headed collapsible tripod I could find. My result was the Giotto RT8150.

Let’s look at the features:

  • Maximum Height 40.6″ (103cm)
  • Minimum Height 10.8″ (27.5cm)
  • Folded Length 11″ (28 cm)
  • Load Capacity 1.8 lbs (0.8 kg)
  • Leg Sections 8
  • Pullout legs
  • Male Thread Size 1/4″-20
  • Weight 1.1 lbs (530 g) – 18.7 ounces
  • $35 on amazon

I guess I should mention my motivations. I wanted a tripod to take backpacking. I wanted something small and compact, but robust enough that it wasn’t going to break on me if I dropped it while I hiked.

Probably the most impressive part of this tripod is just how compact it is. It’s just under 11 inches, which you don’t really appreciate until you put it along side whatever tripod you currently use. It’s tiny. It does have its downsides as it only opens to 41″ tall. I get creative with my use of terrain to get fun angles for my video to make up for it being a bit short. I have a taller tripod, but it packs down to 20″ and weighs in at well over 3 lbs.

 Giottosize

To make it so compact it has 8 snap-lock leg sections. This keeps weight down, but limit its carrying capacity (1.8lbs) That’ll be fine for most handycam-style video cameras and even entry level DSLRs, but might be a problem for some of the bigger and more expensive cameras on the market. The weigh limitation is in part because of the snap-lock sections and in part because the number of sections can make the legs bow a bit with weight.

My favourite part of this tripod is that it has a metal head, mount and mounting screw. All of my other tripods that have broken have broken at the head, making them completely useless. Most lightweight tripods use plastic to cut down weight, but as I’ve learned you can’t cut down on quality at the head. It uses a ball style joint which can articulate 180 degrees vertically and 90 degrees horizontally. It can handle pretty much any shot you need.

I’ve seen tripods that use trekking poles, etc. and while those projects are good for the odd DSLR shot, I can’t just chuck it down for a video angle of hiking, etc.

Conclusion

Obviously my ideal tripod would be lighter than this one, but I’ve gone that road and faced the consequences. The Giotto RT8150 is the best balance I’ve seen yet for weight, size and compactness that doesn’t compromise sturdiness. I’ll be testing it out this summer and if it survives my abuse it’ll make it onto my permanent gear list.

What do you use for a tripod on the trail? or do you? What’s your philosophy for camera gear on the trail?

Carbon Fiber Trekking Poles by Cascade Mountain Tech

If you see me on the trail there’s an almost 100% chance that I’ll be carrying trekking poles. They just provide so many benefits for hiking that I don’t even think about not taking them. You don’t have to drop a lot of money to pick up a good pair either. Right now I’m carrying a $30 pair of carbon fiber trekking poles by Cascade Mountain Tech.

abihuaynapoles

Here are some of the features:

  • Carbon Fiber Construction
  • Cork Handles
  • Anti-shock (with the ability to disable it)
  • Tungsten Carbide Tip
  • Agressive Traction Feet
  • Standard Rubber Feet
  • Sand/Mud Basket
  • Snow Basket
  • Twist Lock
  • Neoprene Strap
  • 16 oz weight (for the pair)
  • MRSP: $29.95

I’ll just say it up front. For the price, you can’t beat these trekking poles. They’re built incredibly well, come with a whole pile of attachments (baskets and feet) and they’re pretty light too! I’ve put them through a lot of testing in lots of climates and I still recommend them.

Carbon Fiber Trekking Pole

Being Carbon fiber you’d expect them to be much lighter than they are, but what they’ve done is taken advantage of the Carbon Fiber to allow them to build a sturdier pole. I’m rough on my trekking poles, so I need to balance weight with strength. Being able to have a sturdier pole and still coming in at an ounce less than me supposedly “ultralight” aluminum pair was an obvious choice. Especially at the rate I go through trekking poles.

huaynapoles


The Cork Handles do an excellent job of absorbing moisture and keeping your grip from slipping. Cork handles aren’t usually found on $30 trekking poles, but somehow they’ve managed to include that and carbon fiber in that price tag.

The baskets are also are twist on instead of pressure fit so I haven’t lost one yet. It’s nice to have the included buckets and baskets that many higher end brands will sell separately to make a few extra dollars.

corkpole

One of the downsides of Carbon Fiber (not a design issue, just a common issue with the material) is that it doesn’t bend well. It provides great strength, but if you slip and bend them (as I did) you’re going to snap it. If you’re an average user this isn’t likely to happen. I abuse pretty much all my gear and on a slippery trip down Incan paving stones I caught the tip of mine on a rock and broke the bottom third.

I was happy to see that I could buy replacement pieces for only $7.95 on www.cascademountaintech.com along with other replacement feet and buckets. I put in my order last night and will be back on the trail with repaired poles as soon as possible.

Conclusion

These carbon fiber trekking poles are a steal at only $30.

If you are new to trekking poles, these should be high on your list. If you abuse your trekking poles and go through pairs regularly, these should be high on your list. If you’re on a budget, these should be high on your list. I can’t fault the design of these trekking poles. The Carbon fiber and cork handles make them compete with $100+ trekking poles and the twist locks are very sturdy.

Do you use trekking poles? What brand do you use? If not, why not?

Mountain Hardwear Versteeg Dry Q Rain Jacket Review

My first ever rain jacket was one of those DWR numbers that had a strange ability to let all the rain in and none of the perspiration out. My second jacket was slightly better, but no seam sealing and problems with the liner. Finally, I’ve found something that I like in the Mountain Hardwear Versteeg Dry Q jacket.

I’ve had the jacket for a few months and have taken it to snowy mountain summits, down tropical jungle trails as well as through hot sun and heavy rain storms.

Take a look at the written and video reviews below. If you’re looking for 25% off already discounted Mountain Hardwear gear at the Sierra Trading Post, click here: http://stp.me/MHVersteegDQCJacket

Specification:

  • Dry Q. Waterproof breathable Membrane
  • 50D Ripstop Nylon
  • Fully seam sealed
  • 2 Large exterior hand pockets
  • 1 exterior chest pochet (WR zipper)
  • 1 inner mesh stuff pocket
  • 1 inner mesh zip pocket
  • Waist cinch
  • 2 Hood Cinches (vertical and horizontal)
  • Velcro zip cover
  • Velcro cuffs
  • Weight: 14 oz average
  • MRSP:$160 (much cheaper on the Sierra Trading Post)

Full Review:

DryQ

Let’s start with the Dry Q. membrane. Dry Q is Mountain Hardwear’s response to the need for waterproofing while keeping it breathable. The technology is tested for 500 hours in a washing machine to make sure it has a long life. Obviously it’s impossible to have something completely breathable and yet waterproof, so don’t get unrealistic expectations.

That said, the Dry Q. does a really good job at making sure you don’t get clammy when wearing it. I have not once felt that wet feeling of getting stuck to the jacket like you do with some jackets. I usually prefer a jacket with a mesh liner to prevent the damp feeling, but the Dry Q means it’s completely unnecessary. Add the fact that it has 2 large pit zips and you’re set for temperature regulation.

coldweather

Speaking of temperature, this jacket performs really well in warm and very cold weather. At a 16000 foot pass I was comfortable in this, a T-shirt and Merino wool base layer (150 weight) despite the snow storm going on. In the tropics It was really comfortable, despite hauling around a backpack on a 3-day thru-hike.

PitZip

The pit zips (which use water resistant zippers) are a great size. They’re easy to open and almost as easy to close. I can unzip with 1 hand, but need 2 to zip them up, which I feel is pretty standard, especially with a water resistant zip.

All the pockets have great capacity without being too large. Adding the water resistant zips was a great choice for the chest pocket. The mesh pockets inside cut down on weight.

Hood

Mountain Hardwear put a lot of thought into the hood. The use of 2 cinches was a great idea. Normally what frustrates me about hoods is that you turn your head and the hood doesn’t turn with you. The horizontal cinch does a great job at keeping the hood stuck to your head so that it turns with you. The vertical cinch keeps the opening nice and small to keep out breezes and inclement weather.

My only criticism is that loosening the cinches on the hood takes some getting used to. They work well, but you need to fiddle with them the first few times to get the hand of how they work.

The sizing is perfect. I’m a pretty perfect medium and the length and arms are an ideal length for layering over base, mid and insulating layers. The cinch on the waist is everything you’d expect for keeping out wind and weather.

The average weight is listed as 14 ounces, but my medium weighs 12.7 ounces. It’s always nice when a company overestimates their product’s weight.

Conclusion:

The Mountain Hardwear Versteeg is a great balance between weight and functionality. It’s a great breathable, but fully waterproof jacket that can handle pretty much any weather you would throw at it. I’d definitely recommend this jacket to anyone looking for a all-round hard shell.

Do you use Mountain Hardwear gear? What items do you have and what do you think about them?


Disclaimer: I received this jacket from the Sierra Trading Post for review. All opinions are my own and are what I would recommend to friends.

Golite Beartooth 650 down jacket review (video)

Two years ago I was looking for a lightweight, compact, warm jacket at a reasonable price. After a lot of research and the promise that I could choose my birthday present, I picked up the Golite Beartooth down jacket. At the time it was less than $70 so it was an easy choice for a reasonably high lofting down jacket. I’ve had 2 years to test it so I figured it was worth a review.

Golite has update the jacket adding an extra 2 ounces (now 18 ounces), so here are the current specs:

  • 650 fill power goose down
  • 130 g of fill
  • 100% polyester DWR outer
  • 100% polyester inner
  • Included stuff sack
  • Micro chamois chin liner
  • 2 exterior zip hand warmer pockets
  • 1 zip exterior chest pocket
  • 1 interior zip chest pocket
  • Suggested price: $200
  • Actual current price on Golite: $59.99

And now for my thoughts.

GoliteBeartooth1

As I’ve said, I’ve had the jacket for about 2 years. In that time my wife and I have taken it up to nearly 20000 feet, to salt flats and well below freezing, in rainy, tropical climates and more. We’ve really put it through its paces.

My version of the jacket comes in at 16 ounces (1 pound) and for such a light weight it does a great job of keeping me warm. The hand warmer pockets are a savior. they honestly feel like heated pockets. I make great use of them.

The lightweight polyester liner does a great job breathing, but has its downside. When I active in it I never work up a sweat, unless I have a waterproof shell on. In that case the moisture obviously can’t escape and the jacket gets damp. The one downside of the lightweight polyester is that it occasionally sheds feathers. That’s a combination of the lightweight fabric and 650 down. It doesn’t she a lot, but you will see the odd white piece of fluff creeping through the jacket.

To save weight, they’ve use lighter weight zippers. It was a good move for the pockets, but for the main zipper I think a slightly heavier zipper would have helped prevent snags and catching. One thing I really like is that the zipper is 2 way. You can unzip from the top or bottom. It’s great for getting access to pockets, or as my 8 month pregnant wife found, great for making child number 4 a bit more comfortable.

Having the micro chamois around the collar was a simple, but great decision, especially for bearded men (or women for that matter). I’ve had a few jackets where beard hair scratches the jacket or gets caught in the fabric. It’s not a problem with the beartooth down jacket.

One thing I found on my 2010 edition jacket is that it is a bit short on the length and arms. I’m an average medium and when I lift my arms my wrists are a bit exposed and breezes can come in around my waist (despite the shock cord waist band).

People talk about down being a pain for wet weather. I have gotten mine wet a few times, but the lightweight shell allows it to dry very quickly. Hanging it up in a breeze or in front of a heater dries it out in no time.

POsummitHP

A huge benefit is how small it packs down. You can squish it down incredibly small for packing (about the size of a softball in a compression sack) and know you’ve got a ton of warmth for when you need it.

Conclusions:

The Beartooth down jacket is an excellent entry level down jacket. It’s packable and warm and a great choice for someone on a budget.

What I like:

  • Weight
  • Warmth
  • pack-ability
  • Price ($60 for a 650 down jacket!)

Improvements (that may have been made already)

  • Runs a bit small
  • Sheds small amounts of down
  • Main zipper catches from time to time

Check out the video below to see the jacket in action. What Golite gear do you own? Are you happy with Golite as a brand?


Pelican 0915 Memory Card Holder review (video)

When it comes to memory cards, organization has not been one of my strong suits w. Typically I shove the 3 or 4 memory cards that I have into my pockets for backpacking. Sometimes I’d use a ziploc bag, but mostly I just fumbled around hoping that I had the right card and that it was empty. This summer I have some longer trips planned, 2 weeks on the John Muir Trail, 1 week on Bowron Lakes, a couple survival trips and a lot more memory. I picked up the Pelican 0915 Memory Card Holder to take up the challenge.

The Pelican 0915 is a shock proof, water resistant (waterproof in my opinion) made of polycarbonate. It’s simple, functional and practically bombproof. It holds 12 SD cards, and underneath those it hides space for another 6 mini SD cards and 6 micro SD cards. It has a place where you can hang it or put a lanyard through so you don’t lose it and well… that’s pretty much it.

P1040562

It’s a simple tool that I know I can trust to keep me organized while keeping my memory cards safe and dry. The only potential downside is that it weighs a bit over 3 ounces. That’s not much, and a sacrifice that I’m prepared to make, but gram weenies would probably leave this behind.

Specs

  •  Stores 12 SD cards, 6 mini SD cards and 6 micro SD cards
  • 4.79″ x 2.25″ x 0.55″ (12.2 x 5.7 x 1.4 cm) (interior dimensions)
  • 3.3 ounces
  • Insert liner for absorbing shock and protecting memory cards
  • Polycarbonate resin
  • Water resistant seal
  • $15