Home / survival (page 4)

survival

Making a kid’s survival kit

When you hike, you carry a survival kit that should cover the basic needs for yourself in a survival situation. When you hike with children you carry a bit bigger kit to help you care for your needs and the child’s. But what happens if you get separated from the child? Your best line of defense is a survival kit suited for your child’s needs and abilities.

The basic needs that you’ll need to meet are Shelter, Warmth, Signaling and First Aid. These are real needs for a child. If they have to spend the night hugging a tree until the survival crew gets there, if it gets cold, if she cuts herself or if he needs to signal to a helicopter or emergency crew then they will definitely need to have the means to do so in their kit and as importantly, know how to use them.

But that’s not the only thing you’ll be interested in. Psychology is just as important. To keep them from panicking and getting themselves in a worse situation you’ll want to give them things to keep them occupied. This can be a flashlight to keep the scary things away at night, candies to suck on, toys to play with or what have you. They will need to pass the time, be it 5 minute, one hour, or 1 day.

In the below video you’ll see the kit I put together for my 5 year old daughter and my reasoning for the things I included.

DIY: How to Light a fire using a Bow drill

“I know the theory”… I chuckle when I hear that. Not because it isn’t true, but like anything, there are so many factors that you don’t see on paper. As much as understanding the concept, one has to consider the physical effort/coordination/will to survive that plays a part in successfully transferring theory into reality.

One of several iterations of my fire-bow set

For example, The first day I tried to start a fire with a firebow and drill all I got was a sore arm from the numerous tries, and a couple bruised and bleeding knuckles from the firebow punishing me for trying to record a DIY video without ever having actually done it before myself. Yes, I successfully got the coal burning, but it was a long, hard slog, and it took me a few days to get the materials, rhythm and everything else to work. So lets talk about what I’ve learned so far and what the “theory” is for starting a fire with what is considered one of these easiest methods of friction fire starting.

What you need:

  • Drill or spindle – A cylindrical piece of wood about 8-10 inches with a point at one end and flat/slightly tapered edge at the other.
  • Fire board / hearth board – a piece of dry, wood (same material as the spindle) around a foot long (30 cm) with at least 3 flat sides.

Both of the above should be made from dry softwood (evergreens).

  • Firebow – just like any bow a piece of wood that is slightly flexible and has a string tight enough to keep a good hold of the drill
  • Bearing block – A small object, preferable hardwood, stone, bone or shell that has a small hole for the point of the spindle,
  • catcher – bark, dry leaf, thin piece of wood or other surface to place under the board to catch any wood dust and powder.
  • Tinder Bundle – dry, finely shaved / shredded bark, dry wood, moss, cotton, etc. Used to ignite the coal created by the bow and drill.

Steps:

  1. On the fireboard, cut a circular hole deep and wide enough to keep the drill in the same spot while drilling.
  2. Place the drill in the bow so that the string wraps around the drill once.
  3. Place the catcher underneath the fireboard, directly beneath the hole.
  4. Place the flat end of the drill in the hole in the fireboard, and apply pressure to the bearing block
  5. start a slow, consistent sawing motion with medium pressure on the bearing block. Continue until you see smoke.
  6. Cut a V notch that intersects almost to the center of the hole in the fireboard.
  7. Start to saw again applying enough pressure and speed to produce a pile of wood dust that is dark brown to black in color.
  8. When you start to see smoke, continue sawing and apply a bit more speed and pressure.
  9. When you have maintained a strong billow of smoke for 10 seconds or more, stop and tap the dust off the fireboard and onto the catcher.
  10. If you can see a red coal in the pile, slowly and carefully transfer your coal to your tinder pile (take your time, fan it gentle with your hand so ensure good airflow before transferring it).
  11. Close the tinder bundle around the coal 
  12. Blow gently and steadily into the bundle. (Make sure you hold the bundle out to one side so as not to allow sweat to drop on it).
  13. Continue blowing until fire is produced… or you pass out from exhaustion. (ok, so don’t do that last part)
Tips:
  • Try putting a green leaf between the bearing block and the drill to reduce friction on the top end of the drill. This will focus the heat where it should be: on the fireboard.
  • If your drill dust is too light in color, you need to apply more pressure and/or drill more quickly. You want a rich, dark brown-black pile of dust that will take a coal.
  • use your lower leg to apply pressure on the arm that holds the bearing block. This takes the pressure off your arm and wastes less upper body strength.

Survival Psychology: 3 keys to improve your chances

You have probably heard the stories of people caught out in extreme circumstances that managed to get out of a potentially fatal situation alive. The fact is that the survived, but how they managed is what is important for you and me. In three points you can present a summary of what is needed. These things are Gear, Know-how and Will to Survive.


Will to Survive


The most important thing you’ll need is an internal desire to survive. It doesn’t matter what you bring with you, if you don’t want to force yourself to use it, then you’re just as much in trouble as the guy stuck out with nothing.


When stuck, whether up a tree as a kid, your leg stuck under a horse, locked out of your car or even lost in Ikea you have to want to survive. Well you should, anyway. But some would just sit there paralyzed by fear of the situation. It’s those who choose to do something about their situation that will have a far better chance of getting out in better shape.


Now I need to clarify, doing something about your situation doesn’t always mean hiking out to civilization, sometimes it’s actually staying put and simply improving your chances of survival where you are.


Whatever your situation is, you need to get yourself into “survival mode”. Find a motivation for going on, your family, your kids, your little dog fifi, your mortgage payments or maybe just that baseball game your favourite team is playing. You have to WANT to live. You have to keep your mind focused on that, even when things get worse.


Knowledge


Now that you WANT to live, you need to have a plan on how to accomplish that. What this looks like will depend on where and what your situation is, but you need to take care of your immediate needs: Shelter, first aid, fire, food and water. The order of these will change depending on your environment, but they’re all important.


A firebow kit
So, do you know how to light a fire? How many ways? Do you carry matches or a lighter, fire steel, magnifying glass or other form of fire starting equipment? Now is the time to practice.


Do you need a shelter? Can you use the rubble from the crash or the trees and scrub around you? How are you going to keep yourself from getting too hot or too cold?


What about water. Is there a source nearby? Maybe you need to dig for it. How will you purify it?

Wild Raspberry Bushes

Hungry? Can you identify those plants? Know how to make a trap to catch small animals? Maybe a fishhook is what you need.


Can you tend to your or anyone else’s wounds? What’s the name of that plant you can use to sooth burns? How do I make a splint?


Can people find you? What can you do to make search and rescue find you more easily?


Sure, it is unlikely you’ll need this, but it is normally those who have the will to live and the knowledge of how to do that that will make the headlines having survived a normally fatal situation. Always remember this, you can have all the knowledge in the world, but without the will to survive you’re stuck. The key is keeping yourself busy while you wait to be rescued.


What’s in your kit?


my daughter’s survival kit
Do you have a survival kit? What’s in it? A good survival kit will give you all the basics to handle most if not all situations. It will be compact and light.


Do you have the right gear with you for your environment? Or are you relying on that friend who you can’t find right now? Always carry some essentials that will help if you’re separated from a group


Final thoughts

Surviving an emergency is all about the psychology. You need to keep yourself thinking that you can and will make it through this alive. If you can keep your mind confident that you will survive then you will force yourself to do just that. You will immediately start prioritizing your needs and taking care of them. You’ll make the most of your gear and keep yourself busy preparing for your rescue. By so doing will make the lonely waiting time fly by and increase your chances of survival dramatically.


If you’re seriously interested in learning survival skills, consider some of the books below, a few of which I’ve already read and learned some of these skills from:
<A HREF=”http://ws.amazon.com/widgets/q?rt=tf_cw&ServiceVersion=20070822&MarketPlace=US&ID=V20070822%2FUS%2Fsurvi0d-20%2F8010%2Fb5577be2-8dfd-4c55-a3ba-9abf13eb7d24&Operation=NoScript”>Amazon.com Widgets</A>

How to make a Desalination Still

“Water, water, everywhere and not a drop to drink.” So says the Rime of the Ancient Mariner. I say that our friend forgot to pack his desalination still. I had been planning to make a still to purify and remove the salt from salt water for a while. A few days ago I finally pulled out some of the gear I take with me on every hike and tried making one. It worked!

As will most survival skills, the chances of you actually having to do this is slim, but knowing how to desalinate water is one of those skills that could just save your life if you do need it.

Obviously there are other ways to do this then the one I present below, but I tried to make this with only things that a regular backpacker/day hiker would carry with them.

  • One container to boil water
  • One container to catch water
  • One tube from a hydration pack
  • Tin foil
  • A means to cool down the tube
  • a means to boil water
That’s it! Take a look at the video below to see the process and how my setup turned out.

If you want to do this as a kids project, it is a condensed way of showing them the water cycle.

Guest Post: Getting the most out of a handheld GPS by Kevin Jordan

As an avid hiker, climber, and backpacker, I have quite a collection of outdoor gear. My closet is filled with ropes, backpacks, cookware, hiking poles…basically everything one would need for an outdoor adventure. Some things I don’t get much use out of–for example, I’ve got an ice ax in there somewhere that hasn’t seen action in three years. However, there are other things that I find so useful that I never enter the woods without them. One such tool is the subject of today’s article–my handheld GPS receiver.

As the owner of a GPS rental service, I have lots of experience helping people learn how to use handheld GPS units for outdoor activities. I have found that most people aren’t aware of just how useful a handheld GPS unit can be. Even people who have owned one for years often are not getting full use of the unit’s capabilities. In today’s post, I’ll cover the best ways to use a handheld GPS unit for a typical hiking or backpacking trip, from the planning stages to the post-trip sharing of your experience.

Planning the trip

The trip planning stage is very important when using a handheld GPS unit, and it’s often one that many people skip–which is why they’re not getting full use out of their GPS. It’s during the planning stage that you’ll load any maps, waypoints, routes, or tracks on your GPS unit that you think might be helpful. For example, for a typical short backpacking trip, you’d want to create waypoints at the start and end of the hike, your planned camping spots, water sources, trail intersections, etc. Most GPS manufacturers provide free computer software that you can download to assist in this process, so that you can do all the planning on the computer and then simply transfer the information to the GPS.

There are many excellent websites, such as Backpacker.com and Trailheadfinder.com, where you can download routes, tracks, and waypoints for many trips that other people have already posted. Many free GPS maps are also available at sites like the GPS File Depot.


Taking the trip

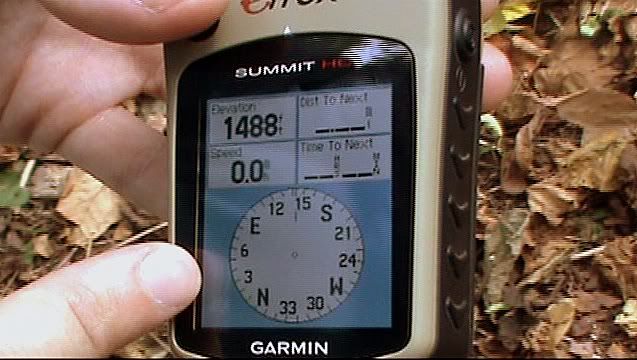
At the trailhead, activate the route you’ve loaded on the GPS, or select the first waypoint you’ll be navigating to. As you hike, keep the GPS clipped to a belt or shoulder strap on your pack so you have access to all the information it will give you. Using the GPS, you’ll be able to see how far you have to go until your next waypoint, and how long it will take you to get there at your current rate of travel. You’ll also be able to see how many miles you’ve covered, what your average speed is, your time moving vs time stopped (i.e, rest breaks), altitude gained and lost, and much more.

  GPS

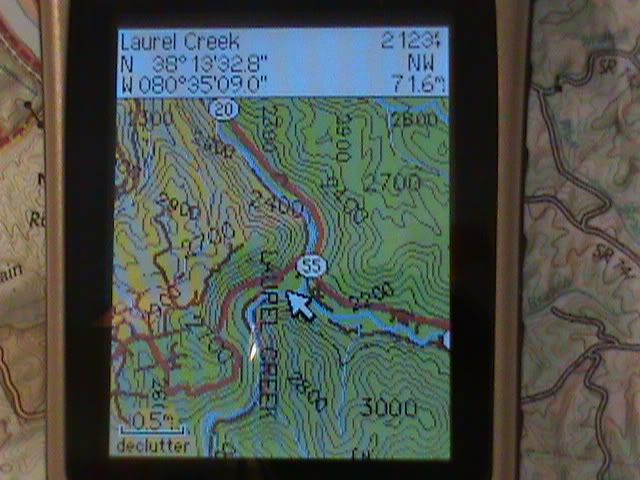
By looking at the map page, you’ll be able to see at a glance where you’re at, what terrain features are nearby, and what’s coming up around the next turn or over the next hill. It greatly increases your situational awareness, and gives you the information you need to make decisions. For example, let’s say you’re trying to reach your next campsite by a certain time. Your GPS will give you a constantly updated ETA, so you’ll know if you have time to stop and enjoy the scenery, or if you need to increase your speed to make it on time.

 GPS map

After the trip

At the end of your hike, you can save your track on the GPS unit, so that you can share it with your friends or post it on-line for the benefit of other hikers. Also, if you’ve taken pictures on the trip at locations where you created waypoints, you can geo-tag those pictures so others can see exactly where they were taken (GPS units with built-in cameras automatically do this for you). Finally, you can review your stats for the trip to see if you really traveled as far, climbed as high, and moved as fast as you thought you did

Now, a handheld GPS unit is not a substitute for a paper map and compass. You should always carry those with you, and know how to use them. However, when used correctly, a good GPS unit will give you the confidence you need to take your outdoor adventures to the next level.

Book Review: The Outdoor Survival Handbook by Ray Mears


Ray Mears. He knows what he’s talking about. And he put some of what he knows is in a book. That’s Raymond Mears’ “The Outdoor Survival Handbook.”

Based out of the UK and a common feature on the BBC, he’s known for his many TV survival series and experience with traditional cultures around the world. He learned from how the indigenous peoples from around the world have lived and shows others those skills that have been lost. Did I mention that he also runs a survival school? Imagine all that knowledge distilled down into 235 pages of easy to read, easy to duplicate instructions with an abundance of drawings and diagrams.

I just finished reading it and there is enough to keep you busy all year round for many a year. From survival skills, to primitive crafts and projects there’s a ton of things I want to teach and show my kids as they get older to make them feel more at home in the woods.

Let’s start with the layout. The majority of this book is structured around the seasons, divided into Spring, Summer, Autumn and Winter. Although this took me a bit to get used to, it makes a lot of sense. What we need to survive and what we can make use of varies by the season. What wildlife to expect, shelter needs, available wild edibles, etc. are all seasonal issues and best presented as such.

Of course, some outdoors skills or needs don’t have anything to do with the weather and so they book end the seasonal info.

For example, the book starts like this:

  • Introduction – Everything you’d expect from an introduction.
  • Clothing – the role it plays, what you should wear and how you should layer it
  • Personal Kit – As he says, “Make sure that you carry what you need, and not an item more.”
  • Under cover – From Hammocks to Bivy sacks to tent, it’s a brief look at the role of the different shelters.
  • Base Camp Kit – For those of haven’t considered the possibility of setting up a camp and doing short expeditions from there he gives some suggestions of how you can do that.
  • Cutting tools – Ray Mears’ take on different cutting tools 
  • Navigation – An easy to understand, but detailed section on Compass and map navigation, as well as a look at navigation with natural signs from trees to sun to stars.
Expect a bias here on gear related themes, but he has a lot of experience, so he’s entitled to it. Frankly that part dates the book at bit, references to specific brand names and products make it feel a bit “sponsored” although I don’t know if that’s the case.
Seasonal Info

From there it moves onto the 4 Seasons, each with its own information on the following categories:
Animal Kingdoms
  • Animal tracks
  • Droppings
  • Feeding signs
  • Winter trails
Shelter
  • A wide variety of shelters for individuals and groups for different climates
  • Beds and bedding
Water
  • How to find, collect and purify water in every season
Fire
  • It starts with the science of how a fire burns and what you need to make it
  • Next it looks at different types of fires and what they’re for (cooking, drying, heating, etc)
  • It looks at how to transporting fire
  • as well as various tools and methods for starting them.
The pursuit of food
  • Edible plants and roots
  • Fish – catching, filleting, drying, cooking
  • Making flours
  • Primitive ovens
  • Small and large games and “wasting nothing”
  • Edible fungi
  • Trapping
Special Projects
Each section about the season has a different set of projects including:
  • Cordage
  • knots
  • Birch bark creations
  • Pottery
  • Basketry
  • Carving
  • Sap
  • Wild plants and fungi for utility
  • Making snow shoes
Appendices
No, this isn’t a field surgery section, but it does provide a couple other things
  • A list of “useful addresses” which are just outdoors suppliers
  • Sharpening a knife – lots of useful pictures and info to show you how you’ve been doing it wrong/right
  • Coppicing – Say what? (Not even the spellcheck recognized that word). It shows how to correctly prune/cut trees and stumps to keep a tree healthy and make it a source of future bushcraft and survival resources. Did you know that if you take off a branch and don’t cut it flush with the trunk that fungus could enter and harm the tree? Neither did I.
Final Thoughts

This book is a good balance of survival and primitive skills with lots of pictures and an easy how to format that makes the knowledge offered easy to remember and apply. It covers a wide array of subjects and projects that make long term survival a lot easier.
It really focuses on the outdoor experience (I was going to say “outdoor adventure” but it seemed to cheesy). Ray several times speaks about awareness and experiencing nature. He’s about preserving nature for future generations while exposing it to them so they can appreciate it for themselves.
This book does not deal with first aid in survival situations. Aside from a couple wild plants and a reference to bringing a first aid kit it doesn’t dig deeper. 
If you’re looking for an easy read and easy to understand book on the outdoors, this is definitely worth a look.

Take a look at these other Ray Mears Books:

<A HREF=”http://ws.amazon.com/widgets/q?rt=tf_cw&ServiceVersion=20070822&MarketPlace=US&ID=V20070822%2FUS%2Fsurvi0d-20%2F8010%2F2d817c1d-fe37-4efd-9b5a-cfcbe5cc81eb&Operation=NoScript”>Amazon.com Widgets</A>

DIY: How to make an emergency blanket sleep system (Quilt)

For the next little while I’m down in South America and I didn’t bring a sleeping bag. I don’t want to buy a new one down here if I don’t have to, so in typical DIY fashion I decided to work with what I have: A closed cell foam sleeping pad and an emergency blanket.

The biggest thing I was worried about was the fact that mylar blankets, being so light, tend to let the warm air out the gaps. Yes they insulate to 90%, but that’s if the are tucked in nice and snugly. I decided to take a hint from ultralight backpacking. To shave off a few more ounces, several companies make sleeping bags that are open on the back (because any part of the bag that you lie on doesn’t insulate very well anyway). They use the sleeping pad inside the quilt by using strings or thin fabric on the back of the “ultralight quilt” and voila! I decided to put that to work.

I tried it out at 10 500 feet where the temperature got down to 3 degrees C (40 degrees F). That was to cold, but down to 50 degrees F(10 C) it was quite comfy. 7 degrees Celsius is probably the limit. All told it weighed 2 oz for the blanket system and 7 oz for the mat.

Here’s the materials list:

  • One closed cell foam sleeping pad
  • 1 roll of tuck or packing tape
  • 10 feet of string cut into 18 inch lengths
  • 1 emergency blanket
I decided to do it in video form to make it more entertaining.
Take a look at the video below to see the “making of” the emergency quilt sleep system.

The wild berries of my summer

My son grazing on wild raspberries

As a kid, I remember my dad taking us around the property and through the woods and on our journeys he would show us new wild berries to enjoy. I never forgot the ground berries, the salmon berries, the huckleberries or the blackberries (to name a few) and now that my kids are growing up I decided to share these simple pleasures with my own kids.

This summer we came back from our travels to visit family and friends and it gave me the perfect opportunity to show them the abundance that the Pacific Northwest has to offer.

DISCLAIMER: While many of us have eaten wild edibles without problem and enjoyed them, make sure you know what you’re doing and that you can correctly identify the berry/fruit/plant that you plan on using/eating. Also, be aware of family allergies and sensitivities. Basically, know what you’re doing before you do it. In most areas there are experts and courses or classes that will help you identify and enjoy what is available in our fields and forests.

Here are a few of the berries we enjoyed.

The thimble berry or thimbleberry. Deliciously sweet and constantly ripening. Without knowing what a thimble was, my daughter immediately started putting these caps on the end of her fingers. They’re ripe and sweet when bright red!

Saskatoon berries. They can be mealy but this tree was growing beside a lake. As a result they were large and plump, nice and sweet. The kids stood their and cleaned off every one of them within their reach.

Wild raspberries. Although these guys are midgets in comparison to store bought ones, I find that they pack a punch. I’d say they have the same, if not double the flavor of store bought raspberries.

Bunch berries. OK, so these guys were never shown me as a kid, but they’re edible. That’s pretty much all I can say positive about them. The don’t have a lot of flavor and there is a large seed in the middle of each ones. Still, I’d been wanting to try them for a while.

Wild Strawberries. Of course, these are another berry in league with the wild raspberries. Tiny, sweet and delicious. There was a whole field of these at our friends’ house. The kids wandered through the plants gorging themselves on these fellows. The stains on their knees showed that they missed a fair few!

Were berries a staple in your childhood diet? If so, what was your favorite?

Finding your North – What time is it mister wolf?

We want to look at one more tip on how to find out which way is north. All it requires is a watch. An analog watch (one with hands) is best, but if you can draw an analog watch based on the time displayed on the digital watch then you’ll be fine.

This one is fairly straightforward. Here’s what you do:
  1. Point the hour hand from your watch at the sun.
  2. If you’re in the Northern Hemisphere then you’ll want to take the measurement half way between  the hour hand and 12 o’clock. This is due south.
  3. If you’re in the Southern Hemisphere then you’ll want to take the measurement half way between  the hour hand and 6 o’clock. This is due north.
That’s it. Now if you have a digital watch don’t worry. Draw a circle and then your minute and hour hands in the right place based on what the digital watch says. Don’t forget to adjust the hour hand to match how many minutes have passed.

One last tip

OK so this isn’t to do with navigation but it’s fun none the less. How much daylight do you have? You probably have seen this on shows like Survivorman, but it is worth the reminder nonetheless. Here’s what you do:

  1. Without looking directly at the sun, hold out your hand horizontal.
  2. Using your four fingers line up the top of your hand with the sun. Each finger you have indicates about 15 minutes of sun left in your day. 
  3. Move your hand down to just below where your hand was and repeat until you get to the horizon. This will show you just how much time is left in the day.
As always, be careful, be prepared and have fun out there. Make sure you are experienced in outdoor survival if you plan to rely on these tips.

Finding your North – Me and my shadow!

Alright, so far we’ve seen some traditional tools on how to navigate without the need for the sun, but now we want to get to the more accurate and easier to apply tools of navigation, the sun!

Me and my shadow

The first tool in the list is you and your shadow. You can almost always guarantee that when the sun is out, so is your shadow (bonus points for people who can tell me in what situation you would have NO shadow on a sunny day). IF you have half an hour and a couple sticks you can use that to your advantage. Here’s what you do:

  1. The first thing you’ll want to do is set up a Straight stick directly vertical. This is going to cast the shadow you’ll need.
  2. Take a marker (small stick, rock or other small object) and place it at the tip of the shadow.
  3. Every 10 minutes mark where the new tip of the shadow is with other small markers.
  4. Draw a straight line connecting all the markers together.
  5. Draw a line perpendicular (at a right angle to) the line drawn in step 4.
This perpendicular line runs North and South. There’s just one more question, which way is north? To find out that you have to know if you’re north of the equator or not. If you are in the Northern Hemisphere the shadow will be on the North side of the stick. Take a look at the following video that shows this trick, but in the Southern Hemisphere (so you’ll see the shadow pointing south).

As always, be careful, be prepared and have fun out there. Make sure you are experienced in outdoor survival if you plan to rely on these tips.

Finding your North – "seeing the forest for the trees"!

In our last article we took a simple look at how to find your way north using the old adage, “The moss always grows on the north side of the tree.” If you have no moss, or the moss grows everywhere and you’re not sure where to go, here are two more tips that make finding your way north easier when the sun isn’t out.

Branch out!

If the moss can’t give you an accurate reading, don’t get frustrated with that tree, just look up! The sun won’t cooperate, but the trees can still help you find your way. All you need to remember is what we learned when planting seeds in school.
Give this photo a try. Examine the trees and then leave a comment
guessing which side of the photo is South!

Remember those little green shoots craving the sun? They’d lean over as far as they could, just to get an inch closer to those life giving rays. Well, those great trees surrounding us now went through that process. They still need that sun so they try to direct their foliage towards that ever so important light. In the Northern Hemisphere the south side of the tree should have more exposure to the sun and therefor better opportunities for growth. This means that there should be a higher concentration of branches and an almost lopsidedness on the southern side of the tree (And of course the reverse for the southern Hemisphere.) Take a couple trees for example, try to find trees that have exposure to direct sunlight because they will make it the easiest to identify. Combine this with the moss and you’re well on your way home.

Does it have a ring to it?

Ok, maybe you’re in a clear cut… Don’t Panic! In the off chance that you encounter a tree stump, look at the rings. Even though our habits have made it more difficult, we haven’t made it impossible. You can use that stump to help you! You should find the center of the tree farthest away from the north side.

Take a ruler and measure from the center to the edges. Leave your guess  in the comments.
credit Thamar Larsen
Combine all these tools together and you should be able to find your north, even in the cloudiest of conditions!


Just remember that there are always exceptions to the rule so it is best to take an average, apply a combination of different skills and ALWAYS bring a compass.


As always, be careful, be prepared and have fun out there. Make sure you are experienced in outdoor survival if you plan to rely on these tips.

Finding your North – "the moss ALWAYS grows"

Sometimes, we talk about a “moral compass” or “direction”. In Spanish, they call it, “finding your north”. Obviously it finds its origin in the literal, someone who is lost and needs to find his way. Whether morally or literally, you have to know where you’re going in life. However, even if we plan to know our way, there are times when we get lost. For many years people have known these skills out of necessity, but unfortunately access to modern equipment has made us grow complacent and reliant on such gadgets. Obviously your best option is to bring a compass, but if you break or lose it, you’ll be happy to know some simple skills to find your way back home.

Over the next few articles I want to take a look at different tools one can use to get a fix on where you are and where you’re headed starting with what to do when the sun isn’t out (after all, this is Seattle). Let’s start with the old saying

“The moss always grows on the North side of the tree”


Although it’s the best known, it’s not actually the easiest one to use, at least not in the Pacific Northwest!

Close up of a tree from a hiking trip in Well Grey Park, BC. The moss is clear on the north side.

The concept is fairly simple; the side of the tree that gets the most sun is typically dryer and moss prefers moisture. As you can guess, while in the Northern Hemisphere this would leave MORE moss on the north side of the tree. (However,  if you are in the Southern Hemisphere, like I am right now, then this tool would lead you South). You may have noticed that I said “more moss” earlier, that’s because in the costal Pacific Northwest you tend to encounter temperate rainforest where everything is wet! This makes it more difficult, but not impossible.

In extremely wet areas you’ll find moss all the way around the tree so look for the side where there is a larger quantity of moss and check a good number of trees. Choose a tree and make a note of what direction you think is north. After taking a sample of half a dozen to a dozen trees and combining your results you should be able to find a consensus as to which way is North.

As an aside, for those who travel to the southern hemisphere, the drier side of the tree would be the northern side. This means that in South America for example the moss grows on the south side of the tree. Don’t forget as you could get yourself more lost than you already were!

As with all tips, go out and give it a try fully equipped. Make it a family activity. Get the kids to choose 4 trees and decide which side has the most moss. When everyone is done, pull out your compass and see how they did. Skittles all round and you can be satisfied that your kids just might not get lost next time they’re out in the woods.

Just remember to be careful, be prepared and have fun out there. Make sure you are experienced in outdoor survival if you plan to rely on these tips.