Home / DIY

DIY

Flying a DIY model aircraft

My nephew is a bit of a wiz when it comes to building and fixing things. He’s an early teen now and has been taking apart, fixing and re-assembling small engines for years.

Recently he started buying components for remote control aircraft online and has been his own air frames. He came over to try his foam board and coroplast spitfire a few weeks ago and I was duly  impressed.

Check out the video and let us know what you think? His next project is a quadcopter that he’s building from scratch.

Happy New Year!

How to Build a Canoe Rack

You can never have too many canoes, but you can run out of places to store them. To solve that, you’ll probably need to make a canoe rack, so we’ve made a DIY video for a canoe rack that can store up to 3 canoes.

This rack holds up to 3 canoes

We like to keep ours out of the snow to prevent damage, so we built this one to go into our storage container for winter. Watch the video above and if you have any questions or tips, leave them in the comments below.

Quick Tip: Attach pipe insulation to the arms of this canoe rack with a couple zap straps to add a bit of protection to the gunnels.

If you have heavy canoes, you may want to make the braces longer to support the heavier weight.

Remember: a canoe must be stored upside down on its gunnels to prevent warping, water collection and rot.

Try it out and let us know what you think!

FixnZip – Easy Zipper Repair Review

You know that favourite jacket of yours that hangs in the closet because the zipper slider is missing or broken? We’re going to fix it!

If you have a jacket, tent or anything that has a broken or missing zipper you need to take a look at FixnZip. Even if it’s a waterproof zipper, FixnZip handles it without a problem – no technical knowledge required! This is probably the easiest DIY zipper repair you’ll ever do.

Fixinzip1

Fixnzip kit Features:

  • 1 FixnZip™ slider
  • 1 ring pull tab
  • 1 black cord pull tab
  • Repair Instructions (on the back of the cardboard display tag)
  • Reusable
  • Colour: Nickel or Dark Nickel
  • Works for: sleeping bags, pants, bags, wetsuits, jackets, tents, etc.
  • MSRP: $9.99 for one or $24.99 for three

fixnzip5

What is this for?

FixnZip is specifically for replacing damaged or lost zipper sliders. They are compatible with nylon and metal coil and teeth zippers. They do not replace damaged stoppers at the end of a zipper. For that click here for amazon zipper stopper options. It does not replace missing or damaged coils/teeth.

Fixinzip2

How do you do it?

Replacing your zipper slider is simple. Choose the right sized slider with this online zipper sizing guide. Then, follow one of the guides here (it will depend on your repair job and piece of gear).

fixinzip6

MY repair was for a waterproof zipper, which meant I had to put the slider on backwards. After that, I simply tightened it all the way with the knob and then backed it off a 1/4 turn. Et Voila! My work jacket could come out of retirement!

Fixinzip4

What do I think?

A replacement for my work jacket would cost close to $200, so a $10 universal zipper is a small (and extremely easy) price to pay for a replacement. What’s more, the manufacturer didn’t have a replacement zipper, so an aftermarket repair was my only option.

The repair was straight forward and with a bit of tweaking to the right pressure the zipper now works fine. FixnZip is definitely worth checking out. Take a look at their website here.

Have you ever done your own zipper repair? Would this have made your life easier?

Check them out FixnZip on Amazon.

fixnzip3

Disclaimer: I received this piece of gear free of charge for review purposes. All opinions are my own and what i would recommend to friends and family.

Rocket Launching


This past weekend we were up in Prince George visiting, when a friend pulled out some homemade model rockets and solid fuel engines.

rocket6

They were leftovers from school projects, so we decided to take the kids and try them out. Setting them up required taping the engines, adding a launching fuse and then connecting the wires.

rocket3

Standing way back, of course.

rocket5


The dangerous work was done by adults and the fun was had by all.

rocket2

It was quite impressive to watch the rockets go, and much whiplash was experienced as they took off.

rOCKET1


The larger engines disappeared from view. If you try this, give yourself plenty of space and make sure there is little to no wind.

We were definitely hooked. The great thing about a hobby like model rocket launching is that you can work on building the rockets in the evenings or on rainy days and then take advantage of Saturdays to do your testing.

Have you ever built a model rocket before? What do you think?

DIY: Kid-Proof Bench

When Mr. and Mrs. Adventure first got married, we were given a fancy maple dining set. It lasted us very well for six years and we packed it away into storage when we moved to South America. Within a year of returning with four Jr. Adventures they were falling apart. I glued them together, added screws and bracing for reinforcement, but kids are kids.

Mrs. Adventure needed something that could handle the four kids, plus friends, couldn’t be knocked over and wouldn’t fall apart. After searching online for bench plans, she came across this 4×4 Truss Bench Plan. With a few changes (to the length, materials and height, she was ready to work). Here is our build of some of the most practical, heavy duty and kid proof benches you can make… Oh, and they look fantastic too!

Bench1-Wood


With our adjusted plans in hand we went to the local hardware store and picked up our material for two benches:

  • 4 x 2×8″ x 8′ Douglas Fir boards – They’re rough, but take more of a beating than pine and we like the rustic look
  • 4 x 2×4″ x 8′ Douglias Fir boards – For the side aprons (you’ll see below)
  • 4 x 4×4″ x 8′ Cedar – For the frames and bottom stretcher
  • Kregg Jig – This Jigg is how you hide your screws from sight
  • Wood Glue
  • Sandpaper (80, 120, 220 grit)
  • Varnish

Note, price this out first. They aren’t the cheapest to make if you buy new materials, but they will last!


Bench 3-Kreg jigg


After cutting the wood down to fit our customization (6′ Long) we got to work with the Kregg jig. It comes with its own drill bit, etc and is a great way to pre-drill perfect holes with perfect angles, to the perfect length. It means there won’t be unsightly screws visible in your finished product.


Benches 4b-kreggdrill2


Mrs. Adventure did a lot of this. We got our money’s worth out of that Kregg Jig.

Bench 4-Kregg2


In the end, this is what the pocket holes look like.


Bench2-Truss frame

When finished, these Cedar 4×4 frames were durable and lightweight. We wanted these to benches to be heavy, but not too heavy, so the combination of Cedar and a Fir top was ideal. The kids were very impressed with mum’s work and helped out with some of the sanding.

Benches6b-glue

All the joints were glued and screwed, making them doubly strong. I will be very impressed if the kids can manage to break these.

Benches 7-braces

The second to last step was to put on the “aprons”. These are the supports that the Fir 2×8″s will be attached to. We got a little excited at that point and didn’t get any more shots of sanding, attaching the tops or putting on the varnish, so fast forward to the final product!

Benches finished 2


Here they about five months after completion. We made the right decision to put a couple coats of varnish on the top. They’ve held up to multiple birthday parties, handfuls of guests and the kids have yet to knock them over.


3 Easy Tips to Improve Your Outdoor Photos

“It looked so much better than this”. “The pictures don’t do it justice”. “You had to be there”. Sadly, our cameras don’t always do our photos justice, but don’t worry, you can turn those drab photos into fantastic shots with only a few clicks.

Who doesn’t have an album of photos that they want to touch up just a little bit, but is intimidated by the idea of it? While most of us don’t know the inner workings of tools like photoshop or lightroom, there are a few simple tools included with most standard photo editors that can easily transform our hum-drum pics into images that capture the moment we meant to capture.

Let’s start with a decent photo of an amazing place and see how we can transform it into something much more attractive in three simple steps. Thanks, Missouri Howell for the photo!

MH1

NOTE: Don’t have ANY Photo tool? Look no further than Google Photos or google plus photos. It’s free and can all of what we’re talking about.

1 – Crop to the Rule of Thirds

When you take or edit photos, you want to follow the rule of thirds.

Wait, rule of what?

The rule of thirds is dividing a picture with three equally spaced horizontal and vertical lines. It creates nine boxes. Many years ago we humans discovered that our eyes are drawn to the points where those lines meet.

Ideally you’ll remember that when you take the photo, but fortunately for the crop tool you can fix that after the fact.

RuleThirds

For example, See Mr. Howell’s photo here. The scenery is amazing, but you’re not sure where to look. The tree in the middle looks out of place. What should we look at? Maybe the road? The sky?

MHCrop

Let’s try cropping it into a vertical image that places the tree and the road in the intersection of the thirds of the photo. Now you have a photo that at least looks visually more engaging. We look at the tree and then we look at the road. The road takes us deeper into the photo.

2 – Auto Adjust

auto

The Pros will tell you to avoid this tool, but until you become a pro, this can really give you a head start. The Auto Adjust tool will try to improve the lighting, contrast, and color to make your photo much more like what you saw. Sometimes it fails, but most of the time you’ll find a huge improvement with just that tool.

MH1 (1)

How are we looking? The colors are starting to stand out and we see glimpses of what Mr. Howell saw when he took the photo.

3 – Over Saturate

Your photos never look as good as they did when you were there. It’s often true. The colors are more vibrant in real life and the camera doesn’t always capture that. That’s why I like to over saturate my outdoors photos.

popandcolor

Under Color, there is often a “saturate” slider. Sometimes it’s called “pop” or just “color”. Boost that up and the colors will start to look like what you saw on that epic trip. They really make the features “pop” out at you.

You’re Done

MH1 (2)

With these 3 easy tricks and even a basic photo editing app you can make your photos look engaging, exciting and better yet, motivate your friends to get outdoors, because the views are Spectacular.

Ready for more?

I used Google Photo on these photos just to show you what’s possible with a free online tool and minute (ok… less than a minute). If you’re looking for a better tool, look at Adobe Photoshop Elements or Adobe LightRoom. They’re more complicated to use at first, but they are more powerful and you can achieve even better results.

What are your tips for capturing or editing better photos?

DIY Bouldering wall – Part 2 – Done!

After many months of outdoor adventure we took an opportunity to finish off this indoor adventure project. We started our bouldering wall a while ago, but this weekend was a weekend in (due to rain) and we made a lot of progress.

Climbing6


The kits came with a tool to attach the holds, as well as the bolts and T-Nuts. So we were able to get right in and start working. I did manage to snap the too into its two allan key parts. It meant a little more work, but I was able to finish the project as is.


Climbing5


We mixed in another pack of natural rock holds too to give us a mixed look.

Climbing7


Our goal was to mix up the holds in a way that made it more challenging and offered easier and harder routes. In the end it was a success.


Climbing3


There is enough variety that the kids can get up and navigate around the wall, while still challenging themselves (and us) with some much more difficult holds.


Climbing1


All in all it was a huge success. We used super-thick winter sleeping bags as padding below the wall. Matresses and crash pads are also suggested.


It was an awesome project and based on our experience we’d recommend it to anyone. It will be especially useful to burn off kids’ energy in the winter months.

DIY Bottle Catamaran Kit

On a recent tour of garage sales in our area, we found this little treasure: A DIY Bottle Catamaran kit. At $3 I figured it’d make a great spring project for my son and I to work on. Typically these things retails for $15 on amazon so it was a steal, especially as it was new in box.

BottleCatamaran1


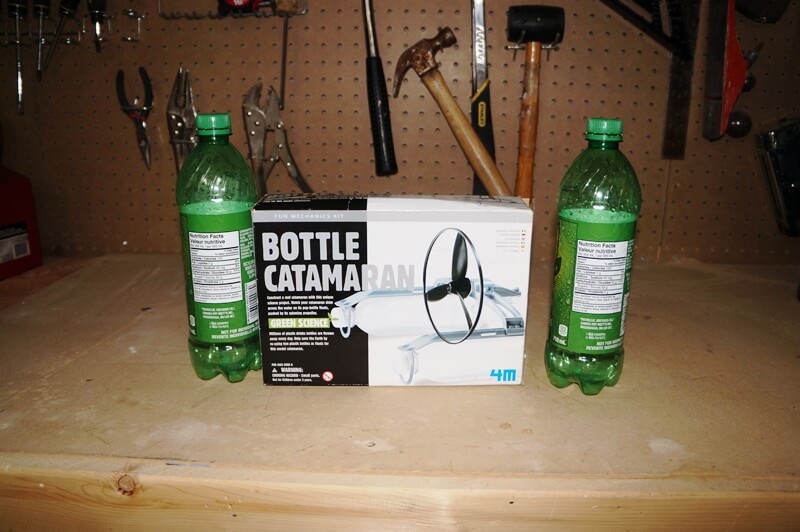
From a company called 4M, this kit makes use of your empty pop bottles for the floats of the catamaran. It’s a neat concept, and one of many “Green Science” kits available.

BottleCatamaran3

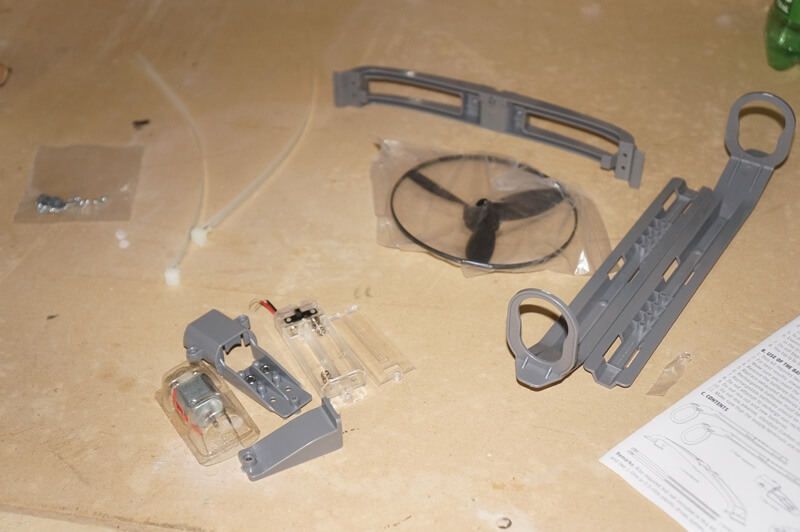
Aside from the bottles, the kit includes everything you need to make the watercraft. The majority of the components are made of lightweight plastic that are assembled with Philips screws.

BottleCatamaran5

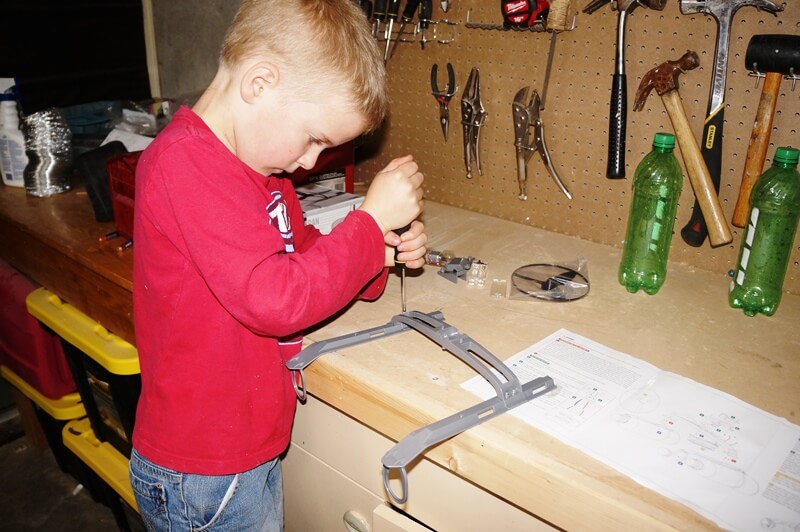
The kit is designed for 8 years and up, so there’s no need for soldering. My 6 year old son was able to do pretty much all the work himself.

BottleCatamaran4


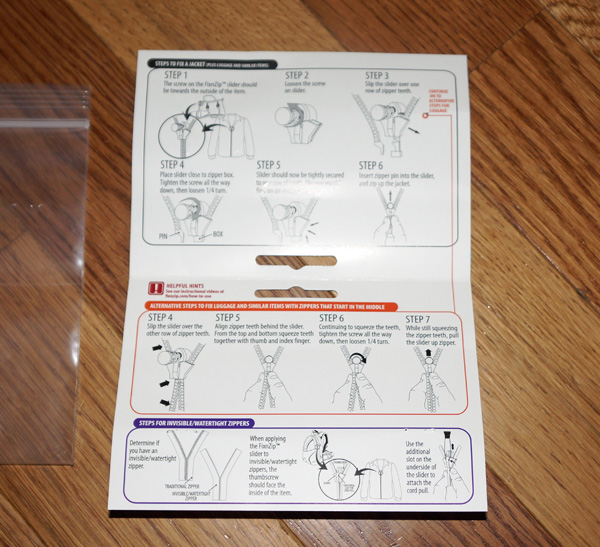
Instructions are straightforward and were easy to follow.


BottleCatamaran6


The concept was cleverly simple. The floats attach via the lids to the bottles and two zap-straps to hold the back on. It really was a simple and rewarding build.

BottleCatamaran7


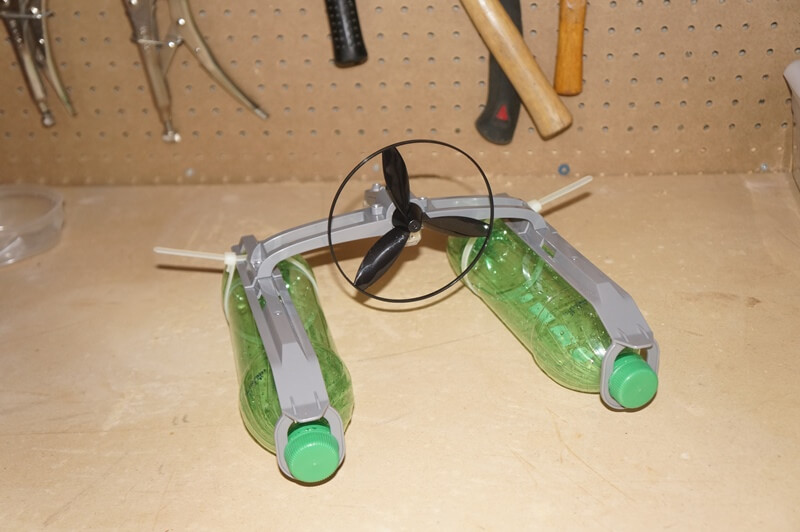
In no time at all we were up and running. I expected it to sit in the water and disappoint, but when we put it in the tub it picked up speed pretty well. Don’t get me wrong, you’re not going to break any records, but it can move. We can’t wait to try it out in a bigger pond.

Take a look at the video above to see the build and check out the kits available on amazon.

 
The only downside is that the edges don’t hold a straight edge after a lot of use. It’s hard to peg it tightly, but it really hasn’t been a problem.

Oh and when it’s all done it’s easy to wipe down with a wet cloth.

Do you use Tyvek? What do you use it for and have you found to be a good purchase?

Paracord Laces – Another reason to carry cordage

Of the many survival situations that one thinks of, broken shoelaces probably isn’t very high on the list. It should be, though. Good laces go hand in hand with good shoes. Don’t believe me? Try hiking all day in your favourite shoes or boots, but with  broken laces!
The risk of breaking a lace on the trail should be just one more reason to bring along some kind of cordage on your next hike.
About a month and a half ago, while I was tightening up my Treksta Assault hiking boots, the lace broke. No problem. I managed to repair it with two knots and I was up and running.
Fast-forward to last Friday. My wife called me to let me know the 4×4 had lodged itself wheel-deep in a roadside problem, so I quickly sprang into my boots. Unfortunately, I sprung too hard and broke the lace a second time. Sadly, it couldn’t be fixed and I had to retire my boots until a replacement lace could be found–except, I couldn’t find one.
As I puzzled over solutions, I asked myself the question: what would I have done if this had happened on a hiking trip? The answer was clear: paracord (Yet another use! It really is the hiker’s cure-all, like duct tape).
I always bring paracord along with me on a hike. Proper military grade paracord can support 550 lbs of weight and is very versatile. I use it for a lot of projects. In this case, my Olive drab paracord would have to serve as new laces for my hiking boots. It was a straight-forward project and easy do do.
All I needed was: paracord, a knife and lighter.
I started by pulling out my good lace and measuring out a length of paracord against it. Then, with my knife I cut off the length of paracord.
Next, I took the lighter and melted each of the ends of paracord down by running the flame up and down the last half of inch of it. Using the lighter, I shaped it the tip into a point that would fit through the laces.
$8.99 at Amazon.com

Then, I simply laced the Paracord through the eyes of the shoe. The end result was very satisfying. They look decent enough to wear around town, they are much stronger than my previous laces, and in an emergency I can sacrifice them or at least part of them to gain a lot of good cordage.

TELL US. What’s your cord of choice for backpacking or hiking? Do you wear paracord bracelets or belts on the trail for use in emergencies? What stories can you share of how you’ve used cordage in an emergency?

Top Outdoor Adventure Videos of the Year

As many of you know, The Outdoor Adventure has a youtube channel with just over 2300 subscribers and 1500 daily views. Because people seemed to like our most popular posts of 2012 article, I thought I’d do the same for our youtube videos. Take a look below to see what was watched last year on our channel.

We do post some content that doesn’t make it onto our channel, so if you don’t want to miss anything, I recommend stopping by BCOutdoorSurvival on youtube.

In 2012 we had over 600,000 views and to make it interesting we’ve taken the top videos and divided them into categories: Gear Reviews, DIY, and Survival and Primitive skills:


Top Gear Review Videos of 2012:

Swiss Ranger Aluminum Military Stove – This old stove can be picked up for $10 and is just plain amazing. They put a lot of research into the design, and it shows.

JetBoil Zip – The solo, bare-bones model of the popular Jetboil system was obviously on a lot of people’s wish lists. What can we say? Stoves are popular.


Top DIY Videos of 2012:

Penny Alcohol Backpacking Stove – This was one of our first videos so we apologize for the quality. It seems though, with the economy suffering people wanted to save money on their backpacking gear… either that or they’re all just pyros.

DIY: How to Make a Backpacking Wood Stove – This easy instructional involving a couple of cans from canned goods turns out a highly efficient stove with afterburner.

DIY Axe Body Spray Stove – Take a simple axe aeresol can and reuse it. It makes a decent little alcohol stove. Plus, it keeps more junk out of the land fills.

Top Survival and Primitive Skills Videos of 2012:

How to cook a fish on a stone – You can’t get a clearly title than this, can you? Oh, and the fish was delicious!

How to start a fire with water – This instructional using only water and plastic wrap was quickly picked up by both Treehugger and Lifehacker and got over 25000 views overnight.
DIY: How to Make an Emergency Desalination Still – My goal with this was to put together a means for distilling dirty or salty water with what a person normally carries on a backpacking trip. It works, even if desalination is notoriously time consuming.