Home / guest

guest

Sandmarc Metal Edition Telescoping Pole for GoPro Cameras

 by Dave P.


The Sandmarc telescoping pole is a simple piece of equipment.  It has one purpose in life.  It functions as an extension of your arm to get your GoPro camera farther away from you.

Sandmarc1

Lately, these extension poles are also being referred to as selfie sticks.  While that term may sound negative, there are times when nothing will help you to take as good a picture or video – unless you happen to have your own photographer/videographer to follow you around.


Think about the times you’ve used your phone to take a selfie with your friends. Unless you happen to be an Orangutan, your arm simply isn’t long enough to get the camera far enough away from you to take a good picture.  Instead, you and your friends have to gather cheek-to-cheek to get everyone in the shot. Personally, I like the closeness of a cheek-to-cheek picture, but all of your selfies come out looking the same.  And forget about getting much of the background in your shot.


Want that great picture of you and your family with the Taj Mahal in the background? Before these selfie sticks, you were forced to stop a stranger, ask them to take your picture for you, and hope they didn’t muck it up. You also had to hope the stranger didn’t desire your camera more than you.


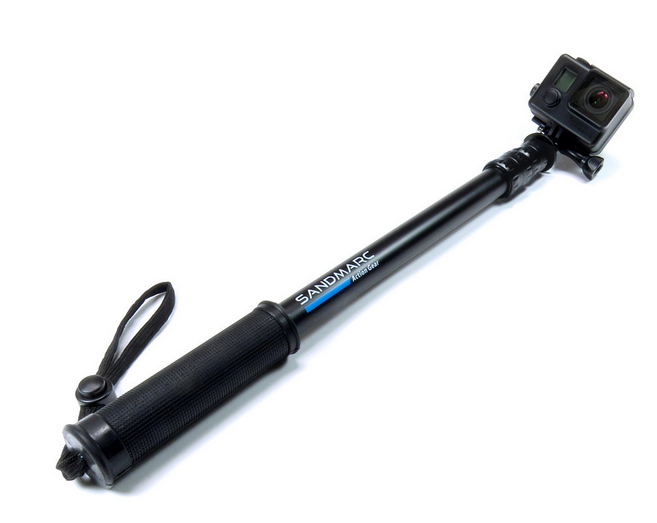
Enter the Sandmarc Metal Edition Telescoping Pole.


It’s advertised to fit all GoPro cameras, including the latest GoPro 4.  The only non-metal parts are the rubber handle and the lanyard. The rest is all aluminum. Even the camera mount itself is aluminum and a beautiful aluminum knob is also included.  The benefit of aluminum is that you’ve got a strong, lightweight, virtually unbreakable pole that will never rust.  Feel free to use it underwater!


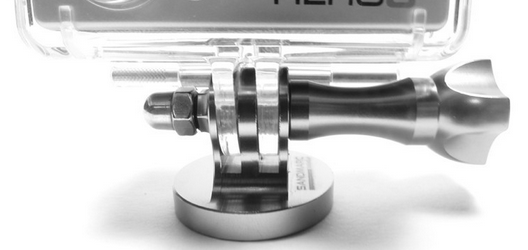
The mount is detachable, so you can also use it to mount your GoPro to standard tripods.  Conversely, you could detach the mount and if you have a standard screw-on camera attachment, you could use the pole for your other non GoPro cameras.


Sandmarc 2


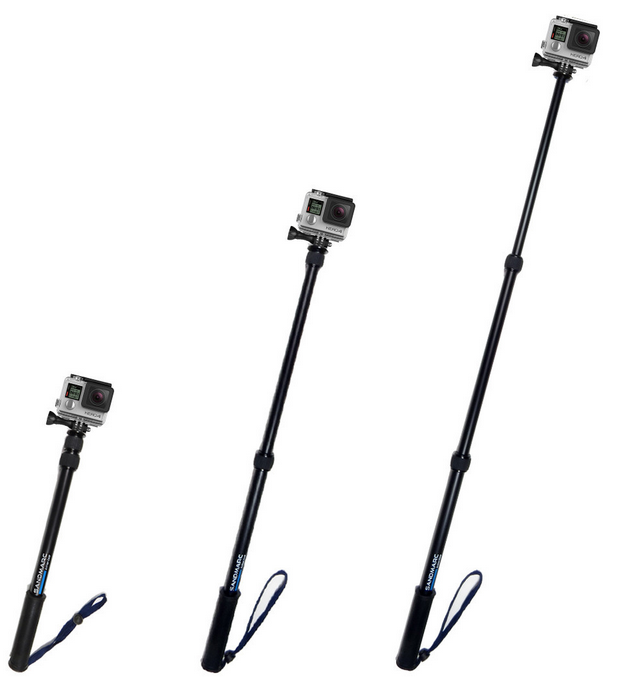
The pole is comprised of three sections that enable you to extend the pole to any length you need, from the fully collapsed length of 17” all the way out to 40” at full extension.  The extensions are loosened or tightened by a knurled knob.  It takes nothing more than a quarter twist to either loosen or tighten the fittings.


That’s the nuts and bolts of the Sandmarc pole, but how does it really measure up?


I like it.  A lot!


There’s nothing cheap or flimsy about this extension pole. Everything about it feels like quality.  It’s sturdy, stylish, and I wouldn’t worry about breaking anything on it.  I can’t say the same about some plastic accessories I’ve come across.


Despite the robustness, Sandmarc has managed to keep it very light.  It weighs-in at a mere 8.5 ounces (0.25 kg).  Before I had the chance to try the stick, I was a little concerned that, while snowboarding down a long slope, it might be too heavy to hold at arms-length, fully extended with my GoPro attached to the end.  I needed not worry.  Even fully extended, I never really felt the weight.


The rubber grip is very firm rubber. At first, it almost feels like plastic. But even in the snow, I never felt like it was hard to hold. I suspect that in the long run, the harder rubber might even be a little more durable than soft rubber.


As I’d stated earlier, the knurled grips can be loosened with a quarter turn, extend the sections to your desired length, and then locked-down with a quarter turn back the other way.  I never needed to apply anything more than a gentle turn and the extension would lock in place with no fear of subsequent collapse.


The camera mount is a thing of beauty.  All GoPro mounting accessories I own are plastic. Mind you, the GoPro mounts are quality pieces in their own right and I’ve never had issues with any of them, but this Sandmarc mount really appeals to my aesthetic sensibility. The mount appears to be machined from a solid billet of aluminum – even the threaded nut was machined from the block.


Sandmarc4


Sandmarc5

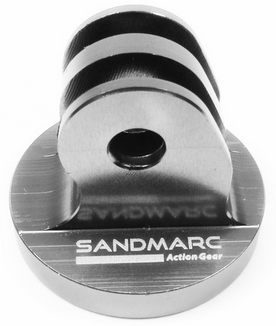
As impressive as this mount is, there is a minor issue worth noting.  Since the mount is machined from a solid billet, it’s very solid – it doesn’t flex at all.  When I mounted my camera, it took a great effort to screw the mounting knob in tight enough to prevent the camera from rotating inside the mount. I happened to have a pair of pliers handy and I had to give the knob an extra little turn with the pliers before it was finally tight enough so the camera wouldn’t move.  I can easily envision many people not having the finger strength to get it tight enough and also relying on a pair of pliers.  There are aftermarket GoPro knobs that give your fingers a little more torque.  There are also aftermarket GoPro wrenches available for tightening and loosening the knob. Or you could just use a screwdriver or a pair of pliers.


To test the pole, I mounted my camera and headed to the ski hill for a day of snowboarding.


I can find no fault with the Sandmarc extension pole.  As I stated earlier, it is lightweight – even with the camera mounted to the end, it is high quality construction, and it’s stylish.  If I had to nit-pic, I simply didn’t know what to do with it when I was done using it.  Even fully collapsed, it’s 17”, so it’s not likely to fit in any of your pockets. My choices were to take it back to my car or go to the ski hill’s village and hope to get a locker for the afternoon.  If you’re out on a hike, it’s light and small enough to carry (or put in a backpack or large purse), but while on the ski hill, I didn’t want to finish my snowboarding trip carrying the pole throughout my remainder of the day.


It also seemed to gather attention from other skiers and boarders.  You’re not exactly inconspicuous speeding down the slopes, holding a camera three feet out in front of you.  But that’s just my own issue.  Maybe if I was a more impressive boarder, I’d feel less dorky filming myself.


Despite my feeling that I was attracting attention to myself, I really feel that you can get some of the best pictures and video of yourself while using an extension pole.  The pole can provide an interesting perspective that you simply can’t get any other way.  Additionally, mounting your camera on the end of a pole has an interesting effect – it smooth’s the video significantly.  When my GoPro is mounted on my helmet, the video can be very jerky and rough.  All my motions (bumping, jostling, shaking) is transferred from my body, through the helmet, and into the camera.  I’m not sure how the pole seems to automatically smooth everything out, but it does.  I’d guess one’s arm is a natural shock absorber.


 Features


  • Compatibility : Fits all GoPro® Hero Cameras (including Hero 4)
  • Durability : Water Proof, Aluminum Locks, Tripod Mount & Thumbscrew
  • Unique Feature : All aluminum build quality
  • Compact : Retracts 17″, Extends 40″
  • Lightweight : 9.5 ounces / 0.25 kgs
  • MSRP: $49.99


All-in-all, I really like the Sandmarc extension pole.  I’m happy to add it to my arsenal of accessories and I know I’ll be using it a lot.  I recommend it highly to anyone that wants to start adding new perspectives to their videos and pictures.


Can I bring my children on a rafting trip?

A summer is not complete without a fun family trip. This year, you’re looking to do something more exciting and outdoorsy than previous years. Maybe you have always wanted to experience whitewater rafting, but are unsure if your kids can handle the trip. Here are some things you should know about whitewater rafting and if you should bring your kids on the trip.

Before you plan your trip, ask the whitewater rafting outfitter of your choice what the age restrictions are for whitewater rafting. Typically, children as young as four years old can enjoy a whitewater rafting trip, but outfitters will generally suggest six years or older for their trips. You can always go for a half-day rafting trip to ensure that the young child does not get too tired or too scared for the duration of the rafting.

Taking kids out on a first rafting trip requires a slower, gentler rafting time. Plan a trip where there are plenty of stops so you can reassure your child that they are safe and make them comfortable if they seem to be uptight and worried. Class 1 and class 2 are the perfect levels of rafting for children of all ages, giving them little engagement but still the thrill of whitewater rafting. Remember that tiny waves to you might feel like giant rapids to a child.

rafting2

Safety is always the most important to all rafters, but it comes a bit differently with younger rafters aboard a raft. They must have a certified life jacket that fits them perfectly, according to their age and weight. They also need a helmet that fits them and is proper for them in order for the helmet to keep them safe.

Keeping a child comfortable is the most important part to make rafting enjoyable for them. They might be scared and nervous about the idea, so you will want to inform them of what they can expect well beforehand, and keep them by your side during the trip. It is easy for a little kid to get scared while whitewater rafting.

All in all, you can take your child on a whitewater rafting trip as long as they fit the rafting outfitter’s criteria. If the company does not have strict rules, keep in mind how old your child is and how well they will be able to handle rafting a river. Taking a newborn baby along for rafting is not the best idea, whereas your five year old might have a blast during the whole trip.


About the Author

American Adventure Expeditions is pleased to bring you this article on can I bring my child on a rafting trip. American Adventure does river rafting in Colorado, and primarily do Arkansas River rafting trips. If you are interested, check out their website today.

Survival in the Outdoors: 5 Wild Vegetable Greens to Feed and Heal You

Editor’s Comment: A special thanks to Melody McKinnon for contacting us and putting together this article. As usual, make sure you can correctly identify these items before consuming. Check for allergies before eating large quantities.


Survival in the Outdoors:  5 Wild Vegetable Greens to Feed and Heal You 


Whether you’re lost in the wild or you enjoy survival camping in remote areas, wild vegetable greens are a tasty source of nutrients and moisture.  They are every bit as nutritious as domestic vegetables, often even more-so.  Wild greens can be eaten raw or are easily cooked in boiling water over a campfire (similar to spinach). Several also offer medicinal properties and all support healthy digestion.

The following five wild vegetable greens are common all over North America.  If you can identify them, you’ll enjoy delicious camp food and survive your wild adventure in fantastic shape.

Dandelion Leaves (Taraxacum officinale)

source wikimedia

Probably the most easily identifiable and widely available edible wild plant, dandelion greens can play a nutritious role in your survival. They are a good source of Beta Carotene, Magnesium, Phosphorus, Potassium, Vitamins A, B6, C, E, K, Thiamin, Riboflavin, Calcium, Iron and Manganese.  They do have a mild diuretic effect so you may wish to limit intake if water is scarce.  Dandelion leaf sap may be used to treat blisters, boils, abscesses, and stings.

Field Identification:  The puffs of bright yellow flowers on hollow stems and sharply serrated leaves are easy to spot.  New leaves found on plants before they flower are the best tasting.

Lambs Quarters Leaves (Chenopodium album)

source wikimedia


Lambs Quarters are a good source of Niacin, Folate, Iron, Magnesium, Phosphorus and vegetable protein, as well as Vitamins A, B6, C, Thiamin, Riboflavin, Calcium, Potassium and Manganese.  The leaves are exceptionally rich in Betta Carotene.  This plant will boost your immunity and stamina during stressful survival situations.

Field Identification:  The leaves of Lambs Quarters have a light powder coating on new leaves and on the underside of mature leaves.  Differentiate between Lamb’s Quarters and toxic Epazote by smell – Lamb’s Quarters have a neutral scent while Epazote has a strong scent.

Chicory Leaves (Cichorium intybus)

source wikimedia


Chicory is a good source of Thiamin, Niacin and Zinc, as well as Vitamins A, B6, C, E, K, Riboflavin, Folate, Pantothenic Acid, Calcium, Iron, Magnesium, Potassium and Manganese. Mashed or boiled leaves make a good anti-inflammatory poultice for minor wounds.

Field Identification:  This plant can be up to four feet tall with blue flowers all Summer long.  Chicory leaves closely resemble Dandelion leaves, but the points of the smaller leaf teeth are directed upwards.  Like dandelions, new leaves in Spring or late Autumn are the best tasting.

Purslane Leaves (Portulaca oleracea)
Said to be a favorite of Gandhi, Purslane, or ‘Pusley’, is a good source of Thiamin, Niacin, Vitamin B6, Folate and Phosphorus, and a very good source of Vitamins A, C, Riboflavin, Calcium, Iron, Magnesium, Potassium, Copper and Manganese.  It’s also a noted source of alpha-linolenic acid, an essential omega-3 fatty acid that may be difficult to find alternate sources of in survival situations.  Purslane offers anti-inflammatory properties that may be used to treat injuries and swelling.

source wikimedia


Field Identification:  This plant has thick, red, creeping stalks with sturdy leaves about an inch long.  It has small yellow flowers that give way to tiny black seeds (which can be ground for flour). It may be confused or cross-collected with the poisonous Spotted Spurge (Euphorbia maculata), but the latter has a significantly thinner stem and white sap.

Chickweed (Stellaria media)

Any chicken will tell you that Chickweed is a tasty wild vegetable, although humans may enjoy it more if it’s cooked to bring out its spinach-like flavor.  Chickweed is a good source or Vitamins A, C, Iron, Phosphorus, Calcium, Selenium, Magnesium, Potassium and vegetable protein.  It may also be used to treat cuts or rashes

by Hugo.arg source wikimedia


Field Identification:  The Chickweed plant spreads up to 16 inches and may be up to eight inches tall. The leaves grow in pairs up to one inch in length with an oval shape and smooth edges. Take great care in identifying it as it resembles the poisonous Spotted Spurge (Euphorbia maculata). White sap indicates Spotted Spurge.

If you’d like to be more prepared to survive the great outdoors by eating wild plants, pick up a copy of The Encyclopedia of Edible Plants of North America: Nature’s Green Feast by Francois Couplan.
When it comes to survival, eating the above wild plants will ensure you’re one of the fittest!


Author Bio

Melody McKinnon holds 52 certifications revolving around nutrition, biochemistry, general sciences, business, marketing, and writing. You can find Melody writing at AllNaturalPetCare.com, (http://www.AllNaturalPetCare.com) on the All Natural Pet Care Blog (http://www.allnaturalpetcare.com/blog) and for Petfood Industry Magazine.

Guest Post: ATV Riding in the Garden of Eden

As many of you have seen, I have a standing offer for guest posts; recently I was contacted by a representative of a company that offers online safety and certification courses for ATVs (Law in some states). They were looking for a bit of publicity and as part of the deal they offered to share a pretty cool experience about quadding through bullet riddled ruins in an island off the coast of Kuwait. I was intrigued and after reading it, thought you’d be interested. – PO

ATV Riding in the Garden of Eden

by Lou Hebert

There is a large island in the Persian Gulf, just off the coast of Kuwait, that the locals swear was the site of the original Garden of Eden. The island is called Failaka, and today it resembles an urbanized desert wasteland more than any likeness to the biblical epicenter of all humanity. If it has ever been your dream to take a dune buggy tearing through a post-apocalyptic deserted island at break-neck speeds with no limitations on your driving or the machine, then this is the destination for you.


During Operation Desert Storm, the United States engaged the entrenched Iraqi army on Failaka. The battle left most of the island in ruin. In the aftermath, the Kuwait government purchased all of the homes and businesses from each of the island’s residents. Failaka was then abandoned, which meant that thousands of vacation homes and stores were left vacant. Today, the island is occupied by a handful of squatters that make a living renting out ATVs to adventure seekers at $35 an hour. This may seem steep for a 125cc dune buggy, until you realize that there are no restrictions.

Being free to do whatever you want to a rented machine does not seem like a good business model, but it can also seem like a challenge to drivers that are not faint of heart. When you first locate one of the Arab-Bedouin rental spots scattered across the island, you will have to be prepared to haggle. He will ask for 20 Kuwaiti Dinar, but you must be persistent and talk him down to 10KD, which is the actually going rate. The buggy ATV will then be gassed up and that is when things start to get dangerous. If you have completed an online ATV safety course, then you may not feel comfortable with how negligible this situation is regarding your safety. There are no hospitals on the island, and the ferry back to Kuwait only comes once a day.

You are truly on your own and completely at risk.

There are no helmets and no restrictions. Seat belts in most of the vehicles are hand-tied shoulder belts. Honestly, when enjoying an extreme situation such as this it is best to wear a five point harness, neck pad and a helmet because it is not just crashes that can cause injury. Blasting across a field of sand is difficult because the jarring vibration of the vehicle can become overwhelming. Ideally, you want greater vertical travel in your suspension for better stabilization at higher speeds so the wheels move more than the cab. A smoother ride paired with a secured driving position equates to greater control. On the dune buggies of Failaka, there is none of that.

There are two seats in the buggies, so there is room for two people to ride. This is a smart choice because it gives one person the opportunity to focus completely on navigation while the other focuses on driving. If you are riding along as the navigator, remember to hold on to hand-holds located within the plane of the roll-bar. In an open-air vehicle with an exposed roll-cage, it is often enticing to casually grip the bar around the door area. If an accident occurs and the vehicle is rolled over, mistakenly gripping the roll-bar will cost fingers.

One of the most enticing opportunities on an ATV is the possibility of flight. Most drivers have dreamed of jumping their vehicle over hills and moguls, and Failaka gave us the opportunity to see how high we could launch a 125cc dune buggy without shattering the suspension or ourselves. To do this, one will need a launching hill that has a nice level incline that does not terminate in a sharp upturn. Too much finishing pitch on a jump can flip your vehicle.

Next, we learned that you have to hit the jump straight on or risk being flipped to the side. If you do flip to one side, remember to turn into the roll; just as you would with a skid. In the end, we had a busted suspension spring, one engine fire, various cuts and bruises and one of the greatest ATV experiences of our lives.

Off-roading in the Garden of Eden was extremely dangerous, difficult but completely unforgettable.


Check out these videos of riding through the Failaka Islands:


Lou Hebert is an American writer and adventurer currently living abroad.

Reader Post: Homemade Marshmallows – a first time for everything!

So one of our friends and followers Rich Kolb mentioned a successful attempt at making Marshmallows on twitter and I was intrigued. He agreed to write about his experience and share how it went. Now that snow is falling around a lot of the USA and Canada, this could be a great family project to prevent cabin fever!

Marshmallows
by Rich Kolb


I was looking for gift ideas for my wife for Christmas. You see, shopping for my wife is rather hard. We’re both rather frugal and we’re pretty well set in what we like. The problem that arises with that is that our wish lists are pretty specific and if one of us is out and about and sees something off that list at a good price it’s not unheard of for us to buy it, hand it to the other one when we get home and say something along the lines of ‘Here, I bought this for you to give me for Christmas.’

So there I was, looking for a gift idea to give my wife, I was hoping to find something handmade and unique. I wasn’t having much luck and then I stumbled upon a random website with gift ideas, and one of them was homemade marshmallows. This worked out great, my wife is a huge smores fan, and they can only get better with homemade marshmallows.

I started searching the internet, and found several recipes, but the one that stuck out the most was this one:
http://www.bhg.com/recipe/candy/homemade-marshmallows/, from Better Homes and Gardens. The BHG New Cook Book has been a staple in my house for as long as I can remember. I found that I had most of the ingredients already, I only had to buy some gelatin and a candy thermometer. I’ve talked to a few people about using a candy thermometer, and a lot of people are intimidated by them, but I found there really is nothing to it.

I read the recipe several times, I always like to have a pretty good idea of what the next step will be. I didn’t follow it exactly, I decided that I would use real egg whites instead of an egg white product. That had more to do with my lack of ability to find anything suitable a week before Christmas then anything else. Plus, I figured we’ve been eating eggs for centuries and we’re all still alive. My only recommendation is that if you use real eggs you separate them into a different bowl to make sure that they’re good before you
contaminate more ingredients.

On to the cooking. I found that it was pretty simple to follow the directions, the only gotcha I had was on step 3, where it said 12-15 minutes total. Either I have a super stove, or they meant that entire step took that long. At least I was keeping a close eye on things and it didn’t cause me any problems. After I had chilled them I used a paring knife to cut them into small pieces. One of the things that I liked was that I could make various sizes, which has been handy for us as we’ve used them in smores, hot chocolate, and just for random
snacking.

All in all, I’m glad I took the risk and made them. My observations have been that homemade marshmallows are much more flavorful than anything I’ve found in the store. They are sweeter than any brands I’ve found, and I’ve decided that I could easily adapt the recipe to make other flavors, like coconut or almond, which is something I hope to try soon. The melt faster, so far we’ve only microwaved them and put them in the over for smores, I expect they’ll melt over a campfire faster than store bought ones too.

If you decide to make something like this yourself I would offer the following tips, read the recipe a few times, it’s nice to not be surprised by things, keep a close eye on what’s on the stove, boiling sugar could turn into a disaster quick, and it’s pretty dang hot, and one thing I’m glad I did first, test fit the thermometer on your pan. With the way it was setup out of the package it wouldn’t have worked and the window I had to get it set was barely long enough. If I hadn’t test fit it I would have ended up getting the thermometer in the pan right when it was due to come off the stove.


Richard Kolb II

Guest Post: Getting the most out of a handheld GPS by Kevin Jordan

As an avid hiker, climber, and backpacker, I have quite a collection of outdoor gear. My closet is filled with ropes, backpacks, cookware, hiking poles…basically everything one would need for an outdoor adventure. Some things I don’t get much use out of–for example, I’ve got an ice ax in there somewhere that hasn’t seen action in three years. However, there are other things that I find so useful that I never enter the woods without them. One such tool is the subject of today’s article–my handheld GPS receiver.

As the owner of a GPS rental service, I have lots of experience helping people learn how to use handheld GPS units for outdoor activities. I have found that most people aren’t aware of just how useful a handheld GPS unit can be. Even people who have owned one for years often are not getting full use of the unit’s capabilities. In today’s post, I’ll cover the best ways to use a handheld GPS unit for a typical hiking or backpacking trip, from the planning stages to the post-trip sharing of your experience.

Planning the trip

The trip planning stage is very important when using a handheld GPS unit, and it’s often one that many people skip–which is why they’re not getting full use out of their GPS. It’s during the planning stage that you’ll load any maps, waypoints, routes, or tracks on your GPS unit that you think might be helpful. For example, for a typical short backpacking trip, you’d want to create waypoints at the start and end of the hike, your planned camping spots, water sources, trail intersections, etc. Most GPS manufacturers provide free computer software that you can download to assist in this process, so that you can do all the planning on the computer and then simply transfer the information to the GPS.

There are many excellent websites, such as Backpacker.com and Trailheadfinder.com, where you can download routes, tracks, and waypoints for many trips that other people have already posted. Many free GPS maps are also available at sites like the GPS File Depot.


Taking the trip

At the trailhead, activate the route you’ve loaded on the GPS, or select the first waypoint you’ll be navigating to. As you hike, keep the GPS clipped to a belt or shoulder strap on your pack so you have access to all the information it will give you. Using the GPS, you’ll be able to see how far you have to go until your next waypoint, and how long it will take you to get there at your current rate of travel. You’ll also be able to see how many miles you’ve covered, what your average speed is, your time moving vs time stopped (i.e, rest breaks), altitude gained and lost, and much more.

  GPS

By looking at the map page, you’ll be able to see at a glance where you’re at, what terrain features are nearby, and what’s coming up around the next turn or over the next hill. It greatly increases your situational awareness, and gives you the information you need to make decisions. For example, let’s say you’re trying to reach your next campsite by a certain time. Your GPS will give you a constantly updated ETA, so you’ll know if you have time to stop and enjoy the scenery, or if you need to increase your speed to make it on time.

 GPS map

After the trip

At the end of your hike, you can save your track on the GPS unit, so that you can share it with your friends or post it on-line for the benefit of other hikers. Also, if you’ve taken pictures on the trip at locations where you created waypoints, you can geo-tag those pictures so others can see exactly where they were taken (GPS units with built-in cameras automatically do this for you). Finally, you can review your stats for the trip to see if you really traveled as far, climbed as high, and moved as fast as you thought you did

Now, a handheld GPS unit is not a substitute for a paper map and compass. You should always carry those with you, and know how to use them. However, when used correctly, a good GPS unit will give you the confidence you need to take your outdoor adventures to the next level.

Guest Post: What you need to know before climbing Mount Rainier – Maria Rainier

After my own summit attempt at Illimani in Bolivia, the subject of mountaineering training has weighed heavily on my mind. When Maria emailed me offering the results of her research on the subject I couldn’t say no! So, here it goes! Thanks Maria! – Paul


What you need to know before climbing Mount Rainier – by Maria Rainier

Thousands of tourists flock to Washington each year in the hopes of climbing Mount Rainier, which at 14,410 feet is one of the largest mountainous climbs in the United States…but also one of the most challenging as well. But what some people fail to realize is that climbing the mountain is actually not as easy as it looks, and can actually be quiet a dangerous trek if you don’t know what you’re doing.

In fact, I’ve heard more about this lately than I care to mention, as one of my best friends is planning such a trek – much to the horror of his girlfriend, who thinks he is ill-prepared to take such a journey! Is he? Time will tell – and let’s not forget the highly probable chance that he will simply lose enthusiasm as he starts to realize what he’s in for. While it’s not a piece of cake, the truth is that anyone with a commitment to get in shape and prepare make a good candidate for climbing Mount Rainier.

If you’re hoping to climb Mount Rainier in the near future, here are various ways you can prepare for the climb.

Do your research


One thing you should prepare for before you start your climb is research the weather conditions as well as the various routes and trails on the mountain.

Although the typical climbing season is between April and September, the best weather conditions usually occur after the first week of July. However, keep in mind that during this time the crevasses tend to open up and the snow bridges become weaker. Not only that, some of the routes on the mountain are only safe earlier in the season because there tends to be much more problem concerning rock fall due to the ice melting as well.

Training


If you feel uncomfortable or not properly trained to climb the mountain, then it may be a good idea to hire a qualified instructor. If you do plan on climbing without an instructor, however, be sure to start your climb as early as 3 a.m. (some camping parties leave as early as midnight).

Your first step is to talk to your doctor to make sure you are in well enough shape to climb the mountain, and then start searching around for the advice of a physical trainer or fitness expert who can advise you of a proper training program before your trip. The best program should focus on cardiovascular fitness and motor fitness, specifically strength, endurance and balance.

If you plan on training on your own, then be sure to spend a lot of time on cardiovascular fitness as it will help your body’s ability to both take in and use oxygen, which is incredibly important if you plan on climbing into higher altitudes.

Aerobics is also a great way to condition your heart muscle while improving your muscle fitness at the same time. There are a variety of different aerobics exercises you can try to help with your training, such as:

• Climbing/descending hills, stairs and stadium bleachers
• Skiing
• Snowboarding
• Running
• Cycling
• Circuit weight training
• Boxing and martial arts
• Swimming
• Aerobics classes

Experts recommend that you train for a minimum of six months prior to your climb, and to try to use a variety of different exercises, activities and locations during your training as well.

Bio: Maria Rainier is a freelance writer and blog junkie. She is currently a resident blogger at First in Education where she’s written on pharmacist degree programs along with math degree programs. In her spare time, she enjoys yoga, playing piano, and working with origami.

Guest Post: Climbing 101 – by Cragmama

Photo by Manuela Eilert
I often think about how many folks may have seen a group of climbers scaling the big walls of Yosemite and wistfully thought, “I wish I could do that!”  Or maybe the family that sees someone rock climbing on TV or in a movie and says to each other, “That looks like fun.  We’re probably too old for that now!”  Well forget about wishing it’ll happen someday, or assuming its too late to learn something so “extreme” – becoming one of those “crazy climber folks” is a lot easier than you might think!  Follow these simple steps and you may be surprised at how soon you’ll be out on the rocks having fun!


Photo credit: Jeremy Sanders 

  1. Find a local gym.  Most good-sized cities have at least one, and every gym should have some sort of introductory class, where you can learn how to tie in to the rope safely, safety commands, and how to use a belay device – that’s the nifty little thing that keeps you off the ground when (not if!) you fall.  That’s how I got started – best $15 I’d ever spent! 
  2. Make friends.  Climbing gyms are also crawling with…you guessed it – other climbers!  The quickest way to learn the lingo and meet the locals it to jump right in and get involved wherever you can.  Climbing is a social sport deeply rooted in community.  Sure you’ll find a few egos that can hardly fit through the door here and there, but for the most part climbers are very open to new folks.  Don’t be afraid to approach climbers that are stronger/more experienced than you and ask for help.  Any climber worth knowing would be happy to offer assistance. 
  3. Get out!  Sure, indoor climbing is fun, but that’s only the beginning.  The real magic happens outside, when its just you and the rock – there’s no colored tape to point out where the holds are, and your end goal is atop a cliff with spectacular mountain vistas (not the i-beams at the top of an industrial warehouse!)  The easiest ways to get yourself climbing outside?  Refer back to steps 1 and 2.  If a gym is at all within driving distance to any type of real rock, odds are that they will be offering guided trips to a local crag – usually gear rentals are included in the price.  These guided day trips can get pretty expensive (insurance for this type of sport isn’t cheap!), so if you’re climbing on a shoestring budget, a better bet is to get to know the local climbers (who are probably climbing most if not every weekend).  Make friends and sooner or later you’re bound to score an invite on one of those trips. 

My first time climbing outdoors was with a guide my husband and I had hired out in Squamish, British Columbia.  We were on a “rest” day during a week long anniversary ski trip at Whistler/Blackcomb Mountain.  After that we were hooked, and we were lucky enough to find a mentor back home that took us under his wing.  He taught us about lead climbing and placing gear, and within months we were confident enough to explore new areas on our own.
 

Photo Manuela Eilert 

Since that very first ski trip rest day, we’ve been able to use climbing as a starting block for countless adventures all across North America!  But probably our biggest adventure yet started in the summer of 2009, when I saw two lines on a pregnancy test – most people would assume that climbing, pregnancy, and babies don’t have very much in common with each other, and that I would have traded my harness in for a stroller.  However, I would beg to differ – climbing played an integral role in keeping me physically, emotionally, and mentally healthy during my pregnancy.  And now that our little Cragbaby is here, he’s as active a participant in our adventures as anyone else!  For a glimpse of what a day in the life of our “Crag-family” is like, check out this short film from Jan Balster. (http://vimeo.com/24808397)


It hasn’t always been easy to continue in our family’s recreational pursuits with a little one around, but the memories we have made along the way have more than made up for some of the challenges and obstacles we’ve faced at certain points on the journey. 


Is climbing a sport for everyone?  No, its certainly not.  But is it a sport for only thrill-seeking, adrenaline junkies?  Most definitely not!  If you could look at my circle of climbing friends, you’d see mommies and daddies, grandparents, children, students, young, old, wealthy, poor, tall, short, fat, people that like to wear polyester…you name it, I’ve seen it.  Few sports with such an extreme reputation have such a diverse population of participants.  But one thing we have in common is that we’re all addicted to playing outside in Creation. 


So if any of this describes you, get to googling a local rock gym in your area!  If you are looking for more resources or ideas on how to get the whole family involved in climbing adventures, feel free to browse through my website, http://cragmama.com or drop me a line at themommy@cragmama.com  .  Until then, climb on!


Creating a Crag Baby from JB-Photo on Vimeo.

WHAT GOT ME INTO HIKING – Guest Post by Ray Anderson of TakeaLongHike.com

About a month ago I asked Ray Anderson who runs the blog TakeaLongHike.com to tell his story of how he got into hiking and what advice he could offer for those hoping to do the same. Take it away Ray:

WHAT GOT ME INTO HIKING

About twenty-five years ago, on a family weekend in New Hampshire, I noticed a trailhead parking sign for Mt. Liberty. We were not prepared for a mountain hike, but the family gamely started up the trail. It was tiring, and when it began to snow, about two-thirds of the way to the summit, we turned around.

The following year, wearing proper footwear and clothing, we started the trek earlier. The picture below is of my family and me on the summit of Mt. Liberty that day. It’s one of my favorite family photos, and, for me, sparked a continual interest in hiking.

We traveled to New Hampshire every year on Columbus Day weekend. Either before that weekend or after, I took vacation days to climb the 4000 foot mountains. My sons joined me once, but the weather was foggy and rotten, and they complained about not seeing a thing, which was true on that day.

For me, the passion built. I went on to climb all the 4000 footers in New England–67 peaks. It was soon after this that I contemplated hiking the Appalachian Trail once I retired. Something about the quietness of nature, the beautiful scenery you could experience on foot, the exercise, the feeling of accomplishment relaxing on a mountain peak–all these things and more led to an early retirement.

My wife, Nancy, realized thru-hiking the A.T., was a big goal of mine; she didn’t squawk at all and supported me. On my last official day in the corporate world (my boss was good to me–thank you, John), I stepped north on the A.T. in Georgia that morning. What a way to retire! What an adventure!

I’ve since hiked the Pacific Crest Trail, The Long Trail (Vermont), and much of the Continental Divide Trail. That sense of adventure still beckons. As long as I’m able, I intend to get outside and follow my feet.

You can do the same; it’s not hard to get started in hiking. If you’ve already done some walking in local parks and would like to take longer hikes, go to an outdoors store and tell them your plans.

They will fit you into trail shoes (low-cut boots). Don’t wear cotton clothes–buy nylon or Gortex. You may not need trekking poles yet, but get some type of small backpack to start off. The people at REI, EMS, and similar stores, can help you.

Now pack some water, some munchies, and get out there. Tell people exactly where you are going and when they can expect you back. Pack your cell, but turn it off. Finally, just keep putting one foot in front of the other.

Happy trails!

Ray Anderson
www.TakeaLongHike.com

Ray also recommends the two following links:
www.rei.com  www.easternmountainsports.com

What is Tenkara Fly Fishing? (Jason Klass)

A while back I got in touch with Jason Klass of Tenkara Talk. As can be guessed by the name of his site (and previous projects like Gear talk with Jason Klass, he’s an outdoor aficionado with a passion for fishing. He kindly agreed to put together an article about Tenkara’s line of backpacking fly fishing rods. I’ll let him take it from here:

Tenkara 101 for Backpackers
by Jason Klass
Have you always wanted to bring fishing equipment on your backpacking trips but thought it might be too heavy, bulky, or too much of a hassle?  Do you already fish on the trail but want to lighten up your gear?  If you answered yes to either of these questions, then Tenkara fishing might be just what you’re looking for.
Tenkara is an ancient method of fishing from Japan which uses only a rod and a line (that’s right, no reel!).  Traditionally, the rods were made of bamboo, but today’s modern Tenkara rods are made of much lighter graphite and fiberglass.  Tenkara rods are fairly long by Western standards (usually 11 – 15 ft.).  Since the line is fixed to the end of the rod, the longer rod length gives the angler more reach.  Lines are typically the same length of the rod or longer. 

Tenkara rods are telescopic and this is probably the greatest advantage for the backpacker.  For one, all the segments collapse in on each other and seal with an end plug.  The rod itself essentially becomes its own protective case so there’s no need carry a bulky, heavy case.  This on only saves weight, but when closed, the rods are extremely compact and will easily fit in the side pocket of your pack.  


I like to take advantage of fishing opportunities along the trail on my way to camp and Tenkara rods give the backpacker another advantage:  quick deployment.  You can literally grab the rod from your side pocket, extend it, and be fishing in a minute or two without having to worry about rod sections lining up, the reel, the leader, etc.  I’ve lost many fishing opportunities because it took me too long to get my Western fly rod set up.

By now you might be wondering how you would catch that trout in the middle of the lake that’s 70 ft. away if you’ve only got an 11 ft. rod with an 11 ft. line.  The answer is simple.  You can’t.  Well, actually you could if you waded out there.  It’s important to keep in mind that Tenkara fishing is not meant for distance.  It’s meant for small streams and to be a simple technique that connects you more to the stream and the fish, rather than your equipment.  If you backpack near streams and small ponds or lakes, Tenkara is perfect.  If you need to cast 80 ft and fish in 20 ft. of water, not so much.


You might also be wondering how you land a fish if there is no reel.  If you think about what Tenkara is designed for (small streams and relatively smaller fish), then the question becomes moot.  I fished many years in small streams on backpacking trips with a Western fly rod and never once actually used a reel to bring in a fish.  I just tilted the rod back behind me until I could reach the line, and pulled the fish in that way.  And that’s exactly how you do it in Tenkara.  Why carry a reel if you’re not going to use it?
Another advantage of Tenkara fishing is that the simplicity allows you to carry less gear.  This is literally all you need:  A Tenkara rod, a line, some tippet material, nippers, hemostats, a small fly box with flies, and maybe some fly floatant.  You don’t need to carry a 20 lb. fishing vest on your backpacking trip.  Check out this video on what I carry in my ultralight fishing kit on my backpacking trips:
I could go into a lot more technical detail about why Tenkara just makes sense for backpackers, but there is plenty of info on the web for you to research it and come to your own conclusion.  One last point though.  Tenkara fishing is not only practical and effective, it’s also extremely fun and incredibly easy to learn.  I used to be a fly casting instructor and watched countless customers suffer through months or agonizing practice and frustration just to learn basic casts.  With Tenkara, I taught my wife (who had never fished a day in her life) to cast in minutes and on her first try, she caught 3 beautiful cutthroat trout.  Since it’s so easy to learn, Tenkara is also great for kids.
So, whether you’re an experience backcountry angler or just thinking about getting started, do a little research on Tenkara and you might find it’s just the right fit for you.
Here are some resources to get you started:
Tenkara USA
Tenkara Bum
Tenkara on the Fly
Thanks Jason! Don’t forget to check out both of Jason’s site: