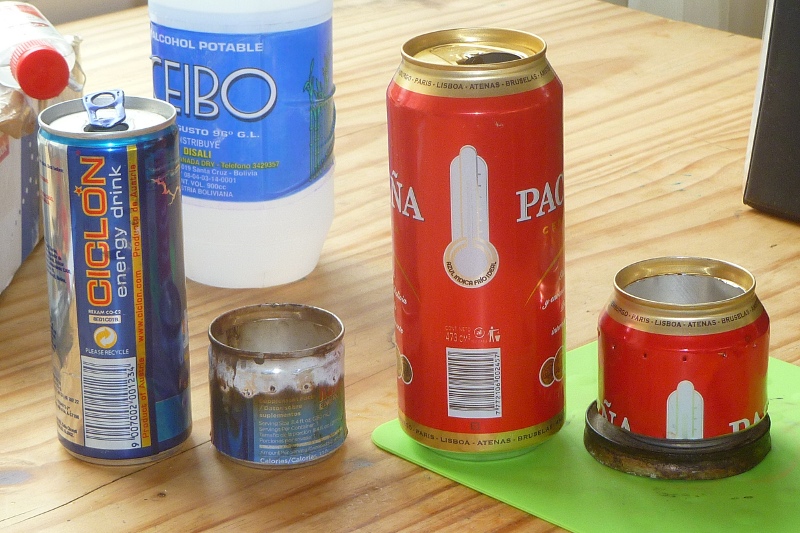
I felt it was time to post an instructional on how to make an alcohol stove and keeping it even greener: Just use 1 can. I’ve used this design many times and I find it to make a more efficient stove than using 2 cans because of how the inner wall works.
This design can be used for any tall can whether it be the energy drinks like monster, the red bull style cans or full sized pop cans. The only thing is that you need to be extra careful while cutting not to make mistakes.
See the video below and continue for the instructional:
What you need:
A tall beverage can, whether that’s a beer can, energy drink can or other, it just needs to be the tall version
A ruler
an exacto knife or other blade
a pair of scissors
a marker
pliers
a lighter
and a push pin
Mark and Measure:
Now the first thing you’ll want to do is to measure your can. You’ll want to divide the length by 3 as you’ll be making 3 pieces for the stove. The can I used was just over 6 inches so I measured and marked at regular intervals around the can 2 inches from each edge.
Pop the Top:
Before you cut the can you’ll want to remove the top. To do that you’ll need the exacto knife or craft knife. You’ll be scoring the channel around the inside edge of the top of the can. Keep working your way around until you’ve almost cut through. Next, push through with the knife at one point and work your way about 1/4 of the way around the channel. The next part is cool. Just push near where you’ve cut and the whole top will start to tare long the scored line. It’ll pop off and you can move on to the next step.
Cut it out!
Next you’ll want to cut the can into its 3 pieces. I use the exacto knife to cut along the dots that I made while measuring until I have about an 8th of the can to go. Then I take the scissors and finish off.
Now, you’ll notice a seam on the can from where they printed the colors on. Cut up the seam until you reach the other line you drew with the marker. Next use the scissors to cut along the other line all the way around. That’s all the cutting you’ll need to do. You now have 3 pieces and just have to connect them all together.
Both pieces of the can are the same diameter so what I like to do is take the bottom piece and crimp the edges with the pliers. I twist and bend the edge in so that the upper can will slide onto the top.
Pull Push it all together:
Once that’s done, you can see how the stove will be put together. You coil the middle section of the can inside the bottom piece to make an inner double wall and then slide the top portion over them both.
If you find it hard to fit the cans together without damaging them, try heating the upper piece of the can with a lighter. This will make it expand and will give you 10 seconds or so to slip the pieces together.
The inner wall needs to slide into the channel on the inside of the top and bottom pieces of the can. I tap the two cans together and then check the inner wall guiding it into the upper channel so that it makes a good seal.
Let’s Jet:
Now that it’s together we just need to mark the jets. The key to the stove are jets that are high enough in the can to prevent the fuel from leaking and low enough to allow the jets to continuously heat the stove. It’s usually between half an inch and 3/4 of an inch from the top of the can. I spacing these jet about half an inch apart. On the narrow diameter cans try 1/2 a centimeter or 3/8 inch apart.
That’s it. This stove is pretty quick and efficient. On my first run it boiled 2 cups in a little under 5 minutes. It did a liter in 7 and a half. Using the wider cans like this you can easily boil 2 litres of water without refilling it.
Thanks for checking this out. Please let me know what you think. Please comment like, dislike and or subscribe! We’d love to see a video response showing your stove in use.
 The Outdoor Adventure Giving you tips, tricks & recommendations to help make adventuring in the Outdoors fun, safe & exciting for you and your kids.