I was reminiscing about some of the fun family trips we’ve done over the past few years and I came across a video that I never ended uploading. It was a trip to Valle de la Luna just outside of La Paz, in Bolivia.
Do you have any great family memories or videos? Please post them or links to them below.
The key to any successful cool-weather, outdoor adventure is to stay warm and dry, and Terramar’s TXO Body-Sensor series top and bottom-wear garments are a comfortable choice to this end. Soft, breathable, fast drying, they are made from carbon-based, anti-microbial yarn that retains and radiates body heat back to the skin. The resulting moisture-wicking and long-lasting odour control features make them an ideal choice as your base layer solution. The individual TXO 1.0, 2.0, and 3.0 garments are designed and constructed to work together based on proven principles of layered clothing strategy for keeping the body warm and dry with good air circulation.
Why is layering important? Layering provides finer control for managing body temperature and comfort compared to limited “on/off” only control of non-layered approaches. Consider an extreme scenario hiking uphill through the snow in subzero temperatures with a thermal control strategy that consists of nothing more than a heavy winter parka over bare skin. The hiker quickly becomes overheated with exertion, his only option for cooling being to remove the jacket, exposing damp, sweaty skin to the extreme elements. While this may provide temporary relief, the body cools too quickly, starts to shiver, and the skin begins to burn from the biting chill. The only option is to once again don the heavy parka and press on with only a matter of time before the body is again overheating. This ineffective approach allows only “on” or “off” control with no comfort in between.
By contrast, the Terramar BASELAYER TXO Body-Sensor system works on the proven principles of multiple layers of clothing, allowing finer comfort control by simply adding or removing layers as exertion levels and environmental conditions change.
The base layer is undoubtedly the most important, designed to wick moisture away from the body as quickly as possible. However, it is not sufficient to select a fabric simply for its absorbent properties; it must be able to quickly release that moisture to an outer layer allowing itself to dry, otherwise it will continue to zap the body’s heat. This will be especially noticeable as exertion and climatic conditions decrease.Pro-mesh ZVP ventilation panels on the back side of the garment and under the arms and armpits facilitate good air circulation.
Terramar TXO 1.0 garment lies closest to the skin and is extremely light weight and comfortable at just 120 grams. I felt it was perhaps a little too snug towards the back of the arm pit – that said, it could be more a matter of body maintenance (ie. lose some weight!) than garment design. As with all TXO layers, it is constructed with all flat seam construction which means no uncomfortable chaffing.
The X-Odor technology on all TXO performance layers boasts moisture and odour control. While out snowshoeing, I was pleased to feel warm and dry instead of damp and clammy. X-odor fabric technology did not eliminate odour, but it was noticeably less offensive at the end of the day than another garment under similar conditions.
The next outer layer(s) are designed with increased focus on insulating properties in addition to moisture wicking features to support the transport begun by the base layer. As such, you should always wear a lower number garment under a higher number garment for optimal performance. I did not have a 2.0 garment to review, but I did have the outer 3.0 fleece. Extremely soft and comfortable with the same care to avoid chaff points such as seams and also behind the zipper.
Another product from Terramar is the merino wool Beanie. I confess, when it first arrived, I thought it was little more than a shower cap – in fact, less than a shower cap, seeing as it isn’t even waterproof! However, merino wool has excellent insulation properties and a popular choice for active wear solutions. Although not entirely flattering, it is very comfortable and provides good warmth. The thin weave design makes it suitable as part of a layered garment strategy for your head; you can wear it under a ski helmet or another hat or toque.
I have been satisfied to use the Terramar TXO Body Sensor 1.0 & 3.0 tops and bottoms on several early morning walks and mountain snowshoe outings. An additional layer was needed when biting winds sprang up and when standing around, but the Terramar TXO Body Sensor Series are effective as intended – as part of a sensible layered strategy for cool weather outdoor activities. So, if you are still struggling to get finer control over managing your body temperature in the great outdoors, why not consider the quality, light weight comfort solution from Terramar this season?
Our review of the Tubbs Snowshoes‘ Mountaineer Snowshoes comes in the form of an excellently produced video made by our new reviewer Tim. Please take a look at the video below to see his take on this incredibly versatile piece of gear.
If you have any questions, please feel free to post them below and we’ll get back to you with the answers as best we can. We will be updating this post with more information so stay tuned!
Feel like keeping up to date with the on social media? Why not follow and like on twitter and facebook:
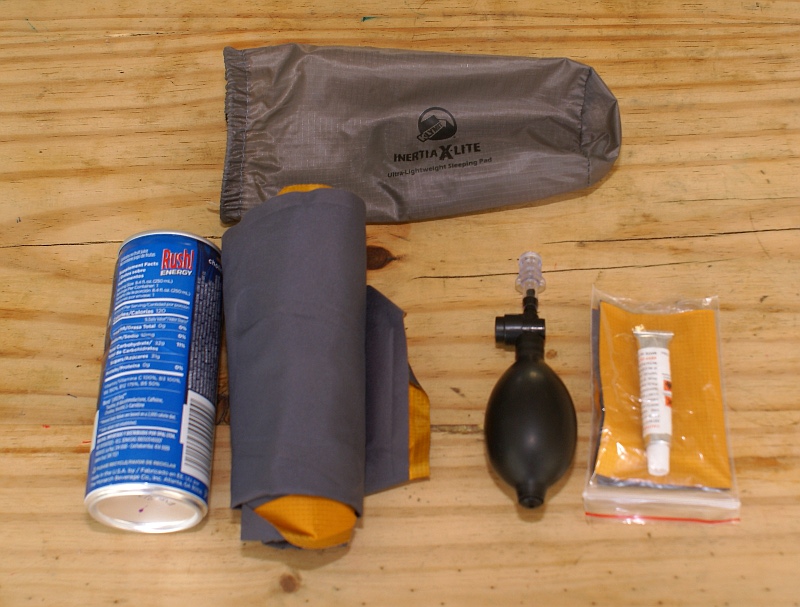
When it comes to sleeping on the trail, I’ve realized that it’s not worth compromising sleep quality. I’ve had a closed cell foam pad for some time, but when I turned 30 on a hike this past June I knew that it was worth investing a bit of money on something nicer. I had searched for a long time for a lightweight sleeping pad that didn’t take up a lot of space, and I decided to throw money at one of Klymit’s many pads, the X-Lite.
Just the Facts
Length: 42″
Width: 18″
Height: 1.5″
Weight: 6.1 oz
Comes with:
Stuff sack
repair kit
Dry-inflate pump
Packed size: 1.5″ x 6″
The Details
The X-Lite is a 3/4 length version of the X-Frame, a sleeping pad designed using Bodymapping to minimize the amount of weight and pad needed, while making sure your body stays comfortable. It provides lots of support for the head, shoulders and waist, but minimizes fabric and padding around the parts of your body that don’t need it. This allows the X-Frame to drop down to a lightweight 9.1 ounces and the X-Lite to weigh only 6.1 oz. It’s an ingenious concept that I see as one of the few revolutions in sleeping pads that we’ve seen in the last 10 years.
The bodymapping has another benefit. The whole sleeping pad packs down to about the size of an energy drink can. My biggest complaint about the closed cell foam pad is the amount of space it uses. This can’t be beat for size, weight or comfort.
When you first look at the sleeping pad you’ll probably think something along the lines of, “This is good for back sleepers, but useless for side sleepers”, at least that’s what I thought. As a guy who divides his time about 50/50 between side and back sleeping and having using this pad for over 60 nights now I can happily say that it works for both. The padding in the key zones makes it comfortable to sleep in both positions.
Another benefit of these body mapped pads are their loft pockets. If you do using a normal sleeping pad, you’ve probably heard that compressed insulation (read the underside of your sleeping bag) doesn’t do much insulating. With the empty spaces in the pad, your bag can loft and your sleeping bag can do its job.
If you worry about falling off the pad or are a wriggly sleeper try putting the x-lite inside your sleeping pad. You get all the benefits without slipping off it in the night.
The other concern I had was not having a full length pad. I recommend taking your current sleeping pad and using it only for your head and torso. Try using your empty pack to elevate your feet. You’ll find that your legs probably don’t even touch the ground at all. This is essentially how to use a 3/4 length pad and you’ll probably find it serves you just fine. If not, try the x-frame for an extra 3 oz.
The one thing that I had to get used to was the width. At 18″ wide I find that my arms hang down off the edges a bit.I had to get used to sleeping with my arms crossed or hands folded. I’m used to it now, but if I was to improve it I’d add another 2 inches to the width to make it a bit more luxurious.
Inflation
The pad can be inflated with either the mouth valve or the pump connect. If moisture isn’t an issue, it is recommended that you blow it up with your lungs (about 3 breathes for me) and then top up to the pressure you like with the inflation pump. If you are in a really cold environment and you don’t want moisture in the pad, you can work away with only the pump. It will take a while, but it works.
The mouth inflation valve has three settings: Open, closed and locked. Open is for inflation and letting the air out. In the closed setting, the valve is shut, but it acts as a pressure relief valve. It is recommended for when you top up the pressure with your hand pump. If you over inflate, the valve will open and the pad won’t burst. The Locked setting is for when you’re using it. It makes sure the air doesn’t escape when you’re sleeping on it.
The Pump itself works with a universal connect and even has a pressure relief button to lower the inflation if you need to so you don’t have to open the mouth valve and start all over again.
Conclusion Klymit has created some really excellent pads for backpacking. The X-Lite is perfect for me. I’m incredibly impressed with its comfort, packability and weight. The only improvement for me would be to make it a bit wider.
If you’re looking for a new pad, check them out. They don’t just do minimalist pads. I’m probably going to pick up the Static V for my wife, who wants something a bit more luxurious for our backpacking adventures.
A month or two ago I had a guest post on how to make night vision IR goggles. It was an interesting article, but after trying it for myself I found it wasn’t working as expected. It turns out that while the goggles do help you see Near Infrared light, it doesn’t help you see the IR spectrum and therefore is useless for making your own night vision goggles. I decided to explain it with a video, but here’s the rundown.
The IR spectrum is mostly invisible to the naked eye. What you can see is what’s called NEAR Infrared. It’s only a very small amount of the IR spectrum. The Goggles with blue and red screens only filter out anything that is not Near Infrared. What’s left is a very small amount of light the NIR or Near Infrared range. The goggles don’t do what IR night vision goggles do: Transform the invisible IR spectrum into visible light. For that you need technology.
All IR vision technology processes the IR light and translates it into an equivalent Visible light spectrum. If you’ve watched the night shots on the BBC Planet Earth series or watched any night shots on TV you’ve seen this. Many camcorders (those with night vision) already transform some IR light into the visible spectrum (see video for example), but they’re not purpose built so don’t do as good of a job. It does show you what you would need to do to make it work.
To do real IR goggles, you’d need an IR light source to amplify this invisible IR spectrum and a way to convert IR light into visible light. In the end though, if you’re trying to sneak around with an IR flashlight you’d be seen by anyone with real night vision goggles.
This is one of those DIYs that would need a lot of resources and understanding of optics. Or you can just go out and drop the cash on a proper set of Night vision goggles that already have everything you need!
In early August, I received an email from someone named Julian in the USA who wanted to hike the Choro Trail with a few friends. I jumped at the opportunity to hike this trail again and we started making plans. Things changed after Julian got sick the day before I trip up to the trail and instead of just bringing along gear for some video reviews of gear, I was placed in the position of documenting the trip for Steven N Newman of worldwalker fame.
Steve hiked across every continent back in the 80s and wrote about his 4 year trek later in a book. It documents his time learning about the different cultures he came across… and getting to know the inside of various jail cells (as a suspected spy!). Steve wanted to put together a video for the children of the Ohio School system to encourage kids to get outdoors, try new things and learn about the amazing planet we live on.
After editing, getting interrupted by other things in life I finally managed to complete the project. Feel free to take a look at the Choro Trail, but with an emphasis on the culture and history of the area.
Feel free to check out Steven’s website and buy a digital copy of the original worldwalker book.
www.StevenNNewman.com
A few months back I was browsing twitter when a tweet crossed my eye. It was written by a survival training company and it said that it was impossible to start a fire with water. The writer was referring to a recent survival show episode where the co-host supposedly did just that. I saw the episode and admit that it was a bit suspicious. So I went and did research on the physics.
It turned out the science was there (as I vaguely remembered from my grade 11 and 12 physics class). Light can refract through water and depending on the shape of the vessel can be redirected. Theoretically, it was possible if you could get the light to focus enough to create a hot spot (like using a magnifying glass to start a fire).
Back to twitter. After a somewhat heated debate (he later removed all his tweets from twitter) I took him up on the offer to try it, prove it and video it. I took two continuous shots from two different perspectives. I mixed them together, but each shot shows the clear focusing of light and smoke coming off the paper.
I was able to get a coal and that’s enough to prove that this method can be used to start a fire. Take a look at the video I put together and try it yourself. I’d love to see a video response from somebody trying it.
How to:
What you’ll need is a piece of plastic wrap used for food, and water.
Steps:
Pour the water into the plastic.
Close the plastic together at the top.
Twist the bubble of water until it is sealed.
Continue twisting until the bubble is firm.
Take it outside on a clear day (it’s easiest when the sun is directly overhead).
Manipulate the plastic bubble until the light passing through the bubble focuses into 1 point.
Put tinder where the focal point is and wait till it combusts. *tip: the darker the tinder, the less light is reflected and the easier it is to create a coal.
Earlier this year I was given a set of Polarmax.com‘s Warmest Baselayers (the Comp 4 Tech Fleece line). The sent me the PMX Hoodie and the Comp 4 Tech Tights. I’ve had several months to put them through their paces and I’m ready to give them a solid review on a solid product line.
Check out the long term review and accompanying video below:
A Quick Look at Polarmax
Polarmax is a US company that puts out 100% Made in the USA products that boasts a lower environmental impact by sourcing, producing and making their products within about a 10 mile radius.
Product Features
Polarmax products feature 2 main additions to the fabric: acclimate dry and scent prevent.
Acclimate dry is their wicking fabric that is a blend of polyester and spandex. It pulls moisture away from the skin and dries off very quickly.
The Scent Prevent technology is an anti-microbial anti-odor proprietary tech that keeps you smelling fresher for longer.
Does it work? A resounding yes. No matter how hard I hike in this gear, you never get that uncomfortable, wet feel. There’s no peeling off soaking wet base layers. The moisture dissipates. The only negative experience was wearing an inferior base layer underneath which held the moisture. After taking that off I found the PMX hoodie comfortable to wear even though it had been next to a wet cotton shirt. The compression tights are the same. It is going to be damp, but 5 minutes in the wind is all I’ve ever needed to get rid of any remaining moisture.
The Scent prevents does work, about as well as you can get with synthetics. It’s not going to outperform merino wool, but it does a good job at fighting smell. After multi day trips I’ve walked away with minimal stink and smell, so it does do what it says it does. I’ve yet to find any product (merino wool included) that lets me walk away from a trip smelling as roses.
PMX Hoodie It’s a solid hooded top that keeps your head and neck warm. It has become a go to item for every one of my cold weather hiking trips.
The only improvement would be to the PMX Hoodie. The thumb holes that keep your sleeves high and prevent cold wrists do their job, but they’re placed in a way that requires the sleeve to twist a bit to fit properly over the thumbs. They could be better placed, but they do a good job at what they are meant to do.
Facts:
8.5 oz. / sq. yd
Athletic Fit
90% Acclimate Dry, 10% Spandex
Heavy Weight 4-Way Stretch Fabric
Tech Face / Brushed Fleece Interior
Acclimate Dry Moisture Wicking
Stretches for Mobility
Anti-Microbial / Anti-Odor Protection
Flat Seam Construction for Ultimate Comfort
Machine Wash/Dry; Easy Care; No Shrinking
100% Made in the USA
Price: $70 online
Comp 4 Tech Tights
They looked too small when I opened up the package, but the stretch fabric has a great fit, keeping your muscles warm. I’ve used them from everything to summit attempts to downhill mountain biking to just keeping me warm in my sleeping bag at night. A really great product that is another go to item for backpacking and hiking.
I’m always looking for new skills to learn and new hobbies to try out, and one of my favourites right now is leather working. My wife was looking for a shoulder bag for carrying some larger items, so I decided to sit down with her and draft up a plan. After chatting about dimensions, features, etc I went to work with the cow hide I’ve had sitting around with me.
I’ve made belts and sheaths for my knife, but I wanted to do something bigger. This project was a big task to undertake so I worked at it in free time, when I needed a break from my schedule and in a week or two I had it finished. It took a bit longer as I decided to pull out a video camera to document the “making of”. Now that it’s all done if people are interested in how I did it, I might be able to put together some DIYs.
I’m certainly just an amateur, but it’s amazing how much you can do with a bit of leather and a couple tools. These tools above are the only ones I used!
Well, please watch the overview of the project below and let me know your thoughts. What leather projects have you been making? Do you have any tips for me?
I’ve had a Tilley hat for over 3 years now. It goes with me everywhere. It’s the perfect hat for summer weather to keep sun and rain off my head. It breathes well too keeping my head cool in hot weather. That’s excellent for late spring to early fall, but it’s no good for winter. As a result I found myself looking for something to handle winter, but that offered the same comfort and versatility as my Tilley Nylamtium® Hat. Needless to say, I was happy to have the opportunity to get my hands on the Tilley Tec-wool Winter hat.
The Tilley Tec-wool is a medium brimmed wool hat that comes with earwarmers that tuck out of the way when you don’t need them. It’s a versatile hat that can serve for outdoor and urban adventures.
Me in my Tilley Nylamtium summer hat.
First off, I need to explain why you’d put down $105 on a hat. It’s a lot, I know, but look at what you’re getting. A LIFETIME warranty. If it wears out in your lifetime they’ll replace it for free! That means you’ll literally never have to buy another hat. If you lose it within two years of purchase it’s insured against loss too! Add to that the fact that it’s great fitting, great looking and extremely functional and you’ll start to see why it’s worth dishing out a bit more for a Tilley.
The Tec-wool hat is extremely comfortable. I chose the same size as my other Tilley and this one fits perfectly. I quickly retired my old Tilley for the cold weather and pretty much always wear the Tec-wool, except in hot weather. The Tec-wool is treated for rain and snow so it is at least resistant to inclement weather. I’ve been out in a snow and rain storm in the hat and in light rain it’s great. Extreme rain storms are a bit too much for the hat, but you’ll be wanting something waterproof in those conditions.
Hiking on Huayna Potosi in Bolivia at 17 000+ feet
As I said, the Tec-wool comes with built in ear warmers that fold away when you don’t need them. With the earwarmers folded up or worn down, the hat stays very comfortable. Better yet, you’d never know that it had earwarmers when they’re folded inside! You can still look fashionable when you don’t need your ears warmed! When I have needed the earwarmers, I’ve found them to work really well. They’re big enough so that they easily cover your ears completely and don’t allow wind or cold in. They’re not just a gimmic. I hiked up to a glacier in Bolivia at 4 AM one morning and my ears never got cold, despite the wind and below freezing temperatures. I’ve taken them up to over 17 000 feet and stayed comfortable all the time. No brain freeze!
Another cool feature of the Tilley (besides the cool secret pocket inside the hat) is that it’s crushable and packable. No need for hat boxes here. If someone sits on it or if you need to shove it in your pack or pocket, you don’t have to worry about damage. For the Tec-wool it means I don’t need to worry about taking it outside and using it on my adventures, which is good as it’s my wife’s favourite hat for me.
My Tilley on the start of the Choro trail (a 4670 meters or 1531 feet).
The only downside about this hat is that it’s dry clean only. It is wool after all, but it’s still a bit of a downside when I can wear my other nylon Tilley in the shower or throw it in the laundry machine to clean it. That said, it’s a small price to pay for a hat that’s both functional and fashionable.
Conclusion …continued below video
If I would have to choose one hat, I’d definitely choose the Tec-wool. It’s great for almost all weather (it insulates in cold weather and breathes well in warm). The brim does a good job of keeping the sun off your face (although the Tilley wide brim hats are unbeatable for that). It is a incredibly good looking hat that is just at home with dress clothes as it is in your hiking wear. Finally and more importantly, when it comes to hats it’s incredibly comfortable to wear. Add this all up and I can tell you that I’ve never had a better hat!
Head out to your local outdoors store and check out this and the other Tilley hats. You’ll be impressed with everything about these hats.
Do you have your own Tilley or know someone who does? Leave a comment below! We’d love to hear what model it is and what your/their model is and what your opinion is of it!
About 4 or 5 months ago I had a box arrive from Columbia: A pair of their brand new Powerdrain shoes. I puzzled over what to do with them and at first look wasn’t sure they were a fit for me, but try them out I did and I found that in a very short time they became my go-to shoe for, well, pretty much everything.
The Powerdrains are somewhat of a minimalist shoe and the biggest goal they seem to have in mind is a water shoe, but in my experience they are much, much more.
Traction
If you’re new to Columbia or haven’t seen them in a while, you’ll be pleased to know that they’ve grouped their new products into different categories within their “OMNI” line. It makes it really easy to identify the key feature of the item. For example, these shoes are part of their OMNI-GRIP line. They use a high traction rubber that sticks really well to all sorts of surfaces, especially when wet, I can testify to that after taking them twice down one of Bolivia’s Incan trails where the 500+ year old stone trail is wet, steep and in many places polished to a slippery shine.
Although not an aggressive tread, they handle smooth, wet and slippery surfaces incredibly well.
The sole is divided into 4 parts, to make it more flexible and allow your foot to curve around uneven surfaces. It works really well, but may take a bit of getting used to if you’re accustomed to hiking boots. I prefer to hike in trail runners where the load suits it and really appreciate the flexibility. It reminds me of my summers as a child where I would go whole days through trails and streams barefoot, but with the added protection of rubber and foam soles. You do have to be careful of sharp rocks as the gaps between the rubber can poke at you, but it hasn’t caused any issues for me in the couple hundred kilometres I’ve taken these on roads and trails… mostly on trails.
Hiking down an Incan path on La Isla del Sol the Powerdrains gave
excellent traction, even when weighed down by two kids.
When hiking down the Incan Trail (called the Choro Trail), I took my powerdrains, but planned to use another pair of trail runners and save the powerdrains for river crossings and slippery sections. The trail runners (ASICS) left my feet so sore and were so uncomfortable (even with my feet taped) that I switched to the powerdrains on the first day. I’ve never worn the other brand’s trail runners again. When I did the Choro Trail the second time I only took the Columbia Powerdrains and didn’t have a single problem descending the 11000 feet on the 40 mile trail.
Drainage
Because you can’t keep any shoe waterproof, Columbia designed the Powerdrain to allow water in, but get rid of it as soon and as fast as possible. It has a really cool system to allow it to do so, utilizing the uppers, the inner sole and the outer sole.
The upper has a mesh exterior and foam interior which is dotted with holes. These allow the shoes to breathe well and water to enter and exit easily.
The sole itself has 9 holes in it that allow water to flow through from the inside of the shoe and drain out. I’ve found this to be great as the water often gets trapped in my other shoes and keeps them soggy and uncomfortable. It’s pretty fancy and works well because of the design of the inner sole of the shoe.
The screen of my Powerdrains after 3 days on the Choro Trail in Bolivia.
The inner sole is perforated allowing any water that doesn’t exit through the sides to drain into the bottom and out through the holes. If you lift up the inner sole, you can see a fine mesh attached to the sole that allows water to flow through it, but prevents any small debris from getting stuck in the drainage ports of the outer sole.
Comfort and Lacing
One of the things that made me worried about taking the Powerdrains on hard hikes was the lacing system. It uses one of those elastic pull systems, but the quality is all there. Despite my fears, it never slipped (unlike my shoes, even when using a double bow!). It always stays snug on my foot, but the elastic allows the lacing to stretch just enough when moving to keep your shoe from getting uncomfortable.
Their light weight and flexibility make them a very comfortable shoe.
Toe Cap
A huge benefit to this shoe is its toe cap. It’s a strong synthetic that keeps your toes from getting dinged up on rocks, but it does have a downside (on the 2012 model) that Columbia says they’re fixing for next year (2013). The toe cap is starting to separate on both of my shoes after a couple hundred kilometers of very hard use. Also, where the outer mesh of the shoe’s upper connects to the corner of the toe cap it has worn through from abrasion. Now, this is after a lot of hard use, and it’s really only an aesthetic problem at this point. It hasn’t compromised the structure or quality of the shoe.
That is the only real downside I have to the shoe, and that’s not much. I look forward to seeing how Columbia has planned to fix it for next year.
Overall thoughts The Powerdrain is an excellent shoe that serves for almost every walking or hiking situation. To call it a water shoe is to insult its capabilities. They can handle rough terrain, steep uphill and downhill and are excellent on slippery terrain. The drainage system is well thought out and very effective. Oh, don’t expect the withe and yellow to stay white for very long!
I’m seriously considering taking a 2013 pair like these on the John Muir Trail next summer.
If you’re looking for a lightweight minimalist shoes for hiking and trails, especially where you expect it to be wet and slippery, check these out, you won’t be disappointed.
 The Outdoor Adventure Giving you tips, tricks & recommendations to help make adventuring in the Outdoors fun, safe & exciting for you and your kids.