When it comes to backpacking, there’s one thing I hate, and that is stuff that gets wet in my backpack… Especially if it isn’t supposed to be wet. Stuff Sacks are good and drysacks are better. Sea to Summit‘s line of Ultra-sil Nano drysacks is not only good or great, it’s excellent.
When you see drysacks, they usually fall into one of two categories: DWR or silnylon. DWR stands for Durable Water Resistant. It’s a water resistant finish that is sprayed onto nylon and which results in a temporary and limited water resistance. Depending on the brand and quality that resistance could be enough for you, but it’s not guaranteed to keep your stuff dry. Also, It does wear off over time. Silnylon on the other hand is completely waterproof. They take silicon and they impregnate the nylon with it resulting in something completely weatherproof and much longer lasting than the cheaper DWR coated fabrics.
Usually, this would make the silnylon a heavier choice, but because of their choice of fabrics, the Ultra-sil drysack from Sea to Summit is SUPER lightweight. I mean really really lightweight. You have the benefits of silnyon, but without the weight. To give you an example, the 13 liter bag that I have weighs in at only 1 ounce. That’s much lighter than the DWR bags I’ve purchased in the past. Now obviously it will be a bit more delicate, but not much: and so far, it seems like a worthwhile compromise.
Sea To Summit carries a full range of sizes for their ultrasil nano drysacks, ranging from 1 liter (at 0.5 ounces) all the way to 35 liters (at only 1.5 ounces). If you like to keep your stuff organized and dry, but don’t want to carry extra weight, this is definitely something you should check out.
As time goes on I’ll be letting you know how the bag holds out to normal backpacking use, but it’s definitely making it into my pack for this summer’s excursions!
Oh and it’s so light weight, it can double as a beachball when you’re bored at basecamp!
Have you tried out Sea to Summit gear before? Can you recommend any other sea to summit gear that’s worth adding to our pack?
A little while back, I was sent an unbottle from a company called Vapur. Actually, it’s more of an anti-bottle. It’s a vessel for holding water, anyway, and in addition to being BPA free and light, it is also packable when not in use. It’s the Vapur Element.
I’d been keeping a casual eye on the battle between hydration bladders, nalgene users and plastic bottle users and was aware that there was a growing trend to these half bag, half bottle options. I had been meaning to pick one up to try it, and fortunately for me, Vapur sent me one to try out.
It may go against what it stereotypically means to be a guy, but I read the instructions before trying it out. (pausing for the gasps of amazement to die down). The first thing that struck me was that it’s BPA free. I know this is becoming the standard, but it’s still something I look for in a drinking vessel. It’s got to be something that I can keep long term and that won’t break down and make me sick.
After that the cool dishwasher safe feature caught my attention. One thing that prevents me putting electrolyte drink powders in my water bladder is the difficulty of cleaning. I can’t get the smell out and I can’t scrub the inside out! I’m looking forward to putting drink mix in their and then trying out the dishwasher friendly results!
Although it looked tough, I was kind of concerned about how it would hold up under a hot dishwasher’s breath, so I devised a hard wearing test. I poured near boiling water in it several times on an 3 day outdoors trip and it didn’t get weak or damage any seams. Hey, it even served as a good hot water bottle!
Apparently you can freeze it as well and use it as an ice pack… I smell a test coming on!
This made in the USA product also has a really neat nozzle or head. It shuts solidly thanks to an inside seal and firm squeezing didn’t cause any leaks. It has a carabiner type ring on the top that can be hooked on to your pack or even directly on your belt and it doesn’t disturb me at all while I walk. That same loop can be used to whole the rolled up antibottle tightly to save extra space in your pack.
Oh and another benefit was that by blowing it full of air I had a really nice, soft pillow for sleeping on at night.
Although I haven’t completely abandoned my water bladder, I am impressed with how compact and lightweight these vapur elements are. I definitely will carry one with me this summer to help me decide what will work best for me and I would definitely recommend it to anyone that is looking for an alternative to that heavy nalgene bottle!
Do you use a Vapur or similar product? What do you think? Would you recommend it to others?
Finally the plans are set, in fact, as of tomorrow morning (Read May 7th), I’ll be out and suffering… I mean surviving!
We spent 2 days scouting locations and we decided on the best of two. I haven’t made specific location plans, but I’ve decided on a lake that works at 800 meters. There aren’t a lot of wild edible plants, but there are fish and wild game. We should be able to set ourselves up and get some interesting shots to share.
My dad is coming as a semi-participant, semi-safety camp in case things go wrong.
Here’s the gear I’m taking:
SOG Aegis black TiNi – Provided by SOG for the trip
SOG Hand Axe – Provided by SOG for the trip
2 Survival Straps – Donated by Survival Straps for another project
2.5 Liter lightweight aluminum pot
Adventure Medical Kit survival pak
1 Extra mylar blanket
Super cheap waterproof poncho
3 LED lights
small survival fishing kit (a couple extra things to add to the one in the AMK pak)
Extra Paracord
flint striker
2 pieces of processed cheese
3 pieces of homemade fruit leather
It seems like a long list, but it’s not actually that much and all fits inside the cook pot.
I addition to those items, I’ve packed a waterproof backup kit that I don’t plan on touching. It has the following:
bear spray
lightweight down bag
AMK escape Bivvy
That’s it! The weather is likely well below freezing at night and so I’ve had to think hard about the most effective and warm shelter for the trip. It’s not necessarily efficient, but it should keep us warm.
The Scenario
I’ve been trying to think up a scenario to make this somewhat realistic, and the best I can think of so far is the following:
We’ve been dropped off on a remote mountain lake for a 3 day fishing and camping trip, but our gear got dumped and all that survived was my waterproof duffle bag full of stuff. It’s not entirely unimaginable and would explain the 3 day event.
Here’s a video of the scouting of another lake and trail. It was a fun hike and we saw a lot of really cool stuff.
On the second day out, we had a guide and started up the original trail we had ventured down on our first day, but we went much further and saw so much more.
This time, as we were hiking along, i noticed a licorice like smell that had me searching for a plant I had seen on a trip to Sorata the previous year. It turned out to be wild anis that the guide didn’t know was in the area and when you rub it between your fingers it lets out an amazing aroma. It can be used to make a tea (mate in Bolivia).
The kids were more interested in the flowers and mariposas (butterflies) and getting a free ride over the puddles (thanks to the guide).
Again, they crossed the bridge without concern and then led the way up the trails. We saw lots of plants and flowers, including an amazing tree that smelled like perfume. My favorite was the phosphorescent lichen growing on the rocks near the waterfall.
Our first sgoal was a waterfall. Superstition says that drinking from it will grant you wishes! The kids, wife and I were all happy to just be allowed to climb it and enjoy the cool, refreshing spray. The kids then proceeded to wade through pools, soaking themselves as they headed down river.
Our second stop was the better of the two falls. It was much bigger and we had to clamber through the pools and river to even see it. It gave the kids (and me) a chance to distract ourselves and get soaking wet in the process.
I ended up having to carry my son back as he was completely tuckered from all the walking. We were really looking forward to lunch after a change of sopping wet clothes.
There are a lot more trails then we went on and they are even working on a much larger Tibetan bridge that crosses the larger river as well. If you have the energy you could have passed the whole day trekking up the mountain side and getting closer to seeing bears, pumas, porcupines, deer and other wildlife. While the hotel was a disappointment, the trails are definitely worth a look if you have the time.
In a previous post I mentioned a trip down to the Bolivian tropical region called “Los Yungas”. We stayed in an 80 year old castle, but the real interest was in the trails.
When we unpacked we headed straight for the path that borders a small village and heads down to the river. There were a bunch of butterflies, lots of grasshoppers and other small bugs, but surprisingly very few biting bugs. The kids loved it and even though the path teetered on the edge of the abyss at times the trotted along without fear. Even the bridge made of rebar and fencing wire (which my son claimed was tin foil) was crossed with more trepidation from us parents than the 3 and 5 year old.
We passed about 20 minutes with the kids playing in the pools before heading up the trail for a nice lunch.
That afternoon my daughter and I headed off to another trail that lead us through fields of flowers, through jungle, past coffee and orange-like plants until we hit a “Tibetan bridge” (read 2 wires with some square boards stapled to it and 2 more wires for hand rails). My daughter wasn’t daunted by it at all. She trotted across over the rushing torrents and merrily went on her way.
The rest of the trail was somewhat uneventful as we came out at the river and wandered around looking for tracks (human or otherwise) in the sandy areas between the rocks.
Having satisfied ourselves with our accomplishments, we headed back for some board games inside and a tour of the antiques and history of the castle.
Check out this short video of my trip with my daughter across the Tibetan bridge.
Last Saturday I started up a giveaway exclusively for Youtube on the happy moment of getting to 600 subscribers! It’s a thank you to everyone that has subscribed and is subscribing to our youtube channel. We’re giving away a SOL Survival Pak from Adventure Medical Kits. You can enter too, just check out the video and instructions below!
Here’s what someone will get:
An Adventure Medical Kits SOL Survival Pak (older version of the SOL Scout). Weight: 5.8 oz. Includes 1 – 2×50″ duct tape 1 – Liquid-filled button compass 7- Waterproof matches 1 – Fire Lite fire striker 1 – Fishing gear in vial 1 – Heatsheet survival blanket 1 – Mini rescue flash signal mirror 1 – Mini rescue howler whistle 4 – Tinder Quick pieces Dimensions: 6x4x1-1/4″ (HxWxD)
If you’d like to enter, stop by the video on youtube and leave a comment there (not on this blog post). Here are the rules:
1) Open to our subscribers in North America (budget reasons), or anyone with a North American shipping address. 2) Be a subscriber to our youtube channel (it’s for you subscribers after all). http://www.youtube.com/user/BCoutdoorsurvival 3) Leave a comment (1 comment counted per person).
Oh and don’t forget, you can still get 20% off until March 9th at www.thegearhouse.com with the code: adventure211
I have long rejected the thought of cooking ‘systems’ in preference for the flexibility afforded when I can pick the pot and stove best suited for my trip. The Jetboil Zip, and by extension the whole Jetboil cooking system has challenged that preference with an efficient and well-designed system demonstrated in the Jetboil Zip.
The Jetboil Zip is generally designed around the thought that in the backcountry you will mostly be eating freeze dried food, and so its principle use is that of boiling water.
Fully-loaded (Fuel and all accessories), the Jetboil Zip weighs in at 560 grams, or 20 oz. Without fuel you start with 370 grams / 13oz. The cup has a capacity of 800ml (27 fl oz) and the system maintains compatibility with all of other systems in the Jetboil family. The inside of the cup has measuring lines up to 500ml, perfect for most freeze dried meals. This makes the Jetboil Zip system perfect for a single individual as you are easily able to boil water for your food and a bit extra for that cup of tea you may need.
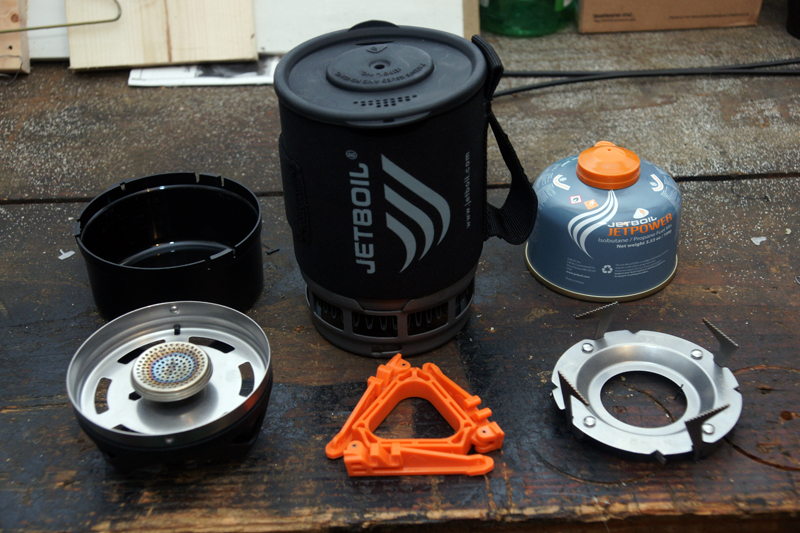
One of the particularly nice features of the Jetboil Zip system is its efficient use of space in your pack. Within the 800ml space you are able to fit the stabilizer tripod, stove, fuel (100 gram Jetboil fuel), and a pot stand. The lid features a spout for sipping/pouring as well as a strainer. The bottom of the cup has the standard Jetboil Flux Ring (a build in heat exchanger / windscreen) and a protective cap that doubles as a measuring cup. If that seems like a lot to fit together the insulating cozy has a diagram indicating the order everything fits. For a tiny weight savings, if you are not bringing another pot you can leave the pot stand at home.
Putting the Jetboil together is relatively easy. The pieces are all straightforward to assemble and you can tell quickly what goes where. Using the stabilizer tripod is a little cumbersome, though probably useful of you are on uneven ground. As well, getting the cup on to the stove itself can be a challenge when having to line up the slots. Granted this was my first time using it. I’m sure with time there is a certain intuition that helps get everything lined up properly.
The stove is well built and of solid construction. The Jetboil Zip stove requires you bring a lighter or matches (which are probably good to pack anyway) and has very good heat output. It has a ring that fits around the bottom of the companion cup and is designed to minimize exposure to wind, relying on the flux ring and metal supports to either deflect or slow with wind enough that it maximizes heat being applied to the cup. It is not the best windscreen, but it is far better than cooking without a wind screen at all. The control knob allows decent flame control, though its small size would make it difficult to use with gloves.
The Jetboil Zip has an advertised boil time of 500ml in just over 2 minutes, 30 seconds. However, living in the Pacific Northwest means that there is a vast variety of conditions that may be encountered. I took the Jetboil to the park where the temperature was about 7 Celsius/45 Fahrenheit with the goal of boiling 500ml of ice cold water. In only very mildly breeze conditions and on slightly uneven ground the Jetboil Zip took the water from very cold to a rolling boil in 3 minutes 25 seconds. It feels like hardly a wait if you start another activity while you’re water is boiling.
At the end of the day I found the Jetboil Zip to be a decently made and highly efficient product that has convinced me of the usefulness and efficiently of the Jetboil system in the backcountry. Boiling water is probably the most common activity and this stove does a great job of it. The 800ml capacity is perfect as it fits everything one person needs in a nice compact space. I found that the control knob, stabilizer tripod, and the task of getting the cup on to the stove are a bit finicky, but with a bit of practice I would expect it would get better. For a simple, no frills, and yet highly efficient stove, you cannot go wrong with the Jetboil Zip. However, if you are looking for a few more features, I would strongly consider the Jetboil Sol system as it is a similar size but with easier flame control, piezo ignition, and a little less weight.
Summary:
Pros:
–Reasonably light – weight
–Compact stove
–Very efficient at boiling water
Cons:
–Flame control knob is small
–Cup and stabilizer tripod are finicky
The final verdict:
A well-built, compact and efficient stove that performs well for a single person, but lacks a number of features possessed by other members of the Jetboil family.
Prepared by Graeme A.
This Jetboil Zip was borrowed from Chris Pund at http://www.thegearhouse.com. As always, opinions are those of the writer and are the same recommendations we’d give close friends.
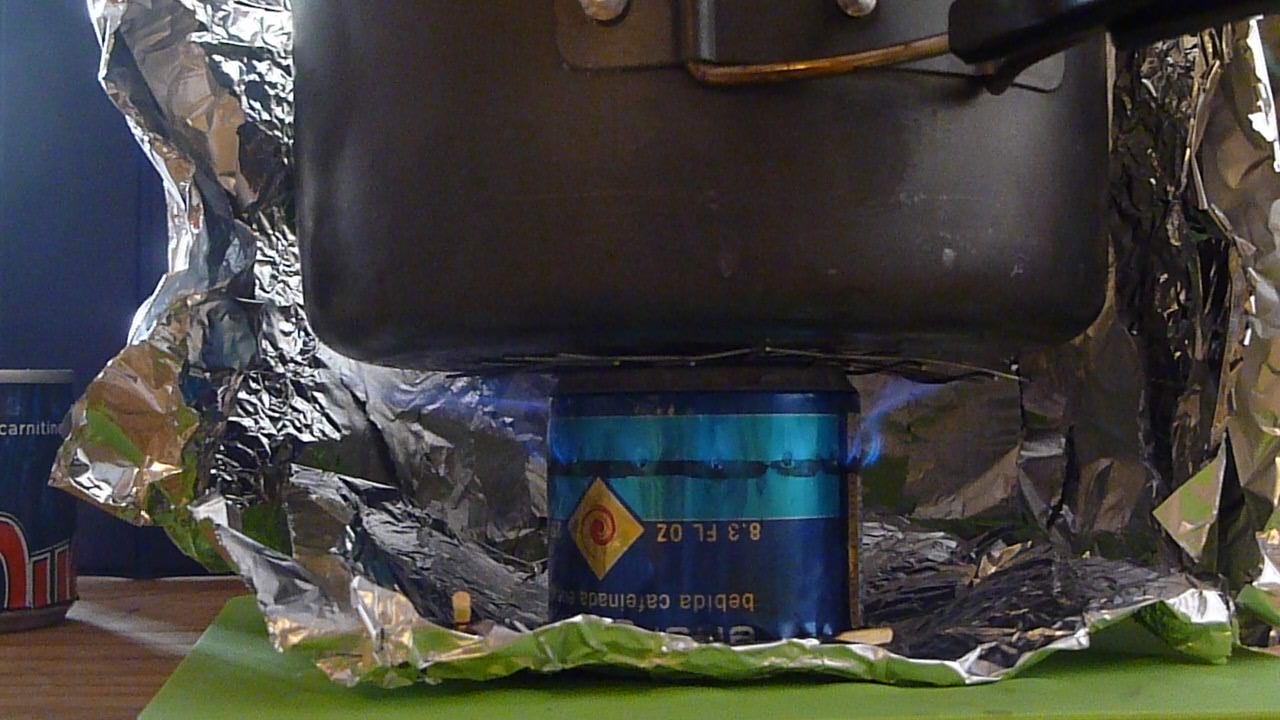
The bane of many a solo-hiker that buys his snowpeak 600 or 700 is that most alcohol stoves no longer work well with such a small pot! Never fear, you can now save more grams and more money with this DIY… WARNING: It may leave you slightly more caffeinated!
It’s a mini side burner stove made from 2 mini energy drink cans. Hurray, another excuse to buy energy drinks! It’s made out of the narrow energy drink cans and that makes it incredibly light (9 grams) and also really efficient for narrow pots that solo hikers tend to use.
I put together a video with instructions on how to make it and tried to be as thorough as possibly (while frustrating the viewer with a bit of off center, out of focus videography!
Watch the DIY and feel free to leave comments and feedback. I know that a couple times I go off screen, Sorry!
It’s winter and more than any time of year you need to be prepared for emergencies. A piece of gear you shouldn’t be without is a flashlight. I’d been eyeing a dynamo powered flashlight for a while and dropped the money on one by Etón corp. I’ve been aware of Etón for a while, I knew that they were partnered with the American Red Cross, but there was something else that caught my eye about one of their products.
About a month ago, I decided to add a Clipray to the cart when I bought a new backup harddrive for my computer. Why a Clipray? Well, not just because it was a dynamo powered flashlight, or it’s durable housing and components, but because it also includes a USB charger. First impressions were good and now that I’ve had a bit of a chance to play around with it and try out the features I decided to put together this review (along with a video).
The Clipray (one of their American Red Cross branded tools) is marketed as a “Hand Crank LED Flashlight with USB Cell Phone Chargers and Carabiner clip, excellent for Emergencies & Outdoors”. Let’s put it to the test. (Video at the end of the blog post)
Just the facts
So here’s the low down:
Features
Powerful LED flashlight
Crank powered
USB cell phone charger
Hands free carabiner clip
Specs
2.25”x 6”x 1.25”(W x H x D) or
57.15 x 152.4 x 31.75 mm (W x H x D)
Weight: 4.9 oz. (138 g)*
*Mine was 134g woohoo! (I love products that are more than honest with specs.)
Reviewing the Features
Well let’s look at the features one by one on the product.
Powerful LED flashlight LED flashlights are always guilty of have great visibility (you can see it) but can suffer from providing great visibility (what you can see with it). Add to that the fact that this is a hand cranked flashlight and you need to be extra careful on how much energy draw your LEDs make. Well as an emergency flashlight this is more than adequate. The visibility was good with it, providing both width and distance. Don’t mistake it for a headlamp or maglite, it’s not that, nor does it claim to be. It’s good at what it meant for.
Crank Let’s analyze this one. It has a crank that feels tough. They didn’t cheap out on materials and put the effort into making something ergonomically pleasing. There’s no bumping of the fingers while you crank and while the knob for your finger could be a millimeter or two bigger, it is very easy to get a good grip on. When you’re not using the crank, it stores away nice and securely.
Powered The cranking functions well, but a sacrifice in putting in better LEDs is that the battery drains more quickly. It’s no problem to charge, but you will get a work out if you need to use it for long periods of time. I found it best to charge when you don’t need it so that it’s ready to use when you do.
My son wanted to help out. “It’s so easy, even children can use it!”
USB cell phone charger I won’t lie, this feature was what made me buy the flashlight. Dynamo flashlights are incredibly common and the technology is pretty well proven, but the ability to charge a USB device was something new to me. This part gave me mixed emotions (as you’ll see on the video) as I forgot that it was an emergency device. If your phone or MP3 player is dead then you’ll need to put in some work (1 minute of steady cranking gave me 3 1/2 minutes of audio with the screen set to turn off after 10 seconds.) I haven’t tested it with a cell phone yet.
Oh, one more thing, the USB only charges while cranking, there’s no ability to charge from the battery unfortunately.
Hands free carabiner clip I assume by hands free they meant that you can slip it on without needing to open the spring loaded carabiner. A bit of pressure does that for you. You’d need to use your hands to open it though. It’s an ok carabiner for the purpose. I don’t see it breaking in the near future, but don’t do heavy bushwhacking with this hanging off your hip. In normal situations it should be fine.
Conclusions
Well, as a emergency device, this is a great tool. I definitely would keep this in my car glove box and in an easy to reach place at home.
The USB charger is a great feature that works, albeit with a bit of work. I bought this with a dream of thru-hiking the AT, PCT or CDT and using the USB charger for charging a cellphone/MP3 device. I think I will first do some weekend tests to see how it works out on those before committing myself to this and giving up my headlamp.
Over all? I’m very happy with it, the kids love to play with it and I’m not afraid of it breaking. Plus, at only $15 on amazon, how can you go wrong? I would tell friends it’s great to keep on hand for emergencies, but to be realistic about the USB charging. I’m also considering this as a gift to friends for their glove box.
A few months back I entered to win my choice of gear up to a $150 value on one of Sierra Trading Post‘s 25th Anniversary giveaways (@sierratp on twitter). I had been looking for a down sleeping bag and when I saw the specs on the Vaude Ice Peak 150 Down bag I had to choose it. Luckily I won! I have been meaning to do a review for a while and so I finally got out the camera and put together a video (see below). But before that I want to show a bit more about this bag.
As a 1 to 2 season bag I’m quite happy with this. My favorite aspects of the bag are weight and compressed size.
The listed weight on this bag is 1 lbs 6 oz or 700 grams. Mine was actually a bit less (650 grams) and that is probably because it lacks a bit of insulating power. This weight can easily be dropped half an ounce by cutting down the compression straps.
When I ordered the bag I was surprised at the stuff size (11″ x 5″) and I assumed that was compressed. It wasn’t. That’s right, when you tighten the compression sack you can get this thing down to 7″ x 5″. I fit both this and my shelter (a golite cave) in my daughter’s school backpack and the size and weight combination meant it was easy for her to pack around! I might get her to carry them on the next backpacking trip!
I’m working on getting my base weight down for backpacking so I assumed that I would be adding a few degrees by wearing warm clothes inside the bag. I got a shock when (after ordering the bag) I saw a review saying there wasn’t any space for that! Well fortunately for my 5′ 10″, 170 lb frame I had plenty of room to spare and my puffy vest fit well on top of me inside the bag (see video for more details).
The sleeping bag boasts a trapezoidal baffle system, which means that you get the benefit of all that down without any cold spots.
There is an additional baffle across the zipper that prevents heat loss. A very nice feature.
What I would improve
As I said before, my bag was a bit underweight. While that would be nice for a tent or backpack, when it comes to a sleeping bag I’d rather have an ounce more of down fill and sleep a bit more comfortably. As well, the rating on the sleeping bag itself says 7 degree Celsius limit, which isn’t the 37 degrees advertised.
The name “Ice peak” covers the whole line of bags, but to me I would never consider this something worthy of an “ice peak”. Perhaps “cool summer peak”, but not Ice peak.
The material, although light have allowed a few pieces of down to escape already in its limited use.
There is no “warmth collar” as advertised. Unless they are referring to the pull string that tightens the mummy top. There is no neck baffle like there is for the zipper.
The bag temperature rating is not accurate. It rates the limit of temperature at 2 degrees Celsius (35 F). At 7 degrees (45 F) I was getting quite chilly in my tarp tent. At that point I added my puffy vest and fleece sweater around my ankles and slept comfortably. It is advertised online as a 35-40 degree bag and I can’t imagine being out in that weather without extra layers.
The zipper works well but to save a couple grams they used one that tends to get stuck when you zip it. It doesn’t look cheap though, just light weight.
The Conclusion:
Ok, I’m very happy with this bag as a 1-2 season bag. It is compact and light and keeps you warm down to the recommended warmth rating. I bought this to be used with insulating clothing layers to bring the temperature up without being pack weight up. It will do for that.
I was hoping for a couple more degrees on the bag (the 37 degrees F (3 degrees C) advertised on all websites) which would have made below freezing nights comfortable with extra layers.
Expect a long term review sometime in the long term.
Where can I buy this or other Vaude Ice Peak bags?
A week or two ago I posted an article about the backpacking cookset on a budget where I mentioned some cheap cooking pots. I just wanted to show one of them in this post / video and how these cheap options don’t mean a sacrifice of creature comforts.
In Bolivia I picked up a 2 cup teapot with coffee maker attachment that weighs under 4 oz. Take a look at the following video to see the setup and a boil test with my fastest stove from the previous post’s video comparison.
If there is interest, I’ll look into getting a few more, but it could take a while.
I know this will appeal to a small subsection of my readership, but I’ve been meaning to sit down and do some altitude speed runs of some alcohol stoves (10500 feet up). In the below video I start the stove and immediately put the pot on to boil 2 cups of water. It’s marginally more exciting than watching paint dry so I condensed the speed down so the whole process lasts around 4 minutes or so. The results are surprising.
Anyhow, take a look if you’re into that sort of thing and let me know if you want a tutorial on one of the two stoves that I haven’t shown yet on the blog.
 The Outdoor Adventure Giving you tips, tricks & recommendations to help make adventuring in the Outdoors fun, safe & exciting for you and your kids.