Home / video (page 8)

video

Guideline Eclipse Rx Polarized Sunglasses

My wish list for sunglasses is short. I want high quality glasses that look good, can replace my corrective lenses for outdoor activities and that won’t break on me.

I had purchased some really nice frames and paid for some prescription lenses to be put in, but they honestly didn’t have a good fit for my outdoors adventures and often were left stuffed in my glove box. When I was contacted by Guideline Eyewear to see if I was interested in testing out some sunglasses I was interested, although skeptical, from my bad experience in the past.

They claimed to be super-durable, good looking, high-quality polarized lenses designed for outdoor adventurers… oh and you could get them prescription too! I decided to give them a whirl and see how they held up.

I’m at the stage where I wear corrective lenses 85% of the time so while I can handle driving in a pinch without a prescription I definitely prefer the benefit of a prescription. It means I don’t need to carry two pairs of glasses on the trail, one for sun and one for seeing.

SONY DSC

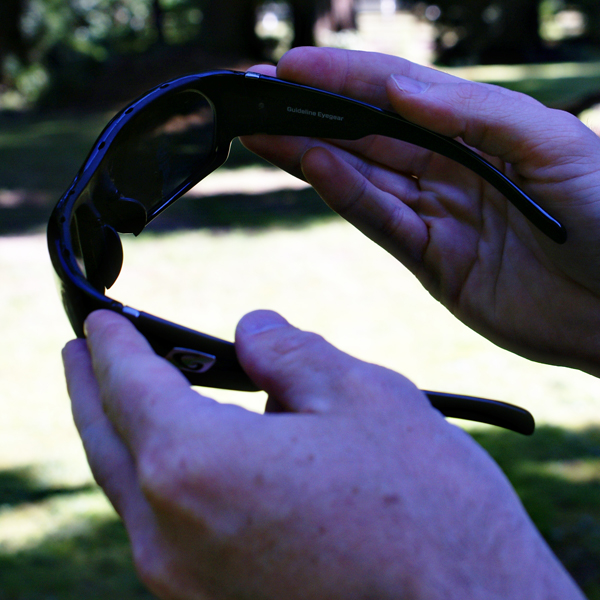
I opted for the Rx (prescription) version of their Eclipse glasses. They came in a variety of styles, color frames, lenses, lens tints and lens materials. I chose the shiny black frames with a Deep Water grey tint on the lenses.

When they arrived I was impressed with the look and fit. They blocked out all the light around the sides of the frames. Inside they boasted a comfortable rubber padding with vent holes to help with fogging.

I quickly put the polarization to the test with a couple of fishing trips. I got out on a float tube and was able to see through the ripples and reflections and even spot fish that would have otherwise been difficult. (For the fishing audience they also carry another line of frames: Fisherman Eyewear).

Even driving the car I find the reduction of sunlight reflection to be a huge help. I can see vehicles and movement much better now that I’m not distracted by light reflecting off the road, paint, and windows.

As for durability, I’ve taken them backpacking, left them in my pack, stuffed them in glove boxes and even given a few big bear hugs with them hanging in front of my chest.

SONY DSC

The only negative I’ve found is that they put some pressure behind my ears where the arms sit. The plus side of this tightness is that there’s absolutely no movement or slipping when I’m playing sports. They are designed as active wear, so I don’t see this as that much of a negative, but I do want to give a heads-up for those who find that sort of thing a problem.

All Guideline eyewear comes with a limited lifetime warranty. Here’s the text from Guideline’s site as to what that means:

All Guideline Polarized Eyegear products are warranted against defects in workmanship and materials for the lifetime of the product. This warranty does not cover damage from normal wear or abuse, such as scratched lenses. Guideline will either repair or replace, at our option, any pair of Guideline Polarized Eyegear product which is found to be defective. In the event the same model is not available for replacement, Guideline agrees to offer the customer the choice of the three most similar models (of equal or greater value) for the purpose of satisfying this warranty.

The Guideline polarized sunglasses cost $69 and their prescription polarized versions come in at $169. They’re well worth those prices.

All in all, I’m really happy with my sunglasses and will update this article if there are any changes. I definitely would recommend checking them out if you’re in the market for a new pair of sunglasses, prescription or otherwise.


Survival Saturday #4 – How to make a fire log

If you’re only interested in boiling water, then why go through all the steps of creating a big fire with lots of wood? Check out this week’s Saturday Survival and see how to make a 1-log fire that is great for wet and snowy weather!

Have you tried this? We’d love to hear about what you think!


Family Backpacking the Ozette Triangle, WA – Part 1

Out on the western edge of the Olympic Peninsula you’ll find a beautiful and untamed coastline just perfect for hiking with kids. It’s a 9 mile loop that is divided into 3 equal distances. Both camps are on the ocean and the second day is a breathtaking beach hike offering amazing ocean vistas, petroglyphs and countless opportunities to explore.

OzettePT1-pic6

About six months ago we started planning our adventure with our four kids. That many pairs of legs everything requires more preparation, especially to keep it easy and fun for the kids. To that end my wife spent hours planning and preparing dehydrated meals and energy bars as I worked out the gear requirements and focused on lowering pack weight. This was our first endeavor as a full 6-person group and it presented many challenges. One of these challenges was that two of the kids wouldn’t be walking.

Gear had to be kept to a minimum, especially our own clothes. Originally I tried to fit all our gear inside my Gossamer Gear Mariposa (a 70 liter pack) and my Gossamer Gear Gorilla (a 39 liter pack). If it hadn’t been for the bear Canister (park regulations) I think we could have done it. As it was, the bulky canister that would hold food for six for three days took up half the backpack and I was forced to use my older and much larger internal frame pack as a second pack.

In the end, my wife carried all the sleeping bags, sleeping pads, snacks for the day and the amazingly light 5 lb family tent. I carried all the clothes, the bear canister, cooking supplies and eventually all the dirty diapers. We both had a child on the front, her with the 8 month old and myself with the two year old.

OzettePT1-pic3

I knew the biggest challenge would be sleeping arrangements, so I took all the footprint dimensions, weight and internal height of all the 4-6 person tents on the market and then went to work. I marked out dimensions on the living room floor and organized our sleeping bags to see if they would fit. In the end I chose the Big Agnes Copper Spur UL4 Not only would 5 bags fit inside, there would be space for all our clothes and room to change almost standing up. Coming in at around 5 lbs there was nothing with bug protection that came close and that offered two vestibules for gear.

Our other big challenge was figuring out how to carry the two youngest. Carrying a child in the front is quite the challenge with a backpack… let alone a heavier backpack. Mostly it’s getting both the pack and the carrier on. We had two separate carriers and each had to be loaded differently. The Onya was put on first, then the child and then the backpack. The Boba Air had to have the bottom strap attached, then the backpack, and finally the child and shoulder straps last. Neither was problem free, but by the end of day two we could get packs on an off with little confusion or complaint. That said, with food, gear and clothes for 6 PLUS a child/toddler, you can really feel the weight!

OzettePT1-pic2


The kids carried their Deuter packs with just their sleeping bags, water, headlamps and small survival kits. The general rule of thumb is 1 pound per year of age. That meant our eldest carried about 7 lbs and the next eldest about 5. They were troops about it and we took plenty of breaks for snacks and water. It meant that we were on the trail for three to five hours a day, but we had plenty of distractions and activities to keep it fun.

We were really happy with the results and more importantly the kids had a great time in a beautiful area. Check out day one down below in the video. Stay tuned for a detailed trip report and part 2 of the video.

Have you hiked with kids? What were your best/worst memories?

Olicamp XTS and Vector stove

After looking for 6 months for an efficient canister stove for the John Muir Trail I was recommended the Olicamp XTS pot and Vector stove. After a quick chat with Chris from The Gear House I placed an order and waited patiently. Right up front I’ll say I was not disappointed.

The Olicamp XTS

The Olicamp XTS is a 1 liter (quart) anodized aluminum pot with built in heat exchanger fins on the bottom. It weighs in at 6.7 ounces with a lid and insulated handles. It can be purchased with or without the Vector stove.

My favourite part is that the  heat exchanger fins are protected by an aluminum ring. I have other heat exchanger pots and the one without the protective ring inevitably gets bent when I put it down (take note camping pot manufacturers).

The fins supposedly reduce boil time by 40%. Without an identical pot without fins I can’t confirm that, but I can confirm that it does boil a liter of water in under 5 minutes. That’s twice as efficient as my best alcohol stoves.

Most anyone with a heat exchanger pot will tell you that they are much more efficient. When you put the pot on the stove you almost immediately see a ring of bubbles where the heat exchanger fins connect to the pot. A lot of heat that would normally be lost to the sides is picked up by the fins and channeled into the pot.

One side benefit is that a canister will fit perfectly inside the pot.

The Vector Stove

The Vector stove is a 3 ounce stove with folding legs and an adjustable flow rate. It’s basic but has some big benefits.

What I like most about the stove is the fine flow rate adjustment, I can simmer or boil without a problem. If you like to cook and not just boil water, this stove is for you. I have a Jetboil Helios system and while you can cook with it it’s a big hassle getting the temperature just right.

Olicampvector
Vector stove with the Primus ETA

The Vector is designed to work with the Olicamp XTS. This is both a blessing and a curse. I bought a 2.1 liter Primus ETA pot for family camping and the legs are too narrow to rest on the heat fin protector. It works when you put the legs between the fins, but the stove legs turn bright red when you turn the stove on full.

There is no piezo ignition. This will make the piezo haters happy and the piezo lovers sad. Either way, there are no expectations so just bring a lighter and go.

A bit of a downer is that the vector will only fit inside the XTS with the mini canisters and not with the 8 ounce ones.

The setup is great for a solo hiker on a thruhike or anyone who wants an easy, no-fuss setup.

Olicamp XTS

Price: $26-30
Weight: 6.7 ounces
Dimensions: 4.5″ x 5.3″
Capacity: 1L

Vector Stove
Price: $26-30
Weight: 3 ounces
Dimensions: 2.75″ x 3.8″
Manual Ignition
Output: 10 800 BTU

The XTS and Vector can be purchased as a combo for $48.

Survival Saturday Episode # 3 – How to Make a Pot Holder

SScover


Ever cook over the fire? Then you’ll know the challenge of finding a place to put your pot to boil water. There are lots of way to hang your pot over the fire, but here are two of my favourite ones! Take a look, check out the video below and let us know what your favourite way of doing this is!


Lunds Gulch Family Hike – Lynnwood, WA

“Daddy, let’s go hiking!” It’s an awesome feeling when your 5 year-old wants to go out for an adventure and it shouldn’t be missed. That’s how we found ourselves on the Washing Trail Association’s website looking for an easy 2-3 mile hike that I could take my boys on that day. We settled on Lunds Gulch in Lynnwood as it promised shade, a creek and a beach destination.

Trees

I loaded up the car with my son’s new Deuter Fox 30 backpack and Black Diamond First Strike trekking poles (birthday presents) and after filling up the soft bottles with water and picking out some snack food we were on the way down various roads to get to this little park.

Even though it was a Thursday morning, the parking lot was almost full, but despite that it wasn’t overly busy or noisy. It’s a well maintained trail that descends through Northern Forest, down steps until it arrives at the creek. From there it’s fairly level and meanders along until one arrives at the ranger’s station.

Whidbey


Along the way old and tired signs indicating plant types can be found, but my kids were most interested in the abundance of Salmon Berries that can be found along the majority of the trail. They helped keep spirits high and gave my son enough motivation to push on to the destination.

As part of training for our family backpacking trip, I carried our 2.5 year old in our Onya carrier on the front while sporting my Gossamer Gear backpacking on the back. It was a very effective setup that my son enjoyed (in part because of the copious amounts of berries I was feeding him!).

OmniBug

The trail reports warned of Mosquitos and, although there weren’t too many, we were quite happy to being wearing Mosquito resistant clothing.

After crossing a bridge, the trail opened up into a day use picnic area with a shelter and restrooms. We pushed by, crossed under the train tracks and headed out to the real fun: the beach.

kidsonbeack2

Very quickly the backpacks were shed and after some more treats of Larabars and beef jerky they were off exploring the wonders of the beach. I chose to relax and take in the views of Whidbey Island and passing boats. The kids stopped long enough to wave to the passing train before going back to startling themselves with baby crabs darting under rocks.

Crab

We took the 1.25 miles back very slowly with lots of rest breaks and many more berries. We arrived at the car tired and content and zipped home already planning for the next adventure.

Check out the short video below:

Thunder Creek Lightweight Overnight Hike

When it’s nine thirty at night and you still haven’t met up with the rest of the guys it’s time to call it a night.

Last week I made plans to hike up the Thunder Creek trail and meet some friends at mile 3. They had arrived the day before and were supposedly waiting for me there. I had done basic research and set off from the trail-head at just before 7 that evening.

I had just arrived from Bolivia where I lived at high altitude for over a year so I knew hiking wouldn’t be an issue. Add to that my mew lightweight Gossamer Gear Gorilla setup and lightweight Big Agnes tent and Therm-a-Rest sleeping bag and pad and I figured I could blow through the miles in an hour or a bit more. Sure enough, when I hit the trail I felt like jogging I was so in tune. I even had time to set up some neat angles for a video post.

SONY DSC

The problem was that unbeknownst to me the neve camp was well off the trail. I had decided to plow along until I saw smoke or tents. I plowed along and at about 1.5 hours until I wondered why I hadn’t heard anything.  I figured I could have past the camp if it was along the trail, but having seen no evidence and smelled only a bit of smoke (it’s a long valley and the smoke could have been miles away) I started to think they had headed up the trail without telling me for night two.

I had two choices: turn back and look for them, or head on another half an hour in case I hadn’t arrived yet. I made the choice to hike another half an hour (there was a lot of light). I eventually saw a sign in the fading light, ‘Mcallister Camp”. I had definitely missed the neve camp. I asked around at every camp site for my crew, but they weren’t there. It turns out I had hiked about 7 miles in two hours and light was fading.

I knew that it was not a smart move to hike back to Neve camp that night so I found a small corner where I could spend the night, set up camp, ate dinner and disappeared into my Therm-a-rest sleeping bag.

SONY DSC

When I surfaced it was 5:30 am and I was very well rested. I took down camp, ate breakfast and was on my way. I hit the trail at 6:30 am and was down to neve camp in an hour. It turns out there was a pole with the name of the camp written on it right beside the trail. What I hadn’t counted on was the fact that the camp was a good 100-200 yards off the trail.

In the end it all worked out and I met up with my friends (who were still sleeping at the time!). I made the best of a bad situation and I was reminded how important it is to keep aware and level headed when solo hiking.

Have you ever made plans to meet up with friends on the trail only to have things go wrong? I’d love to hear about it in the comments below.

Cheesy Bacon Taters – Backpacking Recipe

When it comes to backpacking meals it’s important to pack meals that are lightweight to pack, taste great and are easy to cook. In preparation of hiking the John Muir Trail this summer, we’ve been testing easy backpacking meals in our Campsite Cooking Meal Series. We’ve tried backpacking recipes with rice, quinoa and pasta. In the below video we tested out a really easy backpacking meal called Cheesy bacon Taters.


As you can see, this lightweight backpacking meal is easy to cook in the backcountry. Follow these instructions to try it on your own.

At Home:

Mix the following ingredients in a plastic bag.

1/2 cup of instant dry milk

1/2 cup bacon bits

1 1/2 tablespoons dried parsley

1 1/2 tablespoons dried onions

a dash of salt and pepper

On the Trail:

IMG_3474 - Copy

Boil 2 cups of water. Remove from heat, add one package of instant potatoes and stir. Add the contents of the spice bag you mixed at home then add two sticks of string cheese. Be sure to cut the string cheese into small disks about the size of a dime, that will help them melt quicker. We used string cheese because it can go a day or two without being refrigerated. Stir all of the contents until the cheese has melted and blended in with the other ingredients. Then enjoy.
If you liked this recipe, be sure to try our other campsite cooking meals? Our previous backpacking and car camping meals include: Trailside Chicken & Rice, Sausage & Mash, Backcountry Pizza, and Dutch Oven Breakfast Burritos.We found this backpacking recipe to be really easy, inexpensive and very packable for a backpacking trip. We recommend you give this meal a try on your next trip to the backcountry. If you do try it out, leave a comment below to let us know what you think of this recipe.

by Andy Hawbaker

Platypus Origin 32 Daypack (with video)

Over the past year my Platypus Origin 32 has served as an ultralight weekend pack, diaper bag, laptop bag, Mountain biking hydration system and oh, even a day pack. Let’s just get right to the point, It’s hard to beat the versatility of this day pack and I’d recommend it or its successor to anyone looking for a daypack.

Here are the major features:

  • Weight: 2 lbs 2 oz
  • Capacity: 32 liters
  • Material: Waterproof Ripstop nylon
  • Waterproof zippers
  • Separate Hydration Compartment
  • Waterproof waist belt pockets
  • 3 liter “Big Zip” Platypus hydration bladder included
  • Double main pocket zip
  • Exterior stow pocket
  • 4x compression buckles (for smaller loads)
  • Ice pick / trekking pole loop
  • Waist belt
  • MRSP (of the Sprinter) $149.95

Let’s keep this short and talk about what I like and what I think could be improved:

Likes:

  • Capacity – Perfect for day trips with family or lightweight multi-day trips
  • Waterproof – whether in a tropical rain, or just keeping moisture from a sweaty back out of your pack, it does a great job
  • Weight – The weight is awesome for a mainstream brand. It’s just the right padding on the back and shoulder straps
  • Double zip – Having a double zip allows you to full stuff out from either side without opening the whole pack
  • Waist pockets – It’s awesome to have waist pockets and more main stream brands should start including them
  • Hydration compartment – with hangers for the Big Zip and a way to keep the water separate from the main compartment, Platypus nailed this.

Dislikes:

  • Waist pockets – This pack needed more packing on the hip side of the pocket. Hard items dig into your hips
  • Breathability – The pack is frameless and it could be better with more airflow on the back.
  • The Shape – I’d prefer a longer more traditional shape instead of the half oval style
  • 1 ice axe loop – I’d like another loop for my trekking poles

UPGRADE

Platypus Sprinter

When I was researching for this review I talked to platypus and they told me that the new pack (the Sprinter) replaces the origin 32 and is geared more towards backpackers. They also have other versions for cyclists etc. The Sprinter as you can see has better waist pockets, a more pleasing shape and what looks like better breathability.

Giotto RT8150 Tripod Review

I have a lot of tripods… scratch that. I have a lot of broken tripods. Some of them are light (12-14 ounces) and broken (the plastic heads invariable break at the mounting plate) and one of them is a massive aluminum tripod that weighs several pounds (despite my having hacked away at weight by substituting pins, etc.)  The Achilles heel is always that plastic head. It breaks when I’m miles away from anywhere and need it. My only option is copious amounts of duck tape or leukotape until I get home and invest in another one. In a final desperate attempt I decided to find the lightest metal headed collapsible tripod I could find. My result was the Giotto RT8150.

Let’s look at the features:

  • Maximum Height 40.6″ (103cm)
  • Minimum Height 10.8″ (27.5cm)
  • Folded Length 11″ (28 cm)
  • Load Capacity 1.8 lbs (0.8 kg)
  • Leg Sections 8
  • Pullout legs
  • Male Thread Size 1/4″-20
  • Weight 1.1 lbs (530 g) – 18.7 ounces
  • $35 on amazon

I guess I should mention my motivations. I wanted a tripod to take backpacking. I wanted something small and compact, but robust enough that it wasn’t going to break on me if I dropped it while I hiked.

Probably the most impressive part of this tripod is just how compact it is. It’s just under 11 inches, which you don’t really appreciate until you put it along side whatever tripod you currently use. It’s tiny. It does have its downsides as it only opens to 41″ tall. I get creative with my use of terrain to get fun angles for my video to make up for it being a bit short. I have a taller tripod, but it packs down to 20″ and weighs in at well over 3 lbs.

 Giottosize

To make it so compact it has 8 snap-lock leg sections. This keeps weight down, but limit its carrying capacity (1.8lbs) That’ll be fine for most handycam-style video cameras and even entry level DSLRs, but might be a problem for some of the bigger and more expensive cameras on the market. The weigh limitation is in part because of the snap-lock sections and in part because the number of sections can make the legs bow a bit with weight.

My favourite part of this tripod is that it has a metal head, mount and mounting screw. All of my other tripods that have broken have broken at the head, making them completely useless. Most lightweight tripods use plastic to cut down weight, but as I’ve learned you can’t cut down on quality at the head. It uses a ball style joint which can articulate 180 degrees vertically and 90 degrees horizontally. It can handle pretty much any shot you need.

I’ve seen tripods that use trekking poles, etc. and while those projects are good for the odd DSLR shot, I can’t just chuck it down for a video angle of hiking, etc.

Conclusion

Obviously my ideal tripod would be lighter than this one, but I’ve gone that road and faced the consequences. The Giotto RT8150 is the best balance I’ve seen yet for weight, size and compactness that doesn’t compromise sturdiness. I’ll be testing it out this summer and if it survives my abuse it’ll make it onto my permanent gear list.

What do you use for a tripod on the trail? or do you? What’s your philosophy for camera gear on the trail?

Carbon Fiber Trekking Poles by Cascade Mountain Tech

If you see me on the trail there’s an almost 100% chance that I’ll be carrying trekking poles. They just provide so many benefits for hiking that I don’t even think about not taking them. You don’t have to drop a lot of money to pick up a good pair either. Right now I’m carrying a $30 pair of carbon fiber trekking poles by Cascade Mountain Tech.

abihuaynapoles

Here are some of the features:

  • Carbon Fiber Construction
  • Cork Handles
  • Anti-shock (with the ability to disable it)
  • Tungsten Carbide Tip
  • Agressive Traction Feet
  • Standard Rubber Feet
  • Sand/Mud Basket
  • Snow Basket
  • Twist Lock
  • Neoprene Strap
  • 16 oz weight (for the pair)
  • MRSP: $29.95

I’ll just say it up front. For the price, you can’t beat these trekking poles. They’re built incredibly well, come with a whole pile of attachments (baskets and feet) and they’re pretty light too! I’ve put them through a lot of testing in lots of climates and I still recommend them.

Carbon Fiber Trekking Pole

Being Carbon fiber you’d expect them to be much lighter than they are, but what they’ve done is taken advantage of the Carbon Fiber to allow them to build a sturdier pole. I’m rough on my trekking poles, so I need to balance weight with strength. Being able to have a sturdier pole and still coming in at an ounce less than me supposedly “ultralight” aluminum pair was an obvious choice. Especially at the rate I go through trekking poles.

huaynapoles


The Cork Handles do an excellent job of absorbing moisture and keeping your grip from slipping. Cork handles aren’t usually found on $30 trekking poles, but somehow they’ve managed to include that and carbon fiber in that price tag.

The baskets are also are twist on instead of pressure fit so I haven’t lost one yet. It’s nice to have the included buckets and baskets that many higher end brands will sell separately to make a few extra dollars.

corkpole

One of the downsides of Carbon Fiber (not a design issue, just a common issue with the material) is that it doesn’t bend well. It provides great strength, but if you slip and bend them (as I did) you’re going to snap it. If you’re an average user this isn’t likely to happen. I abuse pretty much all my gear and on a slippery trip down Incan paving stones I caught the tip of mine on a rock and broke the bottom third.

I was happy to see that I could buy replacement pieces for only $7.95 on www.cascademountaintech.com along with other replacement feet and buckets. I put in my order last night and will be back on the trail with repaired poles as soon as possible.

Conclusion

These carbon fiber trekking poles are a steal at only $30.

If you are new to trekking poles, these should be high on your list. If you abuse your trekking poles and go through pairs regularly, these should be high on your list. If you’re on a budget, these should be high on your list. I can’t fault the design of these trekking poles. The Carbon fiber and cork handles make them compete with $100+ trekking poles and the twist locks are very sturdy.

Do you use trekking poles? What brand do you use? If not, why not?

Mountain Hardwear Versteeg Dry Q Rain Jacket Review

My first ever rain jacket was one of those DWR numbers that had a strange ability to let all the rain in and none of the perspiration out. My second jacket was slightly better, but no seam sealing and problems with the liner. Finally, I’ve found something that I like in the Mountain Hardwear Versteeg Dry Q jacket.

I’ve had the jacket for a few months and have taken it to snowy mountain summits, down tropical jungle trails as well as through hot sun and heavy rain storms.

Take a look at the written and video reviews below. If you’re looking for 25% off already discounted Mountain Hardwear gear at the Sierra Trading Post, click here: http://stp.me/MHVersteegDQCJacket

Specification:

  • Dry Q. Waterproof breathable Membrane
  • 50D Ripstop Nylon
  • Fully seam sealed
  • 2 Large exterior hand pockets
  • 1 exterior chest pochet (WR zipper)
  • 1 inner mesh stuff pocket
  • 1 inner mesh zip pocket
  • Waist cinch
  • 2 Hood Cinches (vertical and horizontal)
  • Velcro zip cover
  • Velcro cuffs
  • Weight: 14 oz average
  • MRSP:$160 (much cheaper on the Sierra Trading Post)

Full Review:

DryQ

Let’s start with the Dry Q. membrane. Dry Q is Mountain Hardwear’s response to the need for waterproofing while keeping it breathable. The technology is tested for 500 hours in a washing machine to make sure it has a long life. Obviously it’s impossible to have something completely breathable and yet waterproof, so don’t get unrealistic expectations.

That said, the Dry Q. does a really good job at making sure you don’t get clammy when wearing it. I have not once felt that wet feeling of getting stuck to the jacket like you do with some jackets. I usually prefer a jacket with a mesh liner to prevent the damp feeling, but the Dry Q means it’s completely unnecessary. Add the fact that it has 2 large pit zips and you’re set for temperature regulation.

coldweather

Speaking of temperature, this jacket performs really well in warm and very cold weather. At a 16000 foot pass I was comfortable in this, a T-shirt and Merino wool base layer (150 weight) despite the snow storm going on. In the tropics It was really comfortable, despite hauling around a backpack on a 3-day thru-hike.

PitZip

The pit zips (which use water resistant zippers) are a great size. They’re easy to open and almost as easy to close. I can unzip with 1 hand, but need 2 to zip them up, which I feel is pretty standard, especially with a water resistant zip.

All the pockets have great capacity without being too large. Adding the water resistant zips was a great choice for the chest pocket. The mesh pockets inside cut down on weight.

Hood

Mountain Hardwear put a lot of thought into the hood. The use of 2 cinches was a great idea. Normally what frustrates me about hoods is that you turn your head and the hood doesn’t turn with you. The horizontal cinch does a great job at keeping the hood stuck to your head so that it turns with you. The vertical cinch keeps the opening nice and small to keep out breezes and inclement weather.

My only criticism is that loosening the cinches on the hood takes some getting used to. They work well, but you need to fiddle with them the first few times to get the hand of how they work.

The sizing is perfect. I’m a pretty perfect medium and the length and arms are an ideal length for layering over base, mid and insulating layers. The cinch on the waist is everything you’d expect for keeping out wind and weather.

The average weight is listed as 14 ounces, but my medium weighs 12.7 ounces. It’s always nice when a company overestimates their product’s weight.

Conclusion:

The Mountain Hardwear Versteeg is a great balance between weight and functionality. It’s a great breathable, but fully waterproof jacket that can handle pretty much any weather you would throw at it. I’d definitely recommend this jacket to anyone looking for a all-round hard shell.

Do you use Mountain Hardwear gear? What items do you have and what do you think about them?


Disclaimer: I received this jacket from the Sierra Trading Post for review. All opinions are my own and are what I would recommend to friends.