I need your help. I’m working with a mountaineering guide on designing a Bivvy sack and I need your feedback.
What is a bivvy?
First off, for those that don’t know, a bivvy or bivouac is a bag to go over sleeping bag. It can be mesh to keep the bugs away or waterproof or resistant for inclement weather. It’s designed for solo hikers. It’s often used with a small, light-weight tarp.
Bivvies vs Tents
Benefits of a Bivvy
Designed as a solo shelter
Lighter than a tent
More compact
Easier and quicker to set up
Better views of the night sky
Adds warmth to your sleeping bag
Benefits of a Tent
Can fit more than 1 person
Has more space to change in
Is more comfortable for waiting out storms
Space for your gear
Better for clostrophobic people
What do you feel are the benefits to a Bivvy or Tent? Are there any benefits you’d add to either list?
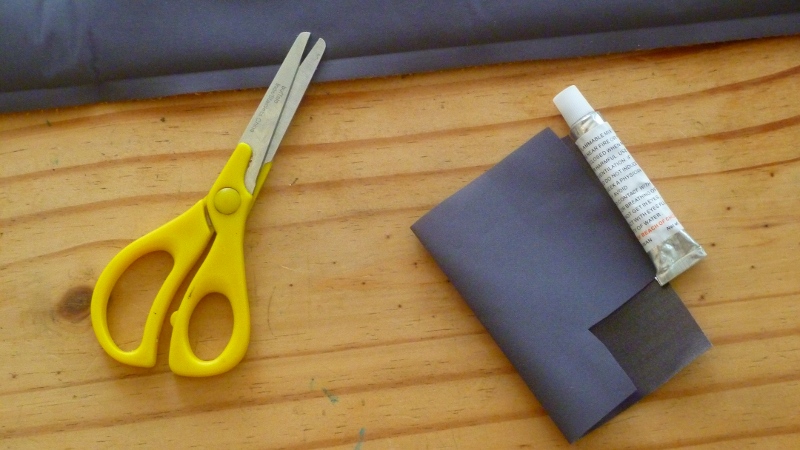
Help me design this bivvy
I’m still in the beta phase of this design. What do you look for in a Bivvy? or what do you think I should change in this design? Here are the specs of this Beta version of the Bivvy. I’d love to hear your feedback.
Waterproof bottom (bathtub style) – Puncture and abrasion resistant
I felt it was time to post an instructional on how to make an alcohol stove and keeping it even greener: Just use 1 can. I’ve used this design many times and I find it to make a more efficient stove than using 2 cans because of how the inner wall works.
This design can be used for any tall can whether it be the energy drinks like monster, the red bull style cans or full sized pop cans. The only thing is that you need to be extra careful while cutting not to make mistakes.
See the video below and continue for the instructional:
What you need:
A tall beverage can, whether that’s a beer can, energy drink can or other, it just needs to be the tall version
A ruler
an exacto knife or other blade
a pair of scissors
a marker
pliers
a lighter
and a push pin
Mark and Measure:
Now the first thing you’ll want to do is to measure your can. You’ll want to divide the length by 3 as you’ll be making 3 pieces for the stove. The can I used was just over 6 inches so I measured and marked at regular intervals around the can 2 inches from each edge.
Pop the Top:
Before you cut the can you’ll want to remove the top. To do that you’ll need the exacto knife or craft knife. You’ll be scoring the channel around the inside edge of the top of the can. Keep working your way around until you’ve almost cut through. Next, push through with the knife at one point and work your way about 1/4 of the way around the channel. The next part is cool. Just push near where you’ve cut and the whole top will start to tare long the scored line. It’ll pop off and you can move on to the next step.
Cut it out!
Next you’ll want to cut the can into its 3 pieces. I use the exacto knife to cut along the dots that I made while measuring until I have about an 8th of the can to go. Then I take the scissors and finish off.
Now, you’ll notice a seam on the can from where they printed the colors on. Cut up the seam until you reach the other line you drew with the marker. Next use the scissors to cut along the other line all the way around. That’s all the cutting you’ll need to do. You now have 3 pieces and just have to connect them all together.
Both pieces of the can are the same diameter so what I like to do is take the bottom piece and crimp the edges with the pliers. I twist and bend the edge in so that the upper can will slide onto the top.
Pull Push it all together:
Once that’s done, you can see how the stove will be put together. You coil the middle section of the can inside the bottom piece to make an inner double wall and then slide the top portion over them both.
If you find it hard to fit the cans together without damaging them, try heating the upper piece of the can with a lighter. This will make it expand and will give you 10 seconds or so to slip the pieces together.
The inner wall needs to slide into the channel on the inside of the top and bottom pieces of the can. I tap the two cans together and then check the inner wall guiding it into the upper channel so that it makes a good seal.
Let’s Jet:
Now that it’s together we just need to mark the jets. The key to the stove are jets that are high enough in the can to prevent the fuel from leaking and low enough to allow the jets to continuously heat the stove. It’s usually between half an inch and 3/4 of an inch from the top of the can. I spacing these jet about half an inch apart. On the narrow diameter cans try 1/2 a centimeter or 3/8 inch apart.
That’s it. This stove is pretty quick and efficient. On my first run it boiled 2 cups in a little under 5 minutes. It did a liter in 7 and a half. Using the wider cans like this you can easily boil 2 litres of water without refilling it.
Thanks for checking this out. Please let me know what you think. Please comment like, dislike and or subscribe! We’d love to see a video response showing your stove in use.
A couple weeks ago I was up on a glacier at over 17000 feet to do a video review when the sun came out full force and I realised that I didn’t have any sunglasses. After struggling for close to an hour on the the slope I was starting to see dancing stars and I realized that I was on the road to causing temporary damage to my vision. I pulled off onto a rocky area to try to deal with it.
Fortunately, although I forgot my sunglasses, I had packed a few other items in my pack and was able to make something to allow me see on my way back down off the glacier. Continue on to read more and see the video.
I’m sure we’ve all seen some kind of documentary or something that talks about this idea and maybe even had to resort to duplicating it. It was a fun experience and I decided to video tape it to see how it would go.
Snow Blindness or Photokeratitis is essentially when you give your cornea or conjunctiva a sunburn from intense UV rays. At 17000 feet I was at a much serious risk of that than I would have been at lower elevations.
Inuit goggles – wikimedia
Traditionally the Inuit of Canada used to carve goggles out of caribou antlers. They were held on the head with sinew. Others used birch bark, or wood, whatever resources were available.
Question: Have you ever suffered as a result of forgetting sun protection or had to improvise? Leave a comment below!
So nobody likes to wake up on the cold ground to find out that their expensive sleeping pad has sprung a leak. Nope, nope. Well, I had used my Klymit Xlite for a lot of nights, around 65+. At about night 55 it started to leak and by night 65 I was having to overfill it and still it was soft 8 hours later. I can’t really blame the pad, after all 3 kids playing with it means that you toy with disaster.
Well, I decided to document my experience finding and fixing the leak on video. If you want to jump straight to the video I’ll have it embedded below.
After watching or reading, please let us know if you have any tips, products or experiences about patching a pad on the trail!
For those of you who just want the facts I’ll divide it into two parts: finding the leak and fixing it.
Finding the leak
Now-a-days, most sleeping pads are using lighter and lighter weight fabrics… yes fabrics. The Klymit uses what looks like a ripstop nylon. That’s why it weighs only 6.1 oz. The bottom is heavier, but you still need to be careful and change some of the traditional ways of finding and marking leaks.
Your best bet is to inflate the pad and submerge it in water until the tell-tale line of bubbles ascends from somewhere in the pad.
If the leak is in the valve, try cleaning it with a damp cloth and later with a tooth or bottle brush. If that doesn’t work you’ll have to hope your sleeping pad is still under warranty!
Don’t use soap or chemicals!
I used a set of small weights to keep the pad submerged!
I know, when finding a leak in a car or bike tire the old soap and water trick are used. You’re taking a risk that you’re going to remove some finish on the fabric with the possible result of causing more leaks in the short or long term. Be particularly careful with detergents.
The same thing goes for marking the leak. Don’t use a marker to mark the hole. At least not on the inflated part of the pad. Sharpies and other markers have various chemicals that may damage the sleeping pad. It’s better to mark a glued section or just tie a string around the part where the leak is. Usually you can see the leak once you find it.
Let it dry
Obviously you’ll need to wait a few hours to let the pad dry. If you’re on the trail, make sure you do this in the AM so by lunch you’ll be able to patch it in time for a good night’s sleep.
Deflate it!
this should be obvious, but if it’s inflated air will bubble through the adhesive and create a leak!
Cut a patch
Klymit comes with 2 patch types, one for the top and one for the bottom. Choose the right one and cut the patch to cover the whole with enough space to make sure you can seal it well. I like at least half and inch all around.
Apply adhesive
Before you head out on the trail, make sure your adhesive tube hasn’t dried out. If you’ve used it once already just open it and make sure it hasn’t dried or jellied.
Do you apply it to the patch or pad? Either or. It may be easier to apply it to the pad, but it can be tidier to apply it to the patch. Just make sure you apply a liberal amount so that it can be absorbed and still have enough adhesive to bind the patch to the pad.
A little pressure
Just make sure you continue to press, tap or hold the patch on until it binds. Sometimes it feels like it won’t stick, but it will if you just hold it down for long enough (10 seconds is recommended, but you may need more).
Let it be
Make sure it has time to cure. If you’re backpacking, strap it to your pack if it’s sunny and just let it cure so that by nightfall you’ll have a fully functioning pad.
Thanks for reading, please share your stories, tips or complaints below!
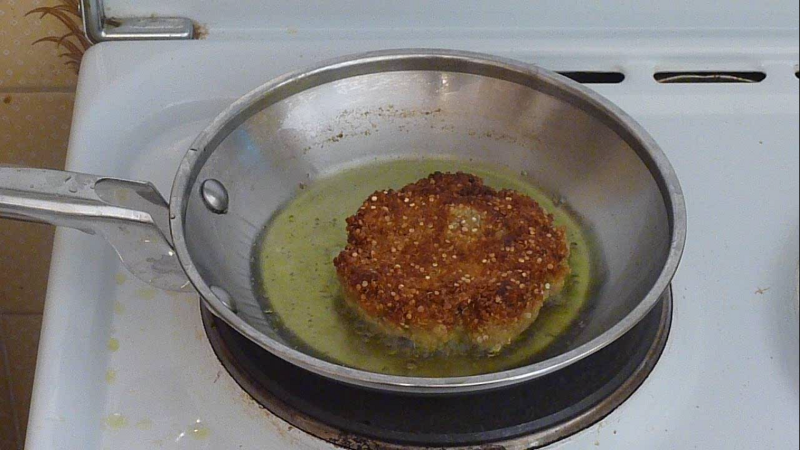
Today’s blog post is about food and something I encountered a lot of in Bolivia – Quinua. People prepare Quinua in many different ways, but I came across Quinua burger in Bolivia that is a mix of rolled and pre-cooked quinua with some other ingredients to hold it together. It wasn’t bad at all and it was high in protein… for a herb. Take a look at this video and read more about what it’s good for.
Quinua is what people call a complete protein. A complete protein contains adequate proportions of the 9 essential amino acids necessary for ones dietary needs. Yup, still a mystery, but at least it’s supposed to be good for you!
If you’re WF (Wheat Free), GF (Gluten Free) and DF (Dairy Free) like my kids are, you’ll really appreciate this as well as it’s easy to take with you and is very easy on the system.
Not only does it boast that, but it has a high amount of protein. An equivalent quinua burger product to the one I bought in Bolivia lists the following, including 12 grams per 75 gram serving or about 30% protein! That’s important for hiking, especially on longer trips!
The recipe is simple, making it an easy meal on the trail:
For 5 burgers or 25 small croquettes
Pour the contents of the box in a bowl.
Add 250 ml. of warm water and let it sit for 5 minutes (you can add a little more water if the mix seems too dry)
Give form to the patties and cook them 2 to 3 minutes on each side in a bit of olive oil.
That’s it.
So, Do you eat quinua on the trail? What’s your favourite way to prepare it?
A month or two ago I had a guest post on how to make night vision IR goggles. It was an interesting article, but after trying it for myself I found it wasn’t working as expected. It turns out that while the goggles do help you see Near Infrared light, it doesn’t help you see the IR spectrum and therefore is useless for making your own night vision goggles. I decided to explain it with a video, but here’s the rundown.
The IR spectrum is mostly invisible to the naked eye. What you can see is what’s called NEAR Infrared. It’s only a very small amount of the IR spectrum. The Goggles with blue and red screens only filter out anything that is not Near Infrared. What’s left is a very small amount of light the NIR or Near Infrared range. The goggles don’t do what IR night vision goggles do: Transform the invisible IR spectrum into visible light. For that you need technology.
All IR vision technology processes the IR light and translates it into an equivalent Visible light spectrum. If you’ve watched the night shots on the BBC Planet Earth series or watched any night shots on TV you’ve seen this. Many camcorders (those with night vision) already transform some IR light into the visible spectrum (see video for example), but they’re not purpose built so don’t do as good of a job. It does show you what you would need to do to make it work.
To do real IR goggles, you’d need an IR light source to amplify this invisible IR spectrum and a way to convert IR light into visible light. In the end though, if you’re trying to sneak around with an IR flashlight you’d be seen by anyone with real night vision goggles.
This is one of those DIYs that would need a lot of resources and understanding of optics. Or you can just go out and drop the cash on a proper set of Night vision goggles that already have everything you need!
I’m always looking for new skills to learn and new hobbies to try out, and one of my favourites right now is leather working. My wife was looking for a shoulder bag for carrying some larger items, so I decided to sit down with her and draft up a plan. After chatting about dimensions, features, etc I went to work with the cow hide I’ve had sitting around with me.
I’ve made belts and sheaths for my knife, but I wanted to do something bigger. This project was a big task to undertake so I worked at it in free time, when I needed a break from my schedule and in a week or two I had it finished. It took a bit longer as I decided to pull out a video camera to document the “making of”. Now that it’s all done if people are interested in how I did it, I might be able to put together some DIYs.
I’m certainly just an amateur, but it’s amazing how much you can do with a bit of leather and a couple tools. These tools above are the only ones I used!
Well, please watch the overview of the project below and let me know your thoughts. What leather projects have you been making? Do you have any tips for me?
A couple weeks back we had a barbecue with a bunch of friends and as usual, there were some obstacles to overcome. I’m no stranger to the barbecue (we smoked a pig for new years) but it’s the simple things that get me. Here are some of the insurmountable tasks I had to brave for our hot dog lunch:
The dogs are always to short for the buns
The hot dogs tend to dry out or cook too well on the outside while being raw in the inside
There isn’t enough space to put toppings in those cheap-o buns
I had seen a video a while back (see below) which I thought would not only serve practically but be fun for the kids among the group. It proved a success and entertained the adults, too! It’s the Spiral-cut weiner and I’ve included chow.com’s video to show you how it worked.
It’s definitely a fun way to present the simple hot dog lunch and has many benefits:
The spiral cut opens up the center cooking the dogs more evenly
The spiral cut when cooked expands to fill the foot long buns
The gaps in the dog end up providing extra space for toppings like ketchup, relish, mustard, mayonnaise, relish, mustard, ketchup, barbecue sauce, onions, cheese wiz or whatever you want to put inside
Anyway, Take a look and try this out on the weekend or whenver you next have friends around for a barbecue!
IMPORTANT UPDATE: While this DIY does make some neat, but potentially dangerous NEAR Infrared vision goggles, it will not help you see at night. Check out my follow up article: Do DIY IR goggles work?
Editors note: Today’s DIY comes via Craig Pearson of www.nightvision4less.com. He contacted us about a diy IR night vision goggle project that we just had to share. I bought the items needed on Amazon and can’t wait to try it out myself! We’ll definitely be revisting this DIY in the future!
DISCLAIMER: This project deals with potentially harmful vision enhancement equipment and should be constructed and used at your own risk. Thoroughly test to make sure that you have adequate low-light or no light conditions when testing your equipment. Your eye safety comes first!
How to make your own Night Vision Rig by Craig Pearson Background
As with many DIY projects, building your own night vision device can be as simple or in depth as you want it to be, depending on how much you’re willing to pay. In this article I’ll outline what the basic fundamentals and requirements for night vision are, and ways you can scavenge or create the different components.
There are several different ways that night vision can work. Infrared, Light Intensification (often used in conjunction with Infrared) and Thermal Imaging. The easiest for DIY purposes is Infrared, so let’s explain a bit more about that.
Infrared light, is light on the low end of the spectrum just below the range visible to the human eye. With the right equipment you can view this light, (which is what we are going to make). This type of technology, when used with an Infrared light source will allow you to see but remain undetected.Now that we’ve covered a very basic overview of how night visions technology works, let’s talk about how you can put together your own Infrared viewing device. Without special technology, the best we can create at home is NIR (Near Infrared), which is what many night vision systems use.
Summary:
The basic components for an NIR night vision setup include:
A way to see infrared light
A way to illuminate unsing infrared light
For this DIY we’re going to make our own IR goggles and use an IR light source to illuminate the night.
Materials needed:
goggles, welding glasses, or glasses – to mount the IR filters onto… and your IR illuminator if you want to.
IR filters – these will be placed in or on the goggles to allow you to see the IR light.
Craig Recommends Gel filters that are used in studio lighting.
You’ll need enough material to cut out 8 red lenses and 4 blue ones.
IR light source or Light Illuminator – For extremely low-light or no visible light conditions when extra illumination is necessary. (i.e. at night)
How to make the IR goggles
WARNING! DO NOT look at the sun with or without these glasses on. This can potentially make you go blind!
Remove all existing filters from the goggles.
Using the original lenses as a model, cut out 8 red lenses and 4 blue lenses from the gel filter sheet.
Insert 4 red and 2 blue lenses into or in front of EACH eye piece of the goggles (depending on if they fit or not).
That’s it! All you need to do now is go outside at night and test your new night vision setup! Either attach the light to your head or glasses or simply hold it like a flashlight and voila, you can see at night!
Good luck, and happy night adventures! As this is only Near Infrared, it won’t be nearly as bright as a proper setup, but you will get to experiment with the infrared spectrum.
-Craig Pearson
Craig Pearson is an avid hunter, outdoorsman, and adventurist. His main passions are hog hunting in Texas and writing about his many adventures. He currently blogs for nightvision4less.com, a supplier of high quality night vision equipment.
A week or two ago I posted an article about alcohol stove cooking where I took my family out on a picnic and we cooked with a couple home made alcohol stoves. One of the recipes was a pasta with white sauce. While most pastas have their own cooking rules, I thought I’d post the recipe for the white sauce and instructions on how to prepare the meal with your own favourite pasta.
The benefit of this recipe is that it uses all dry ingredients and can be premixed. As with any trail recipe, try it out before you go to adjust ingredients to your taste.
Herby Pasta White Sauce (serves 2)
Ingredients
Pasta for 2
1/4 cup whole milk Powder
1 tbsp Parmigiana (parmesan) Cheese
1/4 tsp dried oregano
1/4 tsp dried basil
1/4 tsp garlic powder
Home Preparation:
Mix dried ingredients and store in air tight container.
Steps:
Boil pasta
Pour off extra water into a container to be used with the sauce.
Pour dry white sauce mix into a cup or other container
Add extra water to the mix, stirring regularly until the sauce reaches the desired consistency.
Pour sauce over pasta.
Tips: Consider adding less herbs if you’re not a fan of basil, oregano or garlic. This sauce also works well with packaged tuna.
This Saturday we zipped out of town and up into the foothills of the Condoriri mountain range for a picnic. The 5 of us piled in to the car, drove for a few hours and hiked up to a pretty little waterfall, that sometimes has fish below, and then went to work preparing various backpacking culinary delights. All made from scratch. Scroll down to see a video of the trip and cooking experience.
It was an opportunity to try out some easy and cheap recipes that could make it into our family backpacking trip menus. We didn’t have time to test all of them, but here are three. Instructions and How to video to come.
Herb Potatoes
An improvement on regular mashed potatoes, but we need to fiddle with the ingredients. The kids weren’t huge fans.
Ingredients
Plain instant mashed potatoes
Milk powder
Dried Basil
Garlic powder
Dried Oregano
Alternatively put dried parsley instead of basil and oregano.
Quinua Pasta with white sauce
This was a big hit and ended up nice and creamy. I waas busy working on recipe 3 and didn’t get more than a bite!
Ingredients
Milk Powder
Sauce mix
Parmesan Cheese
Dried Oregano
Dried Basil
Garlic powder
Olive oil
Smoke beef or canned tuna
Backpacker’s Chocolate Bundt Cake
I picked up some mini bundt cakes (about 10cm across) from a local store and combined them with a simple no dairy, no egg cake recipe. The results were a simple, but delicious cake that was plenty for 1 adult, or 2 kids. This is definitely a treat for the trail!
Ingredients
Cake mix
3/4 cup Flour
1/2 cup sugar
3 Tbsp cocoa powder
.5 sp baking soda
.25 tsp salt
.5 cups water
2.5 tbsp oil
oil to grease bundt cake pan
Conclusions
Two out of these three recipes are perfect as is and the potatoes could use some improvement before they make it into the permanent menu. Watch the video and get an idea of how we did it.
Stay tuned as we’ll be showing you a recipe for orange spiced cake that works well in a bundt or can be cooked without in a delicious and fun way.
So, Having got the basics of our shelter together, we turn to fire and food gathering in the second part of our 1st day in a Survival Scenario in the Canadian Mountains.
The plan was to hit a mountain area of British Columbia where we could test out theoretical skills (this was my first trip) and carry a backup kit if we needed it. I brought simple items (emergency blankets for my dad and myself, flint strikers, survival fishing kit, a cheap rain poncho, aluminum pot and a hand axe and Aegis folding knife (provided by SOG). I also took a small panasonic camera to film all our adventures. Video below!
My dad acting as backup, also brought a pot, plate and cup, in addition to a regular fishing kit. We headed up to a lake on crown land at about 800 meters where nights were below freezing and where snow in the day was not uncommon.
DISCLAIMER: I’m an untrained and unprofessional amature. DO NOT TRY THIS AT HOME. I am NOT responsible for any harm that comes from anyone trying to imitate me.
 The Outdoor Adventure Giving you tips, tricks & recommendations to help make adventuring in the Outdoors fun, safe & exciting for you and your kids.


.jpg)


