Home / video (page 2)

video

Teton Sports Adventurer Cot & Comfortlite Sleeping Pad

Over a year ago we picked up two Teton Sports Adventurer Cots and Regular Comfortlite Self Inflating Sleeping Pads (2″) and boy are we glad we did.

We bought them for car camping and they have been awesome. They’re easy to setup, incredibly sturdy and and built to last.
Let’s take a look at the Features and then talk performance

Features:

Teton Sports Adventurer Cot

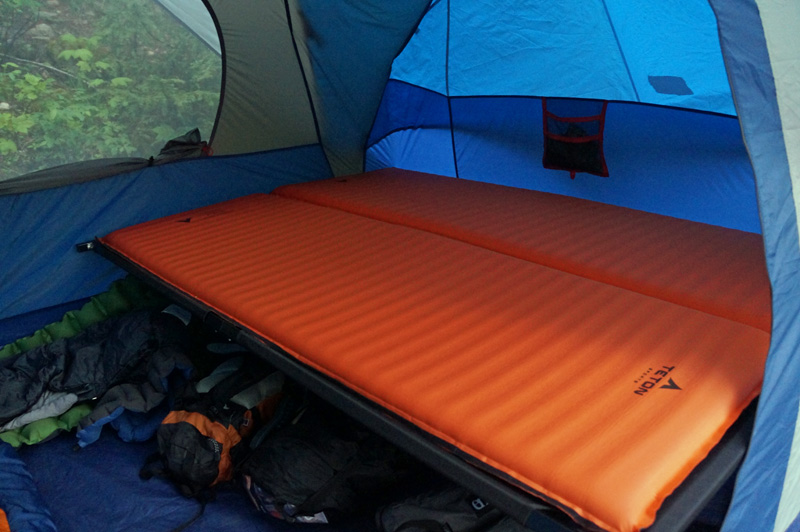
Teton Sports Comfortlite Self-Inflating Sleeping Pad

  • Packed size: 26″ x 6″ x 6″
  • Bed Size: 72″ x 25″ x 2″
  • Top: ComforTech™ Stretch Microfiber Top
  • Bottom: Grey Non-Slip Bottom
  • Insulated with open cell foam
  • Storage Bag: 70D Stuff Sack with Offset Shoulder Strap
  • Velcro Strip for attaching two pads together
  • Weight: 2 lbs 12 oz
  • MSRP:  $95 on Amazon (affiliate link)

Testing
We’ve used them on multiple week long car camping trips, as beds during moves, separately and together. We’ve loaned them out to family and friends and they’re still going strong. Everyone has been impressed with how easily they setup and how comfortable they are (even without the optional sleeping pads) and how well they’re constructed.
TetonBeds2

Performance

Disclaimer: these are not for ultralight backpacking. They are for car camping, canoe camping, base camp camping, or anywhere you want a fantastic, luxurious night’s sleep.

The 600D Poly Canvas used on the Cot is fantastically durable. You may have seen the Teton Sports video of 11 guys standing on their XXL cot… do a search it’s quite impressive. It’s also breathable, so you’ll get a decent amount of airflow.

The stainless steel frame performs great. It adds to the weight (20 lbs) but It’s a small price to pay for the durability you get from it.

I did have two of the plastic spacers in the frame break when I opened it incorrectly one time, but they didn’t affect performance and Teton Sports was quick to send me replacements and thank me for the feedback.

One thing I love about these cots is that they give you plenty of room to store all your gear underneath. That opens up your tent floor a ton… especially when you have 4 kids!

The spreader bars on the cots are offset to allow two cots to be placed closer for two people – ideal when you use the comfortlite sleeping pads which velcro together.

We purchased these sleeping pads to go with our Teton Sports Adventure Cots. While not necessary, they provide a whole ton of comfort to an already luxurious sleep setup.

The Comfortlite Sleeping Pads that we purchased were the Regular 2″ version. They’re insulated which makes them self inflating. They are 26″x6″ when rolled up and weigh 2 lbs 12 oz. They offer two inches of padding when inflated and are spacious (75″x25″x2″). The insulation means they’re great for winter camping and, if you use them on the ground, will provide plenty of protection from heat loss.

They can be used by themselves or with the Teton Sports Cots. Either way you’ll get an incredibly comfort night’s sleep.

Oh, and the awesome bit: the sleeping pads velcro together, which is perfect for couples! We have used these for week long trips with our cots. velcroing the pads together meant it was easier to use both normal bedding and double wide sleeping bags without cold breezes coming up between the pads.

Conclusion

If you want to enjoy the outdoors, but get a good, comfortable night’s sleep at the same time, check out the Teton Sports Adventurer Cot and Comfortlite Insulated Sleeping Pads.

These cots and sleeping pads are an excellent investment. They will give you an excellent night’s sleep in the outdoors and serve double duty as luxurious guest beds for when you have company.

Everyone that we’ve loaned them to has been impressed… and a little reluctant to give them back!


5 Clever uses for chapstick

If you’re a DIYer and you don’t watch Intense Angler’s excellent youtube channel, you need to head over and subscribe. John has grown his audience to 150000 subscribers with his popular “Tip of the Week” series. If you’re not convinced, then take at the video above as John demonstrates 5 impressive uses for chapstick… beyond the typical lip protection.

Here’s the list of what he tackles in the video for reference:

  • A DIY fire starter – Combine some chapstick with a cotton ball for an improvised and reliable firestarter.
  • An Improvised First Aid kit – Use the chapstick to cover and protect minor, topical injuries. It’ll keep it protected, clean and prevent minor bleeding. Make sure you use non-flavoured for this!
  • A gear lubricant – Chapstick is petroleum based, so it can be used to stop squeaks in gear and lubricate sticky zippers.
  • A Temporary Waterproofer – If you find a small leak in your gear, a temporary field repair can be done with chapstick. It’ll act as a temporary fix to prevent water seeping through the tent, jacket, pack or what have you.
  • An Emergency Candle – A surprisingly effective homemade, emergency candle lantern by twisting a cotton ball into a wick and coating it in the chapstick.

See More from Intense Angler and hook up with him on social media:


How to Build a Canoe Rack

You can never have too many canoes, but you can run out of places to store them. To solve that, you’ll probably need to make a canoe rack, so we’ve made a DIY video for a canoe rack that can store up to 3 canoes.

This rack holds up to 3 canoes

We like to keep ours out of the snow to prevent damage, so we built this one to go into our storage container for winter. Watch the video above and if you have any questions or tips, leave them in the comments below.

Quick Tip: Attach pipe insulation to the arms of this canoe rack with a couple zap straps to add a bit of protection to the gunnels.

If you have heavy canoes, you may want to make the braces longer to support the heavier weight.

Remember: a canoe must be stored upside down on its gunnels to prevent warping, water collection and rot.

Try it out and let us know what you think!

Rocket Launching


This past weekend we were up in Prince George visiting, when a friend pulled out some homemade model rockets and solid fuel engines.

rocket6

They were leftovers from school projects, so we decided to take the kids and try them out. Setting them up required taping the engines, adding a launching fuse and then connecting the wires.

rocket3

Standing way back, of course.

rocket5


The dangerous work was done by adults and the fun was had by all.

rocket2

It was quite impressive to watch the rockets go, and much whiplash was experienced as they took off.

rOCKET1


The larger engines disappeared from view. If you try this, give yourself plenty of space and make sure there is little to no wind.

We were definitely hooked. The great thing about a hobby like model rocket launching is that you can work on building the rockets in the evenings or on rainy days and then take advantage of Saturdays to do your testing.

Have you ever built a model rocket before? What do you think?

PA Pure – Electrolytic Water Purifier

The PA Pure by Potable Aqua is an Easy to use water purification system ideal for large group and long trips. It’s easy to use, requires no pumping or expensive replacement parts and little to no maintenance. Using the same advanced electrolysis process found in city water purification it needs only salt and water to kill viruses, bacteria, Giardia and Cryptosporidium – those nasties that can make you seriously ill on the trail.

Let’s look at the features and then talk about how it performed in this summer’s testing.

10459144_1110509608965849_6205392426581791369_n


Product Features and Components

  • PA Pure Electrolysis device
    • Weight – 7 oz with all accessories
    • Purifies up to 20 liters of water at a time
    • Kills bacteria, viruses, Giardia and Cryptosporidium
    • Purifies 150 Liters per charge
    • USB and Solar Charging
    • Built in Flashlight
  • USB Cable and Adapter
  • Brine Bottle
  • Test Strips
  • Lanyard
  • Travel Bag
  • MSRP: $119.99 ($115 on Amazon)

Testing

This device was our go to water purification device this summer. We tested it on day trips to weekend back country backpacking trips to a 4-day wilderness canoe trip.

11157465_1145745695442240_7108606175494486312_o

Performance

First off, I should say that I’m an ambassador for Potable Aqua. The reason I accepted the ambassadorship was because I believe in the technology behind the PA Pure… and I was looking for the ideal group backpacking solution for our troop of Jr. Adventures (a.k.a. our four kids). Let’s get to the straight, honest goods.

Water Purification: The PA Pure gets full marks for effectiveness. Like we said earlier, this is the same process used to purify your drinking water for your tap. It’s proven, reliable and efficient.

Ease of Use: The actual process of purifying water is simple.  See the video above to see it in action. It’s straight forward and if you’re not sure if it worked you can use the testing strips to double check.

Device: The device is durable and easy to use. The included solar panel for field charging is a fantastic addition, helping to ensure you can always have clean water. The device is intuitive and take very little time to learn how to use it effectively and efficiently. The only challenge we found was seeing the LEDs in full sunlight, but shading the device with our hand was an easy solution.

ColumbiaKidscreek

What do we think?

What are the key features that we like most about this device?

  • It kills all the bacteria, viruses and protozoa you’re likely to encounter on your trip
  • It uses proven water purification technology used around the world to purify our drinking water
  • It is ideal for groups (up to 20 liters at a time)
  • It doesn’t require maintenance (like back flushing)
  • It doesn’t require expensive replacement parts (like $50 replacement filters)
  • It has a built in solar charger for potentially unlimited use on your trip
  • It’s fast and easy to prepare your water
  • Water can be easily tested to ensure it is pure

11143329_1120673757949434_2901280916243803818_o

What are areas of improvement?

  • The LEDs are hard to see when filtering in daylight
  • Chemical purification requires more time to purify (30 minutes for most water, 4 hours for Cryptosporidium)

We always stay ahead of the game by purifying new water before we need it. By drinking our clean water at the water source and then purifying new water then and there the 30 minutes of hiking, playing or fishing flies by.

Overall we found this system to be an easy-to-use, lightweight, reliable and efficient way to purify water. It is fantastic for groups or families where more water is needed.

For $120 the PA Pure is hard to beat as a reliable way to purify water for individuals and especially groups. It is now our go-to water purification method for all group or family trips.

Disclaimer: We received the PA Pure free of charge. All reviews and opinions are our own and what we recommend to family and friends.

Keyhole Harness – the Ideal Outdoors Camera Harness

How many of us have missed the ideal shot because we were too busy digging out our camera? There’s no doubt that bringing a DSLR on outdoor adventures presents a problem. Not only does the camera strap dig into your neck, but the camera bounces around when you’re hiking. Do you suffer with it swishing around, chafing or even bruising your chest or have you resigned yourself to missing those shots and not pull out your camera at all? If you struggle with this then I can whole-heartedly recommend the Keyhole Harness System by BackcountrySolutions.com

BCHarness4

Features

  • Shoulder Straps
  • built in neck strap replacement clips (and hardware)
  • KEYHOLE® Harness
  • Camera / Binoculars Keyhole attachment (tripod compatible)
  • Binocular Bracket Assembly (to engage binoculars to harness)
  • Lens cap saver and hardware
  • Instructions
  • MSRP: $79.95

BCHarness7

Testing

We’ve had variations of this product since 2013. I bought the original Keyhole harness in 2013 and in 2014 we were sent the updated version with the shoulder straps and improved keyhole attachment. The harness setup can be broken down into two parts: the shoulder straps portion with the neck strap replacement and the keyhole harness itself. They can be used together, or you can take off the keyhole harness to use it with a backpack.

I took the keyhole portion, connected to my backpack on the John Muir Trail in 2013 and was impressed immediately. I’ve been using the rest of the setup on adventures like canoeing, backpacking, fishing, etc.

BCHarness8

What do we think?


BCHarness2

The keyhole harness itself is an excellent design. it can be used with the should straps or transferred onto your own favourite backpack. Four straps distribute the weight, hold the camera secure and center the camera where you need it. The keyhole plate is a durable plastic that is comfortable and unobtrusive.

BCHarness

The camera attaches to the keyhole plate with this little knob that screws into the tripod port. The knob itself has a second threaded tripod hole in the bottom of it which makes it simple to transfer over to your tripod when you need to.


BCHarness5

The addition of the hooks and straps means you can distribute the weight even more, while ensuring extra safety when you are shooting. Also, should it bounce out of the harness (yet to happen) then you won’t lose the camera or damage it. It’s an excellent combination. The hooks are a durable plastic. I would have preferred metal, but I have had no issues with the construction or quality of the setup.

BCHarness3


I’ve found the harness to be comfortable, allowing me to shoot photos without restricting movement.

JMTharness


As mentioned previously and as can be seen in these two photos, I used the harness without the included shoulder straps with my regular backpack on my thruhike of the John Muir Trail. It allowed me to take thousands of photos (not just selfies) and permitted me to catch those moments that I could have missed if I had to dig my camera out of my backpack.

JMTharness2


Conclusion

The harness setup with shoulder straps is excellent for day hikes, canoe trips, fishing, or anywhere that you’ll need a camera, but need your hands to be free to do other tasks (like winding in your catch, holding trekking poles or just paddling along. It is easy to adjust, comfortable and really does spread the weight on even those heavier DSLRs. It’s quite the ingenious little setup. It’s simple, practical and really does makes carrying your DSLR easier, more comfortable and above all lets you take some great photos in the process. $79.95 is a great price for this setup based on its quality, design and versatility.

Day1d


DIY Bouldering wall – Part 2 – Done!

After many months of outdoor adventure we took an opportunity to finish off this indoor adventure project. We started our bouldering wall a while ago, but this weekend was a weekend in (due to rain) and we made a lot of progress.

Climbing6


The kits came with a tool to attach the holds, as well as the bolts and T-Nuts. So we were able to get right in and start working. I did manage to snap the too into its two allan key parts. It meant a little more work, but I was able to finish the project as is.


Climbing5


We mixed in another pack of natural rock holds too to give us a mixed look.

Climbing7


Our goal was to mix up the holds in a way that made it more challenging and offered easier and harder routes. In the end it was a success.


Climbing3


There is enough variety that the kids can get up and navigate around the wall, while still challenging themselves (and us) with some much more difficult holds.


Climbing1


All in all it was a huge success. We used super-thick winter sleeping bags as padding below the wall. Matresses and crash pads are also suggested.


It was an awesome project and based on our experience we’d recommend it to anyone. It will be especially useful to burn off kids’ energy in the winter months.

A Paddlers’ Personal Paradise: Murtle Lake, BC

By Naomi Osborn (Ms. Adventure)

Murtle Lake is North America’s largest kayak-and-canoe-only lake. I like that. It’s quieter. It’s safer. It’s cleaner. It’s a little brag-worthy. 🙂

It’s more than that.

Canoeing is to me like slipping into a sanctuary; in pushing off from the shore I can almost feel all the cares and worries wash off my face and drop into perspective below in the deep water.

Life is simplified. Meditation feels easy. Hard work is good. Food tastes better.

Murtle Lake, BC

We were a bit nervous at first about this trip, though.

After all, the ratio was 2 adults, 3 teenagers, and 4 kids.

There were three canoes, three tents, three nights, three hot dinners to make, three duffle bags jammed full of food and kitchen items alone, and three teenagers with trusting parents waiting for them at home.

It's all going to be worth it...
It’s all going to be worth it…

Just one portage and then it’s plain sailing paddling!

It's just 2.5 KM...
It’s just 2.5 KM…

We had paddled just 1.6 KM the first day when we pulled off to the first group site; a storm had billowed up and the lake was choppy. None of us had slept more than 3 hours the previous night, so we just cuddled up and pretended we were Voyageurs under our canoes for the afternoon.

Hunkered down under the canoes.

The next day was still peeping around clouds and sighing wind over the waves, but we went 20.5 KM that day.

2015Jul;y_murtleEaglePoint
Eagle Point beach.

Fresh fried fish and sushi for dinner! And then, for those bold enough to venture not just from city’s shelter, but from the cozy warmth of a well-earned sleeping bag (not me), an endlessly starry sky to feast upon (apparently).

2015July_MurtleFishCropped

Mmm, fresh trout sushi.

Saturday bloomed beautifully over the glassy mirror of the lake. At the north end of the lake, Murtle Beach, an earnest committee of hungry mosquitoes welcomed us as we celebrated our trip’s halfway point.

2015July_murtleBeach16

While the mozzies snacked on us, we snacked on handfuls of these little wilderness candies:

Wild blueberries, yum!

After paddling 23 KM, we made it back to the south end of the lake. Pizza night!

Deconstructed trail pizza.

Click here for the recipe! Deconstructed Pizza.

Some pizzas turned out better than others...
Some pizzas turned out better than others…

See that photo below? This is real beauty.

Sunset, Murtle Lake, BC

Sunday was a leisurely 8 KM back to the launching site, the three food bags emptied, three garbage bags filled, and all the kids accounted for.

While not as carefree as it would have been had we traipsed the lake alone, every ache in my arms felt good, even after all the laundry was done.

Thank you to my kids, especially the oldest, who can now paddle with Daddy in her own canoe. Well done!

Thank you to my other three for enjoying the ride and eating an impressive amount of candy and berries.

Thank you to G, M, and N for joining our family and willingly pulling their own weight at the paddle, portage, tent pitching, and pots and pans!

M – thank you for a perfectly spiced, perfectly crisped trout treat!

G – that portage out was really something. Thank you.

N – Thanks for all the quiet quips! (And for not losing your toe.)

Camp cooking team, Murtle Lake, BC

Thank you, too, to the Murtle Lake Park Operators! The campsites are beautifully appointed and idyllically rustic, and the speedboat regularly coming by was a peace of mind for this mama!

Thank you for oohing and aahing over our daughter’s catch!

OOooo I can’t wait to show my granddad this!

Our route and camping sites.

Our route and campsites: Night 1: Site 2 Murtle Lagoon South. Plenty of sites. Night 2: Site 17, Eagle Point. Beautiful beach. Great fishing! Night 3: Site 20, Strait Creek. Pretty crowded!
Our route and campsites:
Night 1: Site 2 Murtle Lagoon South. Plenty of sites.
Night 2: Site 17, Eagle Point. Beautiful beach. Great fishing!
Night 3: Site 20, Strait Creek. Pretty crowded.


Eagle Point, Murtle Lake, BC


Ion Micro Titanium stove and Space Saver Mug by Olicamp

I’m a huge fan of Olicamp and the Ion Micro is no exception. Combine it with the Space Saver Mug and you have an ideal ultralight, minimalist combo.

I took their XTS pot and Vector stove on the John Muir Trail in 2013. When I got back, I bought two more stoves at the OR Show, and looked for a 3+ liter pot for family camping. I wasn’t goign to say no when I was asked to review their Ion Micro Titanium stove and Anodized Aluminum Space Saver Mug.

I’m always on the lookout for a solo cookset that doubles as an emergency cooking setup, and this is it. Let’s look at the features and then take a look at how it performed.

Features

ionmicro4

Ion Micro Stove

  • Weight: 45g/1.5 oz.
  • Size: 1.25″ x 2″
  • Material: Titanium with Stainless Steel pot supports
  • Ignition: Manual
  • Adjustable fuel flow
  • Output: 8,900 BTU
  • Boil Time: 4 min 20 seconds
  • Fuel Type: Canister (fuel sold separate)
  • MSRP: $59.95

Olicamp Ion Micro Stove

Anodized Aluminum Space Saver Mug

  • Weight: 3.2 oz
  • Size: 4.25″ x 4″
  • Material: Anodized Aluminum (also available in regular aluminum)
  • Capacity: 24 oz (to the brim), 20 oz for boiling water
  • Folding handles
  • Colors: available with blue, lime or gold handles
  • MSRP: Anodized: $14.95
  • MSRP: Aluminum: $10.95

Testing:

We’ve used this hiking, canoeing and car camping. It’s not just a great 2 cup water boiler, it holds an excellent amount of tea, coffee or beverage of choice.

What do we think?

ionmicro3

Ion Micro

The Ion Micro stands out as a true minimalist stove. With a small nozzle and swinging arms it packs down to an incredibly small size.

The weight is impressive at between 1.25 and 1.5 oz too. Its choice of Titanium body and nozzle, but stainless steel arms is due to Titanium’s softness. The Stainless steel legs mean the stove can hold greater weight and bigger pots. We like the angle of the stove arms. It provided just enough distance between the burner and the pot bottom for good heat transfer as well as heat distribution. That said, this is not a stove for frying pancakes. You’ll be better off with the vector or something with a wider jet pattern for that. With an 8900 BTu output on a full canister (an ideal conditions) you can get around 4 min 20 seconds for 2 cups (500 ml, 16 oz) of water. Performance will vary with wind and pots.

The fine adjust fuel flow means you’ll be able to simmer your soup or just keep the water boiling gently as you purify it.

There is no ignition on this stove, so bring along your mini lighter.

This pot is compatible with all Olicamp Cookware.

At $49.95 you’re getting a high quality stove with great performance in a tiny, ultralight package. It’s on the higher end of stove prices. This is probably due in part to materials, in part to the quality construction, in part to the higher BTUs (8900) and in part to the niche market of ultralight stoves.

ionmicro6

Summary

The Ion Micro Stove is an ideal choice for the minimalist backpacker. The price is high, but you’re getting a tiny, powerful and high output stove in return. We are huge fans of Olicamp and this stove is no exception. Pair it with the Space Saver Mug for a 4.5-5 oz ultralight cookset.

ionmicro1

Space Saver Mug

Wow. A 3.2 oz mug that holds 3 cups of water and costs $10.95 ($14.95 for the anodized version)? That’s just awesome. We love this sturdy mug.

The anodizing means less sticking to the pot for easy cleaning and a harder, more durable finish. folding aluminum handles give you a strong grip that’s easy to hold with even big hands.

Not only will this stove fit a mini fuel canister and the ion stove, it will fit a standard sized Nalgene bottle as well. It truly is a space saver mug.

This pot works really well with the Ion Micro Titanium stove. Beware of the handles and brim of he mug as they can get hot when boiling water on full.

Not shown: Mesh stuff sack.

ionmicro5

Summary

We love the Space Saver Mug. It’s hard to beat $14.95 for a large anodized mug that doubles as a cookpot.


Check out all of Olicamp’s offerings. Let us know which are your favourite.

Lem’s Minimalist Boulder Boot

As kids we’d spend summers in bare feet, exploring through the woods and hopping along rocks, only groaning and complaining when we had to put shoes on… and then groaning and complaining again at toes that were squished into a small toe box. Our feet were dirty, but they were healthy and strong.

Ever since I started hiking, I’ve felt strongly about the importance of healthy, strong feet. traditional hiking boots have their place for heavy loads, but most of the time what we need is almost nothing. That’s what I like about Lem’s Boulder Boots.

Lem’s designs footwear around a simple philosophy:

shoes should be flat, and fit the natural shape of the foot, allowing movement without any constraint or restriction. – Andrew Rademacher Founder of Lems Shoes

The minimalist footwear movement has been popular for a while now. The idea is that modern footwear makes us run in an unnatural way, and that we would be healthier and less prone to injury if we retrained ourselves to run properly, building up muscles instead of relying on footwear to do all the support and cushioning.

Yes, the debate rages on, and you can find proponents for both sides (and critics as well). I’m just here to tell my story.

Boulder Boot

Lets talk about the features of the Boulder Boot

Features:

  • Last LemsLast™ foot-shaped
  • Upper 100% 1200D Nylon (100% Vegan-black boots only, the rest are part leather)
  • Sole 9.0mm LemsRubber™ injection rubber
  • Insole Removable 3.0mm MoistureWick
  • Lining 100% Cotton
  • Stack Height 9.0mm Drop 0.0mm
  • Weight 9.9oz (Sz 43)

I’ve had these boots for about 4-5 months and have taken them out as formal footwear, to my day job and out hiking. Although I have fairly healthy feet, I followed the recommendation of slowly accustoming myself the shoes before taking them out on long walks and hikes.

Boulder Boot

What do I think?

I had forgotten how much most footwear compresses your toes. The Boulder boots give a huge amount of space in the toe box. it actually took me a week or two before my foot started to de-crumple (that’s a word, really) and my toes started to spread and give me more stability. Since that time, I’ve started to feel more stable and more in touch with where I’m walking.

No, I’m not being all hippy-like. As a kid, I would run around and climb boulders on creeks barefoot. I loved how I could curve my feet around uneven surfaces to get more traction and control. I feel like I’ve regained some of that with these shoes.

The sole is a very comfortable and flexible air injected rubber. It’s so soft the boot can be folded in half without any effort. It’s light, protects your feet from sharp objects, but still allows your foot to conform to surfaces, allowing better contact.

There’s also a removable insole that gives a bit more padding, and that you can remove when you get more comfortable with the shoe. I choose to keep mine in as it provides more breathability.

Boulder Boot

As far as the upper is concerned, there’s not much to it. It’s a 1200 denier nylon. It’s comfortable, breathable and… well it’s not much else, because there isn’t much there. The seams are very sturdy and show no signs of wear. NOTE: these shoes are not waterproof and mud can be challenging to remove from the fabric.

It really is a minimalist shoe. As they say on their site,

There’s absolutely nothing to this boot, no heel counter, no shank, and nothing stiff that would irritate the foot.

Oh, and the nylon is 100% vegan… so… ya… there’s that.

In the spirit of barefoot running, the zero-drop design encourages a more natural step where you land on your mid-foot instead of your heel. I was never much of a heel striker in the first place, so you may notice the difference more than I did.

The $115 price tag is on par with a lot of niche footwear brands, especially for a high-top boot. It may be steep for some, and I totally appreciate that. I can say that I tend to destroy footwear, and these have held up extremely well despite that. There’s no sign of excessive wear and I see them lasting me for another year or two.

Conclusion

The Boulder Boot is a great, lightweight alternative that suits for trails and town, and that contribute to a healthier, stronger foot.


Disclaimer: I received the Boulder Boots for review, free of charge. All opinions offered are my own, and what I’d recommend to family and friends.

Begbie Falls Trail – Revelstoke, BC

Just five minutes south of Revelstoke, BC we found an awesome day hike that took us through temperate rainforest to multiple waterfalls and even a beach. We had an awesome, adventure filled family hike and we’ll definitely be going back.

Begbie Falls

The Begbie Falls area is at the end of a logging road that offers many side trails for mountain bikers, hikers and climbers, but the real highlight for us was the falls.

Begbie Falls

There are two parking lots. The first is about 2.3 km from the actual Recreation site and the other is about 50 yards from the upper falls. We chose the farther parking area and hiked down the logging road with the kids.

Begbie Falls

There was plenty of exploration and discovery and we were treated with some amazing views of the snow covered peaks.

Begbie Falls

The falls themselves were flowing strongly with the spring run-off, but the trails were surprisingly mud-free. The kids were running around looking for sticks and laughing in the roar of the river.

Lems boots
The older kids got a turn on the camera. I guess they have seen me do too many gear reviews. These are Lem’s minimalist Boulder Hiking Boots.


The lower falls trail led us zig-zagging down the hillside and just about to the level of the main river that leads into Upper Arrow Lakes. There’s a safe lookout which seemed like a good photo op.

Begbie Falls

From there we headed out to the sandbar on the river. We encountered a few campers on the beach, but managed to find a private area for the kids. Lunch was spent with more splashing, exploration and obligatory races with the kids.

Begbie Falls

We can’t wait to go back again in the summer when the wild flowers and wild berries are in full bloom.

DIY Bottle Catamaran Kit

On a recent tour of garage sales in our area, we found this little treasure: A DIY Bottle Catamaran kit. At $3 I figured it’d make a great spring project for my son and I to work on. Typically these things retails for $15 on amazon so it was a steal, especially as it was new in box.

BottleCatamaran1


From a company called 4M, this kit makes use of your empty pop bottles for the floats of the catamaran. It’s a neat concept, and one of many “Green Science” kits available.

BottleCatamaran3

Aside from the bottles, the kit includes everything you need to make the watercraft. The majority of the components are made of lightweight plastic that are assembled with Philips screws.

BottleCatamaran5

The kit is designed for 8 years and up, so there’s no need for soldering. My 6 year old son was able to do pretty much all the work himself.

BottleCatamaran4


Instructions are straightforward and were easy to follow.


BottleCatamaran6


The concept was cleverly simple. The floats attach via the lids to the bottles and two zap-straps to hold the back on. It really was a simple and rewarding build.

BottleCatamaran7


In no time at all we were up and running. I expected it to sit in the water and disappoint, but when we put it in the tub it picked up speed pretty well. Don’t get me wrong, you’re not going to break any records, but it can move. We can’t wait to try it out in a bigger pond.

Take a look at the video above to see the build and check out the kits available on amazon.